

Parallel Compression: Making Your Mix Punch Without Killing Dynamics


Listen to the Podcast Dicussion
Making a Scene Presents – Parallel Compression: Making Your Mix Punch Without Killing Dynamics
The Trick That Sounds Expensive Even When Your Studio Isn’t
There is a moment almost every home-recording artist runs into. You finish a mix. It sounds clean. It sounds balanced. Nothing is obviously broken. But when you play it next to a record that hits you in the chest, yours feels polite. The kick does not leap out. The vocal does not stay in your face. The song has emotion, but not enough muscle. So you reach for compression, push harder, and suddenly the life drains out of the track. The groove gets smaller. The singer sounds pinned to the wall. The whole thing is louder, but somehow less alive. Parallel compression is the move that solves that problem. It is one of those real studio tricks that sounds fancy, but it is built on a simple idea: keep your natural performance, then blend in a second, heavily compressed version underneath it. Done right, you get punch, thickness, density, and excitement without flattening the human feel out of the song. For indie artists, that matters because a mix that feels finished earns trust faster, holds attention longer, and gives your direct releases, live recordings, sync submissions, fan-club exclusives, and premium downloads a better shot at turning into actual money instead of just more content floating in the feed.
At Making a Scene, this is exactly the kind of move worth learning. Not because it makes you sound like you work in a million-dollar room, but because it lets you stop waiting for gatekeepers to “elevate” your sound later. The more you can do in your own room with judgment and intent, the more control you keep over your masters, your release schedule, your budget, and your future. Parallel compression is not about chasing a technical badge. It is about building records that feel confident enough to sell at the merch table, stream well enough to pull new listeners deeper, and sound strong enough that fans will pay for the owned experience around the music instead of just treating the song like disposable wallpaper.
What Compression Actually Does
Before parallel compression makes sense, regular compression has to make sense. A compressor reduces dynamic range. That just means it turns down the part of the signal that rises above a chosen level, so the loudest moments stop jumping so far ahead of the rest. In PreSonus’ own support language, threshold is the level where compression starts, ratio determines how strongly the signal above that threshold is reduced, attack sets how quickly the compressor reacts, and release sets how long it takes to return to normal after the signal drops back down. Those four controls are the bones of the whole thing. Once you understand them, compression stops feeling like black magic and starts feeling like a volume manager with attitude.
That sounds technical, but in practice it is easy to picture. Think of a singer whispering one line and belting the next. Or a snare drum that cracks hard once and then feels smaller the next bar. Compression does not just make things quieter. It reshapes movement. A fast attack can clamp down on the front of a drum hit. A slower attack can let the hit punch through before the compressor leans in. A quick release can make the track bounce and breathe. A slower release can make it feel smoother and more controlled. That is why two compressors with the same gain reduction can sound completely different. One feels exciting. One feels stiff. One feels invisible. One feels like somebody sat on your mix.
Why Parallel Compression Preserves Dynamics
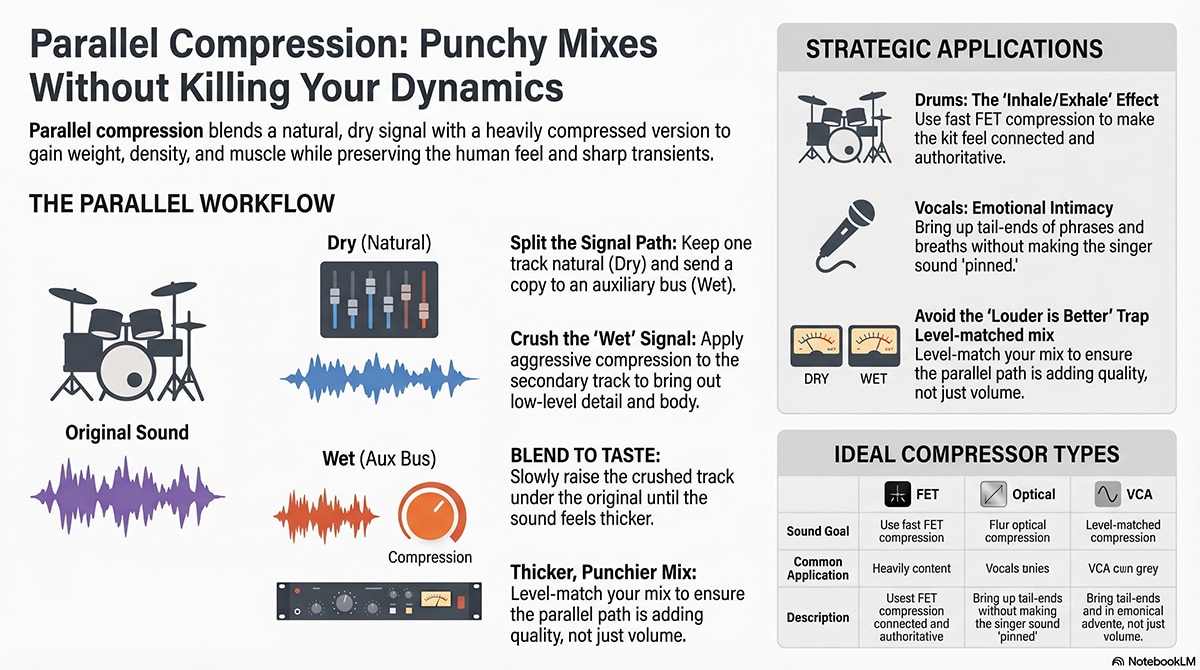
Parallel compression works because it cheats in a smart way. Instead of forcing one signal to do two jobs at once, you split the job in half. The original signal stays mostly natural. That means the vocal still keeps its real front edge, the drum still keeps its transient, and the performance still carries its normal rise and fall. Then you create a second path and compress that path much harder than you normally would. That crushed version brings up low-level detail, sustain, room tone, body, breath, stick noise, and all the little pieces that help a sound feel larger. When you blend the two together, the dry path keeps the life, while the compressed path adds weight. That is the whole secret.
This is why parallel compression feels bigger without always feeling flatter. In a normal insert setup, when you compress aggressively, you are asking one signal to keep the transient, carry the sustain, control the peaks, and still sound emotional. Sometimes that works. A lot of the time it does not. In parallel, the dry track handles the attack and natural movement, while the compressed path handles density and consistency. The result is not “more compression” in the usual sense. It is more information in the body of the sound while the original performance stays in charge. That is why engineers love it on drums, vocals, and sometimes the whole mix. It is also why beginners often hear it and think, “Why does that sound more expensive?” The answer is that you are hearing controlled excess sitting underneath natural motion.
Why Indie Artists Should Care Right Now
This is not just a mixing trick for gear nerds. It is a business tool disguised as audio technique. If you are recording at home, every move that helps you get closer to a finished, competitive sound without renting more time somewhere else is a move that protects your budget. A stronger drum bus can save a mix from feeling demo-ish. A better parallel vocal chain can make one singer in a spare bedroom sound more confident and present. A tighter mix bus can help a song land better on a fan’s earbuds, in a car, or in a bar where somebody hears your music for the first time. Better translation means fewer missed opportunities. Fewer missed opportunities means more tickets sold, more direct downloads that feel worth paying for, more sync-ready songs, more fan confidence when you ask them to buy a deluxe version, and more value in every master you own.
It also fits the artist-owned model. Big labels used to win partly because they could afford the room, the staff, and the accumulated tricks. Now the edge comes from knowing the moves and applying them on purpose. Parallel compression is one of those moves. It lets a solo artist, a songwriter, a home-studio band, or a self-produced vocalist make a record feel emotionally bigger without handing control away. And because the technique works in almost any DAW, from simple bus routing to built-in splitter systems, it belongs in the toolkit of anyone serious about building a real working-class career in music rather than waiting for somebody else to validate the sound later.
The Compressors That Shape the Sound
Not every compressor brings the same personality to parallel work. That matters, because in parallel compression you are often asking the compressor to do something extreme, and the tone of that extreme becomes part of the record.
The classic 1176 family is the first stop for a reason. Universal Audio’s 1176 Classic Limiter Collection, and UA’s own manual describes the 1176 as a solid-state FET design with ultra-fast gain reduction that became famous for punch and character. That speed is why 1176-style compressors are so good in parallel. They grab fast, add edge, and make drums feel like they woke up angry in the best possible way. On vocals, an 1176-style parallel path can bring the singer forward, emphasize attitude, and hold quieter phrases up so they do not disappear. The tradeoff is that FET compression usually has a sound. It is not the most invisible tool in the box. That is the point. When you want aggression, crack, excitement, and “record” energy, 1176-style compression is often exactly the right move.
The LA-2A lane is different. Universal Audio’s Teletronix LA-2A Leveler Collection, and UA describes the LA-2A as an optical tube leveler known for smooth, natural, musical compression. That is why LA-2A-style parallel compression usually feels less like a punch in the face and more like a warm hand on the shoulder. It is beautiful on vocals, bass, and sources where you want density and polish more than smack. If the 1176 says, “Step forward,” the LA-2A says, “Stay close.” On a vocal parallel path, that can be magic. It fills in the body of the line, brings up tails and breaths, and helps a singer feel emotionally present without getting spitty or brittle as fast as a more aggressive FET setup can. The tradeoff is that opto compression is usually slower and less snappy, so it is not the first thing most engineers grab when the goal is to make a snare hit harder.
Then there is the Distressor idea, which is why tools like Slate Digital’s FG-Stress have become so useful. Slate describes FG-Stress as a digital replication of the Empirical Labs Distressor, and points out that the hardware’s design can mimic the tone of several different compressor behaviors. That is a huge deal in parallel work because the Distressor family sits in that sweet spot between control and personality. You can make it punchy, dirty, thick, or surprisingly polite depending on how you drive it. On a drum room or drum bus parallel, it can sound huge. On a vocal parallel, it can keep the singer in front without always sounding obviously “compressed.” It is a flexible middle ground for artists who want one tool that can cover several kinds of work.
The VCA-style mindset matters too, even if you are using a stock DAW compressor rather than a famous brand name. VCA compression tends to be cleaner, more controlled, and more direct. It is often great when you want the parallel path to add firmness and consistency without too much color. That can be a strong move on pop drums, clean rock buses, acoustic ensembles that need a bit more glue, or a mix bus where you want support rather than obvious crunch. Even if your home studio budget is tight, do not overlook the plain compressor that came with your DAW. A lot of artists get fooled into thinking they need a famous logo before they learn the move. They do not. Parallel compression is more about the routing and the listening than the brand. Threshold, ratio, attack, release, and blend still decide whether it works.
Some Modern Plugins Make Parallel Easy on Purpose
One reason this technique is so practical now is that a lot of modern compressors already understand that users want internal parallel blending. In other words, instead of setting up an extra bus, some plugins let you mix wet and dry right inside the compressor.
A great example is Lindell Audio’s 7X-500 from Plugin Alliance. Plugin Alliance’s manual for the 7X-500 explicitly includes a Compression Mix control used for parallel compression, and the same manual notes a sidechain high-pass filter to keep low end from over-triggering the compressor. That is real-world useful. It means you can get the grab and color of a FET-style compressor, blend it with the dry signal inside the plugin, and keep the kick from making the whole thing pump like a bad nightclub remix unless you actually want that effect.
Slate Digital’s Custom Opto takes a similar convenience-first approach. Slate says it adds speed, ratio, tone options, and a Mix control to an opto-style design. That matters because classic optical behavior is lovely, but classic optical hardware was not built with modern dry/wet workflow in mind. A plugin like this lets you use that smoother opto attitude and still dial in parallel balance right inside the unit. For home-studio artists, that is not a small convenience. It is the difference between trying a good idea in thirty seconds and never trying it because the routing feels annoying.
Sonible’s smart:comp 3 also belongs in this conversation, especially for artists who want AI to speed up the first step without taking the wheel away from them. Sonible says smart:comp 3 combines intelligent analysis with standard controls, plus features like Group Mode, Spectral Compression, and Spectral Ducking. Earlier smart:comp manuals also document a wet control that blends compressed and dry signal. That makes it useful for two reasons. First, it can help newer engineers get into the right zone faster. Second, because it can work in a more transparent, spectrum-aware way, it is a strong option when you want the parallel path to add control and density without shouting, “Hey, I’m a vintage character compressor.” For artists doing a lot of their own work, that AI-assisted start can save time, lower frustration, and get you to the creative decisions faster.
If you want access to broader plugin ecosystems rather than buying one piece at a time, the current bundle routes are easy to find. Universal Audio’s UAD Spark subscription. Plugin Alliance’s subscription options, Slate Digital’s Complete Access Bundle. None of these subscriptions replaces listening skills, and nobody needs a subscription to learn parallel compression. But they do make it easier to explore several compressor personalities before you decide which sound actually fits your work. That is useful when you are trying to build an artist-owned production setup without buying five versions of the same lesson.
How to Set It Up in Any DAW
The classic setup is simple. You take the source you want to beef up, usually a drum bus or a vocal, and send a copy of it to a second track or auxiliary bus. On that second path, you insert a compressor and hit it much harder than you normally would. Then you bring that crushed signal up underneath the original until the sound gets bigger, fuller, and more exciting. PreSonus’ own tutorial on parallel processing describes the traditional method as using buses, and another official Studio One answer describes the result clearly: one wet path, one dry path, blended to taste. That is still the universal method. Whether your DAW calls it a send, aux, return, or bus, the principle is the same.
The big beginner mistake is blending with your eyes instead of your ears. Parallel compression usually sounds impressive fast. The crushed track alone is louder, denser, and more dramatic. That does not mean it is helping. Bring it up until you clearly hear the benefit, then back it down a little. In a good parallel setup, you should miss it when you mute it, but you should not hear it as a separate obvious layer unless that is the effect you want. Think of it like good movie lighting. You notice the feeling more than the lamp.
Fender Studio Pro Makes This Easier Than It Used To Be
This is one place where Fender Studio Pro is especially friendly. Fender Studio Pro, and Fender’s own page highlights splitter-style routing, management of parallel chains, and multiband processing as part of the workflow. The official tutorials say Studio Professional includes a Splitter module that makes parallel processing easy within an FX Chain, and Effect Splitters can do parallel processing without needing endless return channels. That means you can still use the old-school bus method, but you can also build parallel behavior inside a channel architecture that is faster to manage once you understand it.
In plain English, Fender Studio Pro gives you two good roads. The first road is the traditional one: make a bus, send your drums or vocal to it, crush that bus, then blend it under the original. The second road is the internal routing road: build a split path inside the channel or FX Chain so one branch stays cleaner and the other gets hammered. For indie artists who live in one DAW every day, that matters because it speeds up experimentation. The faster you can try bold ideas, the more likely you are to discover your own sound instead of just copying whatever preset somebody on YouTube told you to trust.
How to Use It on Drums
Drums are where most people fall in love with parallel compression. Start with the whole drum bus if you are new. Send the drum bus to a parallel aux. Put a fast, characterful compressor on it. An 1176-style unit is a classic choice here because the FET action is fast and assertive. Push the threshold down until the compressor is really working. Use a strong ratio. Then play with attack and release until the drums feel like they inhale and exhale with the song instead of just getting flattened. When you blend that track back in, the kick often gets more authority, the snare gains body, the toms feel more connected, and the cymbals can feel like they belong to the same event instead of floating on top of the kit.
For rock, alternative, punk, and heavier pop, you can be bold. Let the parallel path chew a little. That extra aggression can make a home-studio kit sound more finished and more expensive. For folk, singer-songwriter, jazz, roots, and acoustic music, you usually want less. The same technique still works, but the blend should often be lower, and the compressor may need to be smoother. You are not trying to turn a brush kit into a stadium cannon. You are trying to help the groove read clearly on modest speakers while keeping the player’s touch intact. For hip-hop and electronic music, parallel drum compression can be even more dramatic, especially when you want programmed and acoustic elements to feel like they belong in the same world. The genre changes the amount, not the principle.
A more advanced move is to shape the parallel path before it comes back in. Maybe you high-pass a little mud before the compressor so the low end does not dominate the action. Maybe you roll off some top after compression so cymbals do not get splashy. Maybe you add saturation on the parallel path so the blend contributes attitude instead of just loudness. This is where parallel compression stops being just a control tool and becomes a sound-design tool. The crushed path does not have to be a copy. It can be a version of the drums that only exists to make the real drums feel more alive.
How to Use It on Vocals
Vocals are different because the goal is usually intimacy, consistency, and emotion, not just smack. A parallel vocal chain works beautifully when the singer has wide dynamics or when the arrangement gets thick and the vocal needs to stay emotionally present without sounding crushed on the main track. Start by keeping your main vocal compression reasonable. Then create a parallel vocal path and hit that much harder. An LA-2A-style compressor is a lovely place to begin because the optical behavior tends to sound smooth and musical. An 1176-style path is excellent when the vocal needs more bite and urgency. A Distressor-style option sits in the middle and can be shaped in several directions.
The art is in what you bring forward. On the right vocal parallel chain, the ends of words stay audible, lower-volume phrases stop falling behind the band, and the vocal feels emotionally connected to the listener even at lower playback volumes. That is important for modern listening, because people do not only hear your song in an ideal room. They hear it while driving, walking, doom-scrolling, cooking, and pretending they are working. If your vocal vanishes the second the playback gets casual, you lose the sale before you ever got to make the offer. Parallel vocal compression helps the message survive the real world.
Be careful with sibilance and harshness. A vocal parallel path can bring up every breath, every “s,” every mouth click, and every ugly frequency you forgot was living in the take. Sometimes the fix is a smoother compressor. Sometimes it is a de-esser before or after the parallel compressor. Sometimes it is a darker EQ shape on the compressed path. Sometimes it is simply using less of it. A good rule is this: the singer should feel closer, not more annoying. If the vocal gets louder but less lovable, the chain is doing the wrong job.
Using Parallel Compression on the Mix Bus
Yes, you can use parallel compression on the mix bus, and yes, it can be fantastic. But this is where the move gets dangerous in the hands of excited people. On a full mix, parallel compression can add cohesion, apparent energy, and a sense that the whole track is leaning toward the listener. It can also destroy depth, blur low-end relationships, and make a perfectly good mix feel smaller if you overdo it.
The safest way to begin is not to insert a compressor directly and smash the whole stereo bus. Instead, create a separate parallel mix bus and feed the whole mix into it, or use a compressor with a well-designed mix control if you know how it behaves. Then use much less than you think you need. A VCA-style or cleaner compressor can work well here if the goal is structure and glue. A Distressor-style or more colorful option can be exciting if the track wants attitude. But on the full mix, tiny changes are not tiny. They are big emotional decisions wearing small numbers.
For denser genres like rock, pop, EDM, and modern hip-hop, a parallel mix path can help the song feel more finished and more commercially assertive. For acoustic, roots, jazz, and singer-songwriter records, it usually needs a lighter touch. You are not trying to impress a loudness meter. You are trying to make the record feel complete while preserving the emotional contrast that made the performance matter in the first place. If your chorus no longer feels bigger than the verse, or your quiet line no longer feels intimate, back off. The point is impact, not uniformity.
Where AI Fits In Without Taking Over the Art
This is also one of the clearest places where AI can help indie artists without replacing taste. Sonible’s smart:comp 3 is a good example because it uses analysis to help get you into a useful starting zone while still letting you decide the final behavior, and its Group Mode can help manage multiple related tracks from one place. That is valuable when you are self-producing after work, learning as you go, and trying to keep the session moving. AI will not tell you how much emotional danger a snare should carry, or how intimate your vocal should feel in the bridge. But it can reduce setup friction, point you toward sane starting settings, and help you spend more of your brain on the song itself. For the independent artist, that is the right use of AI: less time wrestling the knobs blindly, more time making decisions that serve the record and the revenue around it.
And yes, there is even a Web3 angle here if you zoom out far enough. If you are selling high-resolution downloads, stems, deluxe fan editions, token-gated experiences, or direct-to-fan collectible releases, sound quality is not a side issue. It is part of the value proposition. A fan will forgive a modest room faster than they will forgive a weak record. Parallel compression is not “Web3 technology,” obviously. But the better your owned masters sound, the more believable every direct offer becomes. The future still belongs to artists who own the work and make it feel worth owning.
The Mistakes That Kill the Trick
The most common mistake is simply using too much. Parallel compression is addictive because it sounds good fast. You bring it up and the song seems to wake up. Then you keep going because louder density feels exciting for about thirty seconds. After that, the groove gets smaller, the mix gets crowded, and the contrast disappears. The fix is brutally simple: blend until it helps, then stop before it announces itself.
The second mistake is choosing the wrong compressor for the job. An 1176-style path on vocals can be thrilling, but it can also turn a tender performance into a nervous one if the top end gets edgy. An LA-2A-style path on drums can be beautiful, but it might not deliver the snap you wanted. A clean compressor on the mix bus might glue things nicely, while a dirtier one might make the center image feel aggressive in a way that does not match the song. In other words, do not ask one compressor personality to be every personality. The type matters.
The third mistake is ignoring the attack and release. Beginners often focus only on threshold and ratio because those are the obvious “more compression” knobs. But attack and release are usually what decide whether the parallel path feels exciting or broken. If the attack is too fast, you can shave the life off the front of a sound. If the release is badly timed, the compressor can pump in an ugly way or never recover before the next hit. When the parallel path grooves with the song, it feels bigger. When it fights the rhythm, it feels like cheap damage.
The fourth mistake is pretending level does not matter. Always compare fairly. If the parallel blend makes the overall level jump, your ears may tell you it is better just because it is louder. Pull levels back and judge the change honestly. Better is not the same thing as bigger. Better means the song communicates more clearly, the emotional center lands harder, and the performance survives the process.
Good Starting Places You Can Actually Use Tonight
If you want a practical first move on drums, make a drum bus parallel aux and start with a fast FET-style compressor. Use enough threshold and ratio that the compressor is clearly working. Then adjust attack and release until the kit starts to move with the groove instead of just getting stomped. Blend it in until the drums feel more confident, then sneak it down a bit. If it starts sounding like the cymbals took over the room, you went too far. An 1176-style option like UA’s 1176 Collection or Plugin Alliance’s MC77 is a classic starting point for this kind of energy.
If you want a practical first move on vocals, keep your main vocal under sensible control, then create a second path and try an opto-style compressor or a smoother modern design. Bring up the parallel until the ends of lines stay present and the vocal feels emotionally closer. If the “s” sounds start stabbing you, or the vocal stops feeling human, back it off or darken the parallel chain. UA’s LA-2A Collection is a safe starting point, and Slate’s Custom Opto is useful when you want more control built into the design.
If you want a practical first move on the mix bus, be conservative. Use a separate stereo parallel path or a compressor with a good blend control. Keep the blend low. Listen for whether the chorus feels more exciting and the verse still feels smaller. If both sections end up feeling equally dense, you are not helping the arrangement. You are just ironing it. That is not a pro move. That is a panic move.
The Real Point
Parallel compression is one of those techniques that perfectly fits the new independent artist reality. It is simple enough to learn in a home studio. Deep enough to grow with you for years. Powerful enough to change the emotional impact of a mix. And practical enough to turn into better records without demanding that you hand your music, your budget, or your authority to somebody higher up the ladder.
That is why this matters. Not because it is a “pro trick.” That phrase gets abused anyway. It matters because it helps you make stronger masters while keeping the dynamics that make a human performance worth hearing. It matters because your songs need to feel alive if you want fans to stay, buy, return, and believe in the world you are building around the music. It matters because every upgrade you can make inside your own artist-owned workflow is one less excuse to wait for permission. Learn the move. Use it on drums. Use it on vocals. Try it carefully on the mix bus. Compare with and without. Listen like a fan, not just an engineer. Then keep the version that makes the song feel more true, more powerful, and more worth owning.
 |  Spotify |  Deezer | Breaker |
 Pocket Cast |  Radio Public |  Stitcher |  TuneIn |
 IHeart Radio |  Mixcloud |  PlayerFM |  Amazon |
 Jiosaavn |  Gaana |  Vurbl | Audius |
Reason.Fm | |||
Find our Podcasts on these outlets
Buy Us a Cup of Coffee!
Join the movement in supporting Making a Scene, the premier independent resource for both emerging musicians and the dedicated fans who champion them.
We showcase this vibrant community that celebrates the raw talent and creative spirit driving the music industry forward. From insightful articles and in-depth interviews to exclusive content and insider tips, Making a Scene empowers artists to thrive and fans to discover their next favorite sound.
Together, let’s amplify the voices of independent musicians and forge unforgettable connections through the power of music
Make a one-time donation
Make a monthly donation
Make a yearly donation
Buy us a cup of Coffee!
Or enter a custom amount
Your contribution is appreciated.
Your contribution is appreciated.
Your contribution is appreciated.
You can donate directly through Paypal!
Subscribe to Our Newsletter
Order the New Book From Making a Scene
Breaking Chains – Navigating the Decentralized Music Industry

Breaking Chains is a groundbreaking guide for independent musicians ready to take control of their careers in the rapidly evolving world of decentralized music. From blockchain-powered royalties to NFTs, DAOs, and smart contracts, this book breaks down complex Web3 concepts into practical strategies that help artists earn more, connect directly with fans, and retain creative freedom. With real-world examples, platform recommendations, and step-by-step guidance, it empowers musicians to bypass traditional gatekeepers and build sustainable careers on their own terms.
More than just a tech manual, Breaking Chains explores the bigger picture—how decentralization can rebuild the music industry’s middle class, strengthen local economies, and transform fans into stakeholders in an artist’s journey. Whether you’re an emerging musician, a veteran indie artist, or a curious fan of the next music revolution, this book is your roadmap to the future of fair, transparent, and community-driven music.
Get your Limited Edition Signed and Numbered (Only 50 copies Available) Free Shipping Included
Discover more from Making A Scene!
Subscribe to get the latest posts sent to your email.


