
Bus Routing 101: How to Mix Like a Pro Without Overcomplicating It




Making a Scene Presents – Bus Routing 101: How to Mix Like a Pro Without Overcomplicating It
Listen To the Podcast Discussion
The Mix Is Not Just Sound. It Is Traffic Control.
Most independent artists start mixing with one simple goal: make every track sound better. So they open the session, click on the kick drum, add an EQ. Then they move to the snare, add a compressor. Then the lead vocal needs help, so they add more EQ, maybe a de-esser, maybe a little reverb. Then the guitars feel too loud. The drums feel too small. The background vocals are jumping out. The bass is fighting the kick. Before long, the session looks like somebody spilled cables inside the computer.
That is where bus routing comes in.
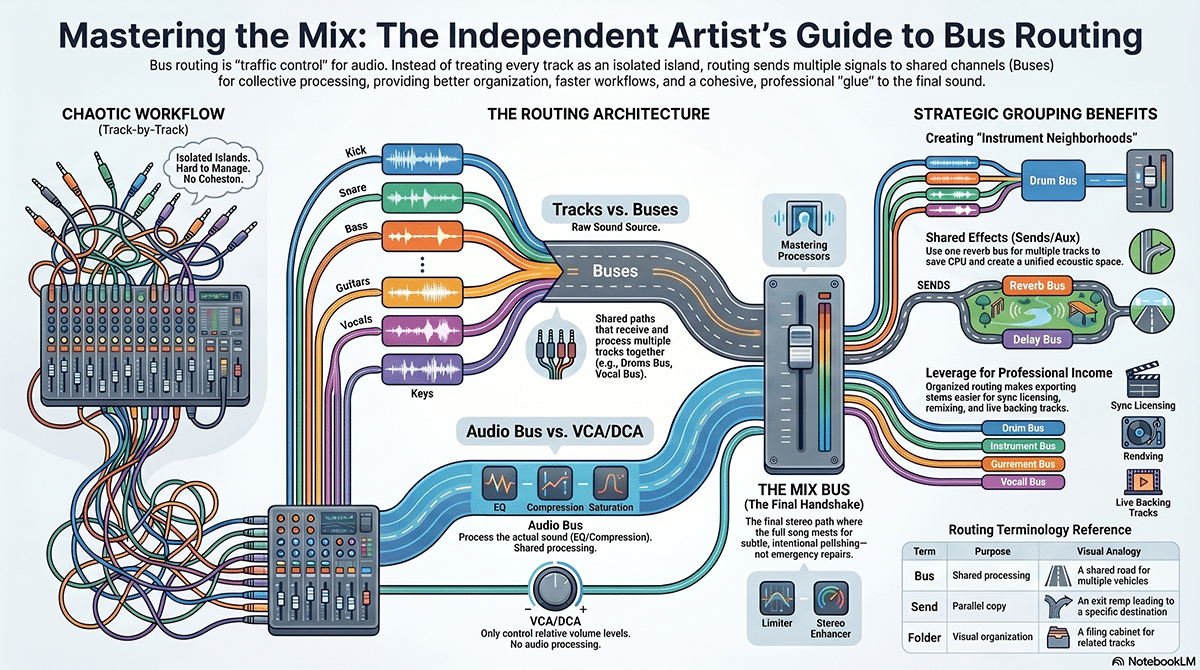
Bus routing sounds technical, but the idea is simple. A bus is a path that lets you send several tracks to one shared channel. Instead of treating every track like a separate island, you create neighborhoods. All the drum tracks can flow into a drum bus. All the vocals can flow into a vocal bus. Guitars can go to a guitar bus. Keys, strings, synths, samples, and other musical parts can go to an instrument bus or music bus. Then those buses flow toward the main mix.
That is it. Bus routing is not magic. It is not some secret handshake only big studio engineers know. It is just a smarter way to organize sound.
And for the indie artist working in a spare bedroom, basement, garage, rehearsal room, or small home studio, this matters more than people think. A good bus routing workflow helps you mix faster, stay organized, make broad decisions without destroying the details, and build a repeatable system. That means fewer unfinished songs sitting on a hard drive. It means more releases. More merch-table-ready recordings. More licensing-ready mixes. More music that can actually go out into the world and earn.
The old industry loved making recording feel mysterious. The new independent music economy does not have time for that nonsense. If you can understand a band on stage, you can understand buses. Drums are one section. Vocals are another section. Guitars are another section. Effects are another section. The whole song is the full performance. Bus routing is simply the mixer version of putting the band in order.
Think Of A Bus Like A Road, Not A Plugin
The easiest way to understand a bus is to stop thinking like a computer user and start thinking like a traffic planner.
Every track in your session is a vehicle carrying sound. The kick drum is one vehicle. The snare is another. Each tom, overhead, room mic, guitar, vocal, harmony, bass, keyboard, loop, and effect return is another vehicle. If all of them try to drive straight into the final mix at the same time with no lanes, no exits, and no organization, you get traffic. In music, that traffic sounds like confusion. The mix gets crowded. You turn one thing up and another thing disappears. You add compression to one track and suddenly the whole balance feels different. You fix one vocal line and the background vocals get weird. You make the drums louder and the guitars feel smaller.
A bus gives those sounds a shared road.
When you send all your drum tracks to one drum bus, you can still work on the individual kick, snare, toms, overheads, and room mics. But now you also have one place where the whole drum kit can be controlled. You can turn the entire kit up or down with one fader. You can add a little glue compression to make the drums feel like one instrument instead of a pile of separate microphones. You can add a touch of saturation to give the drums some color. You can automate the drum bus louder in the final chorus without grabbing twelve different faders.
That is the heart of bus routing. It gives you individual control and group control at the same time.
This is one reason modern DAWs such as Fender Studio Pro are built around flexible routing, buses, folders, effects channels, and session organization. Fender describes Studio Pro as built on PreSonus’ Studio One platform, with modernized workflow tools for faster music creation, which makes it a useful example for artists who want professional structure without getting buried in studio jargon. (Fender)
The Difference Between A Track, A Bus, An Aux, A Send, A Group, A Folder, And The Mix Bus
This is where many beginners get lost, so let’s slow it down.
A track is where the actual sound lives. Your lead vocal recording is on a track. Your guitar take is on a track. Your MIDI piano or drum sample may be on an instrument track. This is the source.
A bus is a shared signal path. It receives audio from other tracks or other buses. A drum bus receives all the drum tracks. A vocal bus receives the lead vocal, doubles, harmonies, and background vocals. A guitar bus receives all the guitars. A mix bus receives the whole mix before it reaches your speakers or final export.
An aux track, aux channel, or FX channel is a helper channel. Different DAWs use different names, which is annoying because apparently the audio world saw one simple idea and said, “Let’s name this twelve different things.” In plain language, an aux or FX channel usually receives sound from a send. You might create one reverb channel and send several vocals to it. The vocals stay on their own tracks, but they all share the same reverb. That saves CPU, keeps the space consistent, and lets you control the reverb with one fader.
A send is like a copy of the sound being sent somewhere else. If your lead vocal goes to the vocal bus, that is usually its main output path. But if you also want some of that vocal to go to a reverb, you use a send. The original vocal stays dry enough to remain clear, while the send feeds a reverb channel that creates space around it. Sends are commonly used for reverb, delay, parallel compression, headphone mixes, special effects, and creative processing.
A group is usually about control, not audio flow. When tracks are grouped, moving one fader or editing one track may move related tracks together. This is useful, but it is not the same as a bus. Grouping tracks does not always mean the audio is flowing through one shared processing channel. It may simply mean the tracks are linked for editing or fader movement.
A folder is mainly for organization, though in some DAWs it can also be tied to a bus or VCA-style control. A folder lets you hide or show related tracks so the session is easier to manage. You might put all drums in a drum folder and route them to a drum bus. That way your eyes and your ears are organized at the same time.
The mix bus is the final shared path for the full stereo mix before it reaches the master output. Some people call it the stereo bus, two-bus, master bus, or mix bus. This is where the whole song comes together. You can place subtle EQ, compression, saturation, metering, or limiting there, but it is also where many beginners get into trouble. The mix bus is not where you should try to rescue a broken mix. It is where you gently polish a mix that already works.
The DCA And VCA Question: Control Without Audio Processing
You asked to include DCA buses, and this is important because the term can confuse people. DCA and VCA-style controls are related to group control, but they are not the same thing as an audio bus.
VCA originally meant voltage controlled amplifier in analog console language. DCA usually means digitally controlled amplifier, and the term is common in live sound and digital consoles. In everyday modern mixing language, both ideas point to a similar workflow: one master fader controls the level of several assigned channels without actually combining their audio into a new audio channel.
That last part matters.
A regular audio bus receives audio. Because the sound is actually passing through that bus, you can insert EQ, compression, saturation, or other processing on the bus. A drum bus can have a compressor on it. A vocal bus can have a de-esser or EQ on it. A guitar bus can have a little tape-style saturation on it. The audio is actually going through that channel.
A DCA or VCA-style fader does not work that way. It controls levels. It is like one hand moving several faders at once while preserving their relationships. If the kick is already a little louder than the snare, and the snare is louder than the hi-hat, a DCA/VCA-style control can raise or lower the whole drum section while keeping that balance intact. But because the audio is not flowing through the DCA/VCA itself, you do not insert a compressor on the DCA and expect it to glue the drums together. It is not that kind of channel.
This makes DCA/VCA control powerful when a mix is already balanced but needs movement. Maybe the entire band needs to come down under the vocal in the verse. Maybe all background vocals need to rise in the final chorus. Maybe all guitar tracks need to tuck back during the bridge. A DCA/VCA-style control can do that cleanly because it is managing fader levels, not changing the tone. Sound On Sound’s Pro Tools coverage describes VCA groups as a way to control groups of tracks, which is the core concept artists need to understand here. (Sound on Sound)
In a clean workflow, you may use both. You might send all drum audio to a drum bus for processing, while also using VCA/DCA-style control to manage the drum faders as a performance group. The bus shapes the sound. The DCA/VCA helps you ride the level.
That is the difference. One is audio processing. The other is control.
Why Buses Make Drums Feel Like One Instrument
Drums are usually the first place bus routing starts to make sense.
A real drum kit is one instrument played by one person, but in a recording session it can become a dozen tracks. Kick in. Kick out. Snare top. Snare bottom. Hi-hat. Rack tom. Floor tom. Stereo overheads. Room mics. Maybe samples. Maybe percussion. If you treat every one of those tracks as a separate universe, the kit can start to feel fake or disconnected. The kick is punchy, but the snare is dry. The overheads are bright, but the toms are dull. The room mics are exciting, but they make the groove messy. Every part may sound fine alone, yet the kit does not feel like one drummer in one space.
The drum bus helps pull the kit together.
Once the individual tracks are balanced, the drum bus becomes the place where you shape the whole kit. A little bus compression can make the drums move together. A little EQ can add brightness or reduce mud across the kit. A little saturation can add body and aggression without destroying the individual tracks. The key word is little. A drum bus is not a trash compactor. It is not there to smash every drum into paste unless that is a deliberate creative choice. It is there to make the kit feel connected.
For a beginner, the biggest benefit is speed. Instead of adjusting every drum track when the drums feel too loud, you move the drum bus. Instead of adding the same room reverb to five separate tracks, you can send the drum bus or selected drum tracks to a shared reverb. Instead of automating ten drum tracks in the final chorus, you can automate the drum bus. That does not make you lazy. It makes you organized.
And organized mixes get finished.
The Vocal Bus: Keeping The Singer In Command
Vocals are where the listener usually decides whether the song feels professional. It does not matter if the guitars are huge, the bass is perfect, and the drums sound expensive. If the vocal feels disconnected, harsh, buried, or uneven, the whole record suffers.
A vocal bus helps keep the singer in command.
In many indie sessions, the vocal section is more complicated than it first appears. There may be a lead vocal, doubled lines, harmonies, background vocals, ad-libs, gang vocals, whispered parts, shouted parts, or call-and-response sections. Each part may need its own treatment. The lead vocal may need de-essing and compression. Background vocals may need more filtering and reverb. Doubles may need to be tucked in. Harmonies may need to sit wider or softer. But at some point, they all need to feel like one vocal production.
That is the job of the vocal bus.
Once the vocal tracks are cleaned up and balanced, the vocal bus can provide final control. You might use gentle compression to make the vocal stack feel more stable. You might use EQ to smooth a harsh upper-midrange buildup. You might use a little saturation to help the vocal speak through the mix without simply turning it up. You might automate the vocal bus slightly louder in the chorus or pull it back in a breakdown.
This also makes effects easier. Instead of putting separate reverbs and delays all over the session, you can feed shared vocal reverbs and delays from the vocal tracks or vocal bus. That creates a more unified vocal space. It also makes it easier to mute, adjust, automate, or brighten the vocal effects without hunting across the whole session.
AI-assisted tools can help here, but they should not replace taste. iZotope Neutron 5 is described by iZotope as a suite of intelligent mixing tools, and tools like this can offer useful starting points for EQ, compression, masking, and tonal balance. The artist still has to decide what serves the song. AI can suggest. The record still belongs to the human. (iZotope)
Guitar, Keyboard, And Instrument Buses: Stop Fighting Track By Track
Instrument buses are where a mix starts to feel manageable.
Imagine a session with four rhythm guitars, two lead guitar parts, stereo piano, organ, strings, synth pads, and maybe a few loops or samples. If every part is fighting for space, it can feel like trying to organize a crowded room by asking every person to whisper at a different volume. You can do it, but it takes forever and everybody still gets annoyed.
When instruments are routed into sensible buses, you can make musical decisions at the section level.
A guitar bus lets you control the overall guitar wall. If the guitars are exciting but too bright, you can soften them together. If they need more body, you can shape them together. If the vocal enters and the guitars need to step back, you can automate the guitar bus instead of chasing individual tracks. The same idea works for keys, synths, strings, horns, loops, or any section that functions as a musical layer.
The point is not to remove individual control. You still fix the one guitar that is too boomy. You still brighten the piano if it sounds dull. You still pan parts so the mix has width. But the bus gives you a second level of control, and that second level is where mixes start to feel professional.
This is also where masking tools can help. Wavesfactory Trackspacer is designed to create space by analyzing a sidechain signal and carving out related frequencies from another track or bus. Used carefully, a tool like this can help a vocal sit in front of guitars or keys without making the whole mix smaller. Used carelessly, it can make the track pump and breathe in strange ways. Like every smart tool, it works best when the person using it knows the goal. (Wavesfactory)
Effects Buses: One Room Instead Of Twenty Tiny Rooms
Reverb and delay are two of the biggest reasons to use buses.
A beginner may put a different reverb plugin on every vocal, guitar, snare, keyboard, and effect. That can work, but it often creates a mix that feels like every instrument was recorded in a different building. One vocal sounds like it is in a church. The snare sounds like a bathroom. The guitar sounds like a canyon. The piano sounds like a tiled hallway. It may be dramatic, but it is not always believable.
Using shared effects buses helps create a common world.
A vocal plate reverb can serve the lead vocal, doubles, and harmonies. A drum room reverb can help snare, toms, and percussion feel like they share space. A short delay can add energy to vocals or guitars without washing them out. A longer delay can become a creative effect that appears only at the ends of phrases. Because these effects live on buses or FX channels, you can adjust them as part of the mix instead of treating them like hidden settings buried on individual tracks.
This also saves computer power. One high-quality reverb on an effects bus may be better than fifteen random reverbs scattered across the session. It is easier to hear. Easier to automate. Easier to mute. Easier to print. Easier to revise when the artist wakes up the next morning and realizes the vocal sounds like it was recorded inside a haunted gymnasium.
The deeper lesson is consistency. Professional mixes often feel expensive because the parts sound like they belong in the same world. Effects buses help build that world.
Parallel Compression Buses: Power Without Crushing The Life Out Of The Track
Parallel compression sounds fancy, but the basic idea is simple. You make a second, heavily compressed version of a sound and blend it underneath the original.
This works because the original track keeps its natural movement, while the compressed version adds density, punch, or sustain. Drums can feel more powerful. Vocals can feel more present. Bass can feel more even. Background vocals can feel thicker. The trick is blending. Parallel compression is usually most useful when you feel it more than you obviously hear it.
A parallel drum bus is a classic example. You send some or all of the drums to a separate bus, compress that bus harder than you normally would, and blend it back under the clean drum bus. The clean drums keep the transient punch. The parallel bus adds body and energy. If you overdo it, the drums start sounding flattened and unnatural. If you use it carefully, the kit feels bigger without losing life.
A parallel vocal compression bus can help a singer stay present without making the lead vocal sound over-compressed. The main vocal keeps its emotion. The parallel bus adds support underneath. This can be especially useful in dense arrangements where the vocal needs to stay clear without being painfully loud.
This is where bus routing becomes creative. It is not just about organization. It is about building layers of control that help the record speak.
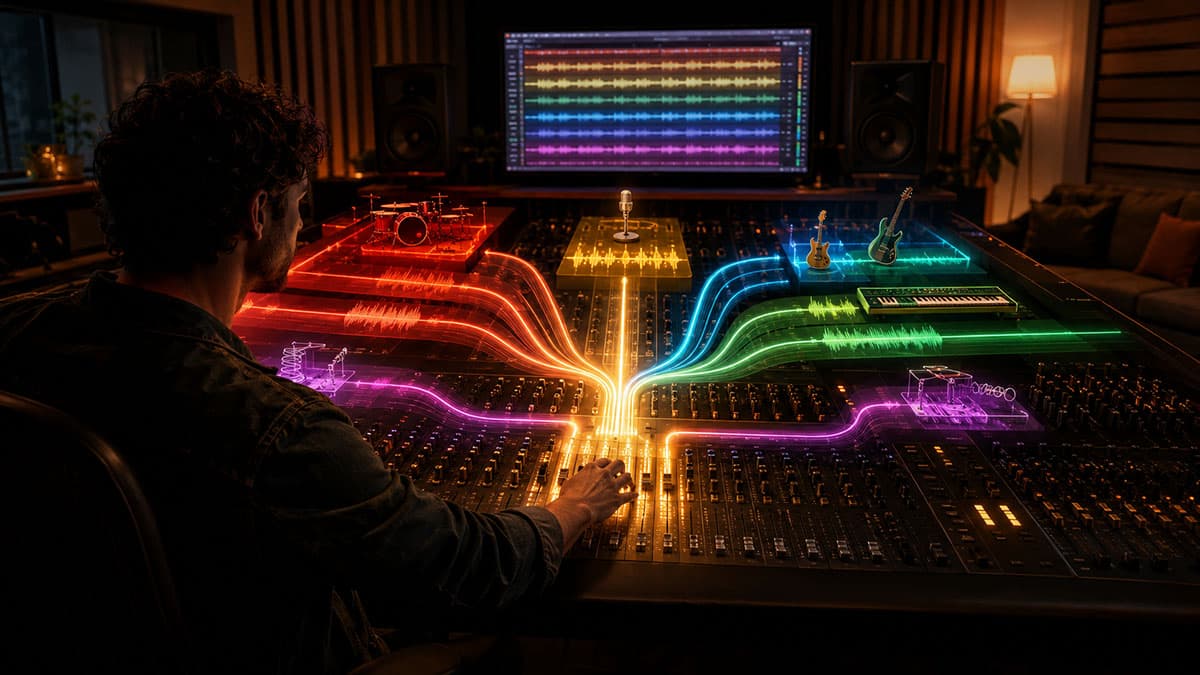
The Mix Bus: The Final Handshake, Not The Emergency Room
The mix bus is where everything meets. It is also one of the most misunderstood places in a home studio.
Some artists put a giant chain of plugins on the mix bus before the mix even starts. EQ, compressor, tape, limiter, stereo widener, clipper, another EQ, another compressor, loudness meter, another limiter because why not, the internet said it was warm. Then they try to mix through all of that and wonder why the session feels like steering a shopping cart with one broken wheel.
Mix bus processing can be useful, but it should be subtle and intentional.
A little bus compression can help the mix feel glued together. A gentle EQ can tilt the whole song brighter or warmer. A saturation plugin can add a little harmonic density. A limiter can help you check how the mix reacts to loudness, though final mastering decisions should be made carefully. The mix bus should enhance the balance, not hide the lack of one.
This is why bus routing before the mix bus matters. If the drums are too sharp, fix the drum tracks or drum bus. If the vocals are too harsh, fix the vocal chain or vocal bus. If the guitars are eating the vocal, adjust the guitar bus, the vocal bus, the arrangement, or the EQ relationship. Do not expect the mix bus to solve every problem. That is how mixes become loud, flat, and tiring.
The mix bus is the final handshake. It is not the emergency room.
Fender Studio Pro 8 Workflow Thinking Without The Button-by-Button Trap
In Fender Studio Pro 8, the practical idea is to think in layers. Your tracks are the raw performances. Your folders keep the session clean. Your buses let you process sections. Your FX channels hold shared reverbs and delays. Your VCA-style controls can help manage groups without changing tone. Your mix bus is where the whole record arrives.
The exact clicks will vary depending on the session, but the thinking stays the same. Select related tracks, send their outputs to a bus, name that bus clearly, color-code it if that helps, and build the mix from sections instead of chaos. Drums should feel like a drum section. Vocals should feel like a vocal production. Instruments should support the song instead of fighting for attention. Effects should create a believable space. The mix bus should receive a mix that already makes sense.
Fender Studio Pro’s official product language emphasizes modern music creation workflows built from the Studio One foundation, and third-party quick-start coverage notes that the software includes project templates with tracks, buses, and effects to help users get started. That matters because templates and routing are not just convenience features. They teach structure. (Fender)
The goal is not to copy somebody else’s routing forever. The goal is to understand why routing works so you can build sessions that fit your music.
Plugin Examples: Use Tools On Buses With Intention
Bus processing is powerful because one plugin can affect a whole section. That power cuts both ways.
A compressor on a snare affects the snare. A compressor on the drum bus affects the whole kit. An EQ on one guitar affects one guitar. An EQ on the guitar bus affects the entire guitar picture. Saturation on one vocal adds color to that vocal. Saturation on the vocal bus changes the whole vocal stack. This is why bus plugins should be chosen carefully.
For EQ, something like FabFilter Pro-Q 4 can be useful because it offers detailed EQ control, dynamic EQ options, and workflow features meant to speed up surgical or broad tonal shaping. On a bus, that might mean gently reducing mud in a drum kit, smoothing harsh guitars, or making space in a vocal stack. (FabFilter)
For AI-assisted tonal balance, sonible smart:EQ 4 uses AI-assisted processing and cross-channel features designed to help with spectral balance across tracks. That can be useful when you are trying to understand why buses are masking each other, but it should still be treated as a guide, not a judge. (sonible)
For compression, sonible smart:comp 3 is described as using intelligent algorithms to map compression behavior and provide transparent, musical results faster. On a bus, this kind of tool can help beginners hear what compression is doing, but the ears still have to decide whether the groove feels better or worse. (sonible)
For console-style color and AI-assisted SSL workflow, the SSL autoSeries Bundle includes autoBUS, autoDYN, and autoEQ, pairing SSL-style analog character with sonible AI-assisted audio analysis, according to SSL’s product page. Tools like this make sense in a bus-routing article because they are built around the same idea: section-level decisions that help the mix move faster while keeping the artist in control. (Solid State Logic)
The danger is thinking the plugin is the workflow. It is not. The routing is the workflow. The plugin is just a tool you place inside that workflow.
The Beginner Mistake: Too Many Buses, Too Soon
Once bus routing clicks, it is tempting to go overboard.
Suddenly there is a kick bus, snare bus, tom bus, cymbal bus, drum crush bus, drum room bus, drum room crush bus, percussion bus, lead vocal bus, lead vocal parallel bus, background vocal bus, harmony bus, shout bus, whisper bus, guitar bus, clean guitar bus, dirty guitar bus, stereo guitar bus, mono guitar bus, music bus, synth bus, pad bus, loop bus, FX bus, short reverb bus, long reverb bus, delay bus, slap delay bus, throw delay bus, master music bus, pre-master bus, mix bus, print bus, and a mystery bus named “Audio 47” that nobody understands anymore.
That is not professional. That is a haunted house.
The purpose of bus routing is clarity. If your routing makes the session harder to understand, it is working against you. A good bus structure should let you look at the mixer and immediately understand the song. Where are the drums? Where are the vocals? Where are the instruments? Where are the effects? Where is the full mix? If the routing does not answer those questions, simplify it.
A bus should exist because it solves a problem. It gives control. It creates consistency. It saves time. It creates a shared effect. It lets you process a section musically. It helps automation. It helps printing stems. It helps collaboration. If it does none of those things, it may just be clutter wearing a fake mustache.
Bus Routing Helps You Print Stems And Work Like A Professional
There is another practical reason bus routing matters: stems.
If an indie artist wants to send a song for mixing, mastering, sync licensing, remixing, live playback, or collaboration, organized buses make exporting much easier. A drum stem can come from the drum bus. A vocal stem can come from the vocal bus. An instrumental stem can come from the music buses. An effects stem can be printed from FX returns. A clean routing structure makes delivery faster and more reliable.
This matters for real income.
Sync licensing opportunities may ask for instrumentals, TV mixes, vocal up mixes, no-drum versions, or stems. Live shows may need backing tracks separated into drums, bass, music, and vocals. Remixers may need organized stems. Mastering engineers may ask for clean mixes without limiters or with proper headroom. If your session is a mess, every opportunity becomes a panic attack.
That is not just an engineering issue. That is a business issue.
Making a Scene has always pushed the idea that indie artists need to own more than their songs. They need to own their process, their data, their fan relationships, their release pipeline, and their ability to move fast when opportunity appears. Bus routing seems like a studio detail, but it connects directly to that bigger picture. A clean workflow helps you finish recordings. Finished recordings become releases. Releases feed shows, merch, publishing, licensing, direct sales, fan clubs, email campaigns, and long-term catalog value.
A messy session is friction. A clean routing system is leverage.
AI Can Help, But It Should Not Become The Producer
AI-assisted mixing tools are getting better, and artists should not be afraid of them. The smart approach is to use AI as a second set of ears, a learning tool, and a workflow accelerator.
An AI-assisted EQ can help identify buildup. An intelligent compressor can suggest starting points. A masking tool can show where the vocal and guitars are fighting. A mix assistant can help create a rough balance. These tools can save time, especially for beginners who do not yet know what certain problems sound like.
But AI does not know your lyric. It does not know why the vocal needs to feel fragile in the verse and dangerous in the chorus. It does not know that the slightly ugly guitar tone is the attitude of the song. It does not know that the background vocal should feel like a memory instead of a choir. It does not know your scene, your fans, your story, or your reason for making the record.
That is your job.
Use AI to get unstuck. Use it to learn faster. Use it to compare options. Use it to find technical problems. But do not hand over the emotional center of the mix. The future of independent music is not artists being replaced by machines. It is artists using machines to remove friction while keeping ownership of the work.
That is the line.
Faster Mixing Does Not Mean Lazy Mixing
Some artists worry that buses are a shortcut. They are right. But not all shortcuts are bad.
A bridge is a shortcut across a river. A road is a shortcut through a mountain. A well-built template is a shortcut away from wasting the first hour of every session rebuilding the same setup. The problem is not shortcuts. The problem is shortcuts that skip listening.
Bus routing should help you listen better. When the drums feel too loud, you can adjust the whole drum picture and hear the song respond. When the vocal stack feels too bright, you can soften the vocal bus and keep the performance intact. When the guitars are swallowing the hook, you can tuck the guitar bus instead of tearing apart every track. When the final chorus needs lift, you can automate buses musically.
That is not lazy. That is mixing like someone who understands structure.
The best mixes are not built one tiny panic move at a time. They are built from relationships. Drums against bass. Vocal against instruments. Lead against background. Dry sound against effects. Verse against chorus. Energy against space. Bus routing lets you manage those relationships without losing your mind.
The Real Goal: A Repeatable Workflow
The point of learning bus routing is not to impress other engineers. The point is to create a workflow you can repeat.
Independent artists do not need to reinvent the studio every time they open a song. They need a system that lets them move from recording to editing to mixing to exporting without burning out. That does not mean every song should sound the same. It means the workspace should be familiar enough that creativity can happen faster.
When your routing is clear, you stop wasting energy on confusion. You know where the drums live. You know where the vocals are controlled. You know where the reverb is. You know where the delay is. You know where the whole mix meets. You can make decisions faster because the session has a map.
That map is freedom.
And freedom is the real indie advantage. Major labels have budgets, but indie artists can move faster. They can release more often. They can test songs with their audience. They can build direct fan relationships. They can sell limited merch tied to a release. They can pitch songs for licensing. They can build fan clubs, private content, and live experiences around recordings. But none of that happens if the music never gets finished.
Bus routing helps music get finished.
Final Word: Make The Mix Easier To Control, Not Harder To Understand
Bus routing is one of the simplest ways to make a home studio feel more professional. It gives your session structure. It helps related sounds work together. It lets you shape drums, vocals, guitars, instruments, effects, and the full mix from a higher level. It makes automation easier. It makes revisions faster. It makes stems easier to print. It helps you stop mixing like every track is a separate emergency.
But the rule is simple: do not overcomplicate it.
A bus should make the mix easier to control. A DCA or VCA-style control should make levels easier to ride. A send should make shared effects easier to manage. A folder should make the session easier to see. A plugin should solve a real problem or create a real feeling. If any of those things make the song harder to understand, pull back.
The home studio revolution gave artists access to tools that once required a commercial studio. AI is now adding another layer of speed and support. Web-based direct-to-fan systems, fan data, merch stores, email lists, membership platforms, and artist-owned websites are giving musicians a way to turn recordings into real revenue without begging gatekeepers for permission.
But it still starts with the record.
A good song deserves a clear mix. A clear mix deserves a clear workflow. Bus routing is not the glamorous part of music production, but it is one of the parts that separates chaos from confidence.
So build the roads. Group the sounds. Keep the session clean. Use the tools, but do not worship them. Let the drums hit as one. Let the vocal stand in the center. Let the instruments support the story. Let the effects create space instead of fog. Let the mix bus polish what is already working.
That is how you mix like a pro without turning your session into a science project. And for the independent artist trying to build a real career, that kind of control is not just technical.
It is power.
 |  Spotify |  Deezer |  Breaker |
 Pocket Cast |  Radio Public |  Stitcher |  TuneIn |
 IHeart Radio |  Mixcloud |  PlayerFM |  Amazon |
 Jiosaavn |  Gaana |  Vurbl |  Audius |
 Reason.Fm | |||
Find our Podcasts on these outlets
Buy Us a Cup of Coffee!
Join the movement in supporting Making a Scene, the premier independent resource for both emerging musicians and the dedicated fans who champion them.
We showcase this vibrant community that celebrates the raw talent and creative spirit driving the music industry forward. From insightful articles and in-depth interviews to exclusive content and insider tips, Making a Scene empowers artists to thrive and fans to discover their next favorite sound.
Together, let’s amplify the voices of independent musicians and forge unforgettable connections through the power of music
Make a one-time donation
Make a monthly donation
Make a yearly donation
Buy us a cup of Coffee!
Or enter a custom amount
Your contribution is appreciated.
Your contribution is appreciated.
Your contribution is appreciated.
You can donate directly through Paypal!
Subscribe to Our Newsletter
Order the New Book From Making a Scene
Breaking Chains – Navigating the Decentralized Music Industry

Breaking Chains is a groundbreaking guide for independent musicians ready to take control of their careers in the rapidly evolving world of decentralized music. From blockchain-powered royalties to NFTs, DAOs, and smart contracts, this book breaks down complex Web3 concepts into practical strategies that help artists earn more, connect directly with fans, and retain creative freedom. With real-world examples, platform recommendations, and step-by-step guidance, it empowers musicians to bypass traditional gatekeepers and build sustainable careers on their own terms.
More than just a tech manual, Breaking Chains explores the bigger picture—how decentralization can rebuild the music industry’s middle class, strengthen local economies, and transform fans into stakeholders in an artist’s journey. Whether you’re an emerging musician, a veteran indie artist, or a curious fan of the next music revolution, this book is your roadmap to the future of fair, transparent, and community-driven music.
Get your Limited Edition Signed and Numbered (Only 50 copies Available) Free Shipping Included
Discover more from Making A Scene!
Subscribe to get the latest posts sent to your email.


