


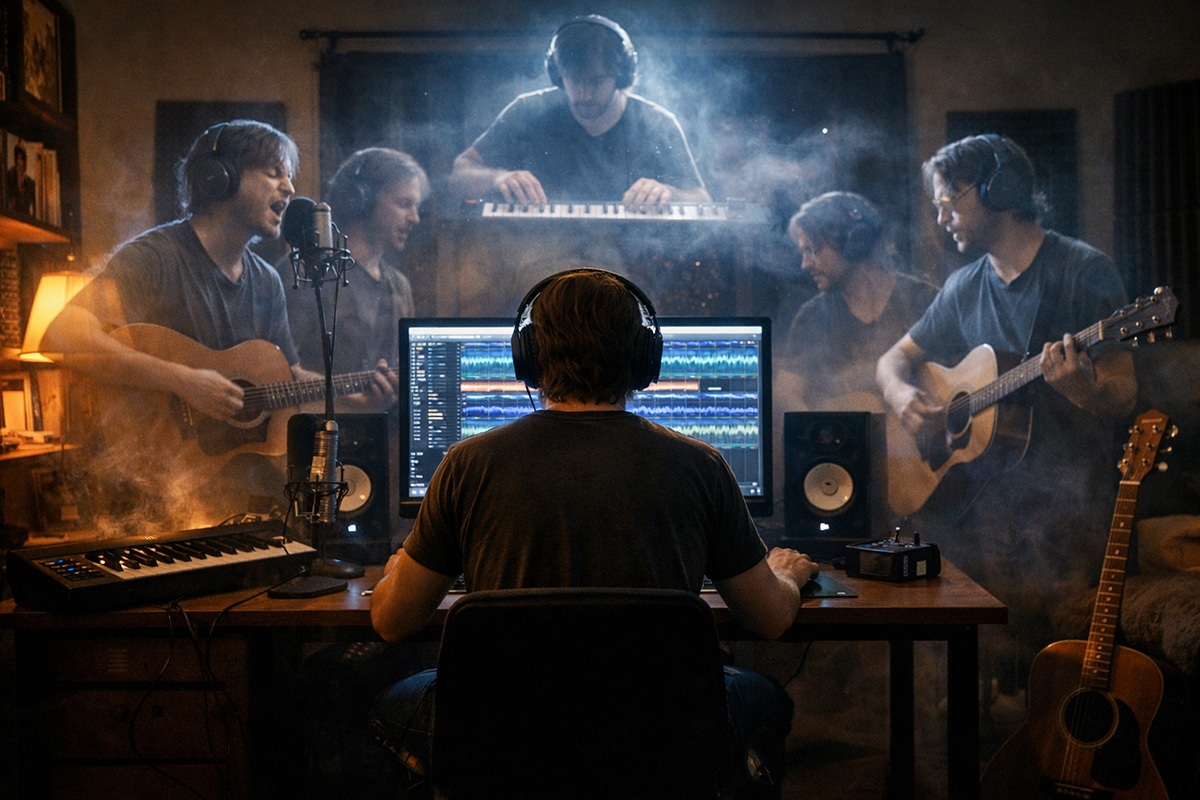
Layering Tracks Like a Pro: Building Big Sounds with Minimal Gear


Making a Scene Presents – Layering Tracks Like a Pro: Building Big Sounds with Minimal Gear
Listen to the Podcast Discussion
There is a lie floating around home recording culture that has probably cost indie artists more good songs than bad microphones ever did. It says big sounds come from big budgets. Big rooms. Big mic lockers. Big consoles. Big plugin folders. Big racks of preamps you can barely afford and barely explain. It is the same old gatekeeper story in new clothes: your art is not ready until somebody with more money approves it.
That idea needs to die.
A big record is usually not about having more gear. It is about making better choices. It is about knowing when to double a part, when to leave space, when to stack a harmony, when to pan something wide, and when to keep it dead center so the song still punches like a fist. The truth is that a lot of the size people hear on pro records comes from arrangement and layering, not from luxury. And that is good news for indie artists, because arrangement is ownership. Layering is leverage. The better you can build a big, emotional, competitive master in your own room, the more value lives in your catalog instead of leaking out to somebody else’s studio bill. That matters for streaming, for sync, for licensing, for direct sales, for fan-funded releases, and for every other way artists are trying to build a real music industry middle class. Fender Studio Pro, the current Fender-branded evolution of the Studio One platform, is built for exactly this kind of fast, idea-first workflow, with tools like Channel and Arrangement Overviews, AI-powered Audio-to-Note conversion, Chord Assistant, updated samplers, Studio Verb, and built-in Fender guitar and bass plug-ins. Fender’s own documentation also identifies the current platform as Fender Studio Pro 8.
So let’s talk about how to make a song feel huge without turning your setup into a second mortgage. Let’s talk about vocals that bloom, guitars that widen, synths that lift, bass that holds, and drums that feel bigger than the room you tracked them in. Let’s do it in the real world, where a singer-songwriter might have one mic and one interface, and a small indie band might be cutting tracks in a spare bedroom, basement, or converted garage.
Big Sound Starts Before the Mix
The first thing to understand is that layering is not the same as piling stuff on top of a song until it collapses under its own weight. That is not production. That is clutter. Real layering starts with a strong core performance and then adds support in a way that increases size, depth, emotion, and contrast. A good song should work in a stripped-down form first. Then the extra parts become architecture instead of camouflage. iZotope’s own educational material on layering makes the same basic point: the foundation has to stand on its own, and the added layers are what create depth, identity, and cohesion.
That matters because indie artists often make the same mistake when chasing “big.” They hear a chorus that feels too small, so they add another guitar. Then another keyboard. Then another reverb. Then a wider preset. Then a shimmer. Then a synth pad. Suddenly the chorus is technically fuller but emotionally flatter. The impact disappears because everything is trying to be important at once. Big is not the same as crowded. Big is what happens when every part knows its job.
In practice, that means asking a simple question every time you add a layer: is this new part adding width, depth, rhythm, tone, energy, or emotion? If it is not doing one of those things, it is probably just stealing attention. That one habit will save you hours of mix fixing later.
Fender Studio Pro as the Home Base
Fender Studio Pro is a smart center for this workflow because it keeps the whole process close to the song. The DAW is built on PreSonus’ Studio One platform and now wraps that workflow in Fender’s ecosystem, with drag-and-drop operation, Channel and Arrangement Overviews for session visibility, AI-powered Audio-to-Note conversion, Chord Assistant, updated Sample One and Impact samplers, Studio Verb, and integrated Fender Mustang Guitar and Rumble Bass plug-ins. Fender’s product page also links directly to the manual, release notes, and quick-start resources, which matters when you are building a repeatable recording system instead of fumbling from song to song.
That “repeatable system” idea is a bigger deal than people admit. A home studio only becomes a business tool when it stops being a mystery. If every song starts with chaos, your studio is a hobby bunker. If every song starts with a method, your studio becomes an asset. Fender Studio Pro helps because you can move fast from capture to edit to arrangement without feeling like you have to open six other apps to make one good choice. For indie artists trying to release more music, finish more ideas, and own more valuable masters, speed with control is not a luxury. It is survival.
What Doubling Really Does
Let’s define one of the oldest tricks in record-making: doubling. Double tracking means recording the same part more than once, trying to match the original as closely as possible in pitch, phrasing, and timing, then blending the takes together. As iZotope explains, those doubles can stay together in the center for extra body or be split apart for more width.
The reason doubling works is simple. No two performances are perfectly identical. Tiny differences in timing, articulation, breath, pick attack, and pitch create natural movement. That movement makes one idea feel bigger than a single take ever can. The magic is not in perfection. The magic is in controlled imperfection.
This is why a real doubled vocal almost always feels richer than a copied and delayed vocal. The same is true for guitars. A copied track can get wider, but a newly performed second pass gets wider and more alive. If you have the skill and the patience, always try a true second performance first. Let the human differences do the work.
Inside Fender Studio Pro, this is where the overview-driven workflow helps. When you can see the song clearly and navigate quickly, it is easier to record a second or third pass while the performance feel is still in your body. That is part of why modern DAW workflow matters more than brand mythology. The faster you can capture variations, the better your layers will be.
Building a Bigger Vocal With One Mic
Now let’s get practical. Say you are a singer-songwriter with one decent mic, one interface, headphones, and Fender Studio Pro. You do not need three vocal chains and a celebrity room to get a radio-sized vocal. You need a lead, a double, and intention.
Start with one clean lead. Do not cut the double yet. Finish the lead first. Comp it. Tighten obvious timing issues. Fix the words that feel weak. Decide what the actual lead is before you make anything orbit around it. iZotope’s guidance on double tracking says the original part should be finalized first, because good doubling depends on knowing exactly what you are matching.
Then record a second full performance of the same lead. Not a copy. Not an effect. Another performance. In the verse, you may keep that double low or even mute it. In the chorus, bring it in. That alone can make the hook feel like the walls just moved outward. If the song needs even more impact, try a third take only on selected phrases, especially at the end of lines, title lyric moments, or emotional peaks.
If you want a modern pop or indie-rock center vocal, keep the lead in the middle and tuck the real double close underneath, also in the middle, but lower in level. If you want a wider, more cinematic chorus, pan the doubles out a bit while the main lead stays center. iZotope’s panning and double-tracking material both point to this basic logic: central elements carry the focus, while doubles and supporting material create depth and width around them.
Then come the harmonies. Stacking harmonies is where a song can go from “demo” to “record.” But you do not need a choir. Start with one high harmony and one low harmony on the chorus only. That is enough to teach your ear what stacking does. Once that feels good, try recording two takes of each harmony. Suddenly your two-part stack becomes a cloud instead of a line.
The key is editing. Background vocals need to line up. Consonants need to land together. Sibilance cannot spray all over the stereo field. iZotope’s harmony-mixing guidance emphasizes editing, bus routing, level control, and careful panning because vocal stacks only feel lush when the small details stop fighting each other.
This is where outside tools can help without replacing your judgment. Nectar 4 is especially relevant for indie artists because iZotope built it as an all-in-one vocal suite and specifically added Voices for vocal layering, Backer for background singers, Auto-Level for consistency, and Vocal Assistant as an AI-powered starting point. That makes it useful not just as a fixer, but as a teacher. You can hear what a supported vocal stack sounds like, then reverse-engineer the idea with your own recordings.
And if your harmonies are close but not quite sitting right, Melodyne can be a game changer. Celemony describes Melodyne 5 assistant as offering pitch, timing, vibrato, phrasing, formants, and dynamics control, while Melodyne studio adds a multi-track workflow that is especially useful for things like backing vocals and layered arrangements.
The lesson here is not “fix everything in post.” The lesson is that a small room can still deliver a finished vocal world if you layer on purpose.
Panning Is Not Decoration
A lot of beginner mixes stay small because everything lives in the center. That is understandable. The center feels safe. But if every part is safe, nothing feels exciting.
Panning is simply placing a sound somewhere in the stereo field. It matters because it creates space so elements can be heard more clearly and helps reduce masking between parts that compete in similar frequency areas. iZotope also notes that important elements usually stay front and center, while supporting elements are moved left, right, or somewhere in between.
That means your lead vocal, kick, snare, and bass will usually feel best close to the middle. Supporting guitars, harmonies, percussion, synth layers, and ear candy can move outward. The point is not to pan for drama. The point is to create a stage where the song can breathe.
One of the smartest simple tricks is complementary panning. If two instruments are rubbing against each other, move one a little left and the other a little right. iZotope gives the example of similar midrange elements clashing in the center but sitting better when split to opposite sides. That principle is gold for indie productions because it lets you create size without adding another plugin at all.
Think of panning as arrangement after the recording is done. You are not just placing sounds. You are deciding who speaks first.
Guitars: Width, Weight, and Restraint
Guitars are where many indie artists either discover layering or ruin a song with it.
The classic move is double-tracked rhythm guitar. Record the same part twice and pan one take left, the other right. If the playing is tight, the song gets wider instantly. If the part is simple strumming, you can often pan harder. iZotope’s acoustic guitar mixing guidance notes that doubled guitars can widen a mix effectively, and simpler strumming parts can often live far out on both sides, while more complex parts usually work better brought in a bit.
Here is where Fender Studio Pro earns its keep for guitar-based artists. The built-in Fender Mustang and Rumble plug-ins give you a lot of tonal range right inside the DAW, with Fender’s product page listing dozens of guitar amps, bass amps, and effects pedals included. That means you can track one guitar part with a cleaner, tighter tone on one side and a hairier, more mid-forward tone on the other side without leaving the session.
That contrast matters. Two identical tones on left and right can sound wide, but two complementary tones sound wider and clearer. One side can carry more bite. The other can carry more body. One acoustic can be picked. The other can be strummed. One electric can be tight and dry. The other can be more ambient. Now the width is doing emotional work instead of just stereo work.
You can also build “big” with fewer notes. Try this on a chorus. Put the main rhythm guitar in two takes, left and right. Add a single-note line tucked mid-left. Put a pad or organ mid-right. Keep the lead vocal in the center. Suddenly the mix feels expensive because the parts stop stepping on each other.
If you are a solo artist and cannot play the same part tightly twice, do not panic. Record one performance, then add a simpler supporting part instead of a true double. Maybe the first guitar is full chords and the second is higher voicings. Maybe the first is strummed and the second is palm-muted. The goal is not imitation at all costs. The goal is width with identity.
Synths and Keys: Fill the Air, Not the Floor
Synths are powerful because they can make a record feel huge very quickly. They are also dangerous because they can cover everything like wet paint.
A smart way to layer synths is to think in zones. One synth owns the body. Another owns the shimmer. Another owns motion. The body might be a midrange pad that supports the chorus. The shimmer might be a high airy layer that only appears on the hook. The motion might be a pulsing part that adds rhythm without adding drums.
This is where Fender Studio Pro’s songwriting tools become more than gadgets. The product page highlights Chord Assistant and AI-powered Audio-to-Note conversion, and those can be genuinely useful for layering. If you hum a counter-line or play a rough keyboard idea, Audio-to-Note can help turn that audio into editable MIDI. Chord Assistant can help you test new harmony colors when your arrangement feels flat but you cannot quite hear what is missing yet. The updated sampling tools in Sample One and Impact are also built for grabbing sounds and turning them into playable layers.
That means your synth stack does not have to start with browsing presets for an hour. It can start with the song. Hum a line. Convert it. Try it as a pad. Try it as a pluck. Try it one octave up. Suddenly layering becomes composition, not shopping.
If you use outside tools, Samplab’s Audio to MIDI tool is another interesting option. Samplab says it converts audio into MIDI and lets you edit audio more like MIDI, which can be useful when you want to turn a guitar or vocal idea into a playable synth layer without re-performing it from scratch.
The best synth layers often work because they are felt more than noticed. If a chorus gets bigger and nobody can quite explain why, you probably layered well.
Bass, Drums, and the Hidden Layers
When people talk about layering, they usually mean vocals and guitars. But the low end and rhythm parts are often where the real size is won or lost.
Bass usually wants to stay near the center. Panning conventions exist for a reason: kick, snare, and bass tend to anchor the image. Move them too far out and the song can feel gimmicky instead of strong.
But centered does not mean simple. A bass can be layered too. One track might hold the clean low-end fundamental. Another might add a dirty midrange edge that helps the bass read on phones, laptops, and small Bluetooth speakers. Fender Studio Pro’s integrated Rumble Bass tools make this especially easy for home setups because you can split the role of bass tone inside the box instead of needing multiple amps and cabinets.
Drums can also be made larger with layers that do not sound obviously layered. Add a tucked clap under a snare in the chorus. Add a roomy tom hit only on transitions. Double a kick with a subtle click layer if it needs more definition. Use percussion to widen the groove without stepping on the center. A tambourine or shaker panned off to the side can make a chorus feel like it suddenly opened up, even when the drum kit itself did not change much.
This is also a place where the “less gear, more thought” mindset pays off. You do not need a massive drum sample library to make a chorus grow. Sometimes a single handclap recorded three times in your room, panned across the sides, does the job better because it belongs to the song.
The Difference Between Layering and Smearing
Every home producer eventually discovers the dark side of layering. It is called smear.
Smear happens when multiple parts occupy the same range, same rhythm, same tone, and same space. Nothing sticks out. Nothing hits. The mix gets wider but weaker. It feels foggy instead of powerful.
The fix is contrast. If the lead vocal is dry and intimate in the verse, let the chorus doubles and harmonies bring the bloom. If one guitar is dark and steady, let the second be brighter and more rhythmic. If the pad is wide and soft, keep the pluck narrower and more focused. If the bass has lots of sustain, keep the kick punchy and shorter.
This is where AI-assisted tools can help as ears, not bosses. Neutron 5 is built as a mixing suite with Mix Assistant and modules like Unmask, plus flexible visual and mid-side tools. That can help you spot when layered parts are stepping on each other instead of supporting each other. Sonible’s smart:EQ 4 is even more directly relevant to layering because it uses AI to correct tonal imbalances, offers cross-channel processing for spectral unmasking, and includes a reference track feature that lets you build a profile from an audio reference. In other words, if your stack feels cloudy, these tools can help you see and hear why.
That is the real healthy use of AI in production. Not “make my record for me.” More like, “show me where the traffic jam is.”
AI as a Layering Teacher, Not a Substitute for Taste
This is probably the most important part for today’s indie artist.
AI is useful in production when it shortens the road between instinct and understanding. Fender Studio Pro’s AI-powered Audio-to-Note conversion can help you take rough melodic or harmonic ideas and turn them into something editable. Nectar 4’s Vocal Assistant, Voices, and Backer modules can help you hear how a vocal stack might sit. Neutron can suggest a smarter starting point for a dense mix. smart:EQ 4 can reveal tonal pileups. Samplab can turn audio ideas into MIDI for reharmonizing or revoicing.
But the deeper value is educational. These tools help you hear cause and effect faster. You add a doubled harmony and the AI-assisted processor shows you where the extra mud happened. You create a new synth layer from a hummed line and suddenly understand why the chorus needed a higher counter-voice instead of another low pad. You run a vocal through Nectar and hear that the stack works better when the doubles are controlled and the center lead stays clear. That is not cheating. That is learning at speed.
One important note: not every modern helper is AI, and that is fine. Tonalic, for example, is not selling itself as AI. It is a Celemony-made arrangement tool built from real studio performances by more than 30 musicians, designed to adapt guitar, bass, drum, and percussion performances to your chords, tempo, and groove. For indie artists who need live-feeling support parts, that can be a strong bridge between a demo and a fuller production.
So the smart indie stance is not anti-AI and not blindly pro-AI. It is pro-control. Use the tool if it teaches you something, speeds you up, or helps you finish. Ignore it if it flattens your identity.
Real-World Example One: The Singer-Songwriter Setup
Let’s build a huge chorus with minimal gear.
You are one artist in a home studio. One mic. One guitar. Maybe a MIDI keyboard. Fender Studio Pro on a laptop or desktop. The song starts with vocal and acoustic guitar.
In the verse, keep it simple. One lead vocal in the center. One acoustic guitar close to center, maybe just a little off to one side for separation if the vocal needs room. iZotope’s acoustic guitar mixing guidance notes that a single acoustic often works close to center in sparse arrangements, with small offsets when you need clarity.
Now the pre-chorus arrives. Add a low octave vocal tucked under a key phrase. Add a second acoustic part playing higher voicings or a capo shape. Keep it lighter than the lead guitar. Maybe add a subtle pad made from a converted hummed line using Fender’s Audio-to-Note feature or a small synth patch from inside your session.
Then the chorus hits. Bring in the full vocal double under the lead. Add one high harmony and one low harmony on the title line. Double the acoustic part and pan the two performances left and right. Add a soft electric texture with a Fender amp sound tucked to one side. Add a bass layer with just enough edge to speak on smaller speakers. Use Studio Verb to push the support parts behind the lead instead of washing everything equally.
Nothing in that chorus requires expensive hardware. What makes it feel large is the timing of the additions. The song earns its size.
Real-World Example Two: The Small Indie Band in a Home Studio
Now picture a four-piece indie band cutting tracks in a modest home room.
The mistake here is usually everybody playing everything all the time. That can sound exciting in rehearsal and blurry in a recording. Layering for a band is often about separating roles more clearly than you do live.
Start with the core. Drums and bass in the middle, as the anchor. One main rhythm guitar double-tracked left and right. Lead vocal in the center. Already, the song is wide.
Now ask what is missing. Maybe the chorus needs lift, not more volume. Add stacked gang vocals on the last line only. Maybe the bridge needs tension. Add a narrow, tremolo guitar or mono synth in the middle so the final chorus feels wider by contrast. Maybe the verse needs intimacy. Mute one of the rhythm guitar doubles so the chorus grows when both sides come back.
Fender Studio Pro’s Arrangement and Channel Overviews are especially useful here because dense band sessions live or die by visual clarity. When you can see where the part density changes, you can make smarter decisions about muting, doubling, and transitions instead of just throwing more tracks at the wall. And because Fender Studio Pro also includes the built-in amp ecosystem and updated samplers, you can create support layers fast without breaking your flow.
If the band lacks a keyboard player, this is where optional support tools can save the production. A restrained Tonalic part can supply a guitar, bass, or rhythmic foundation that follows the song naturally. A Samplab conversion can turn a rough voice memo into a useful MIDI idea. A Melodyne pass can tighten stacked vocals so the chorus stops wobbling. The point is not to fake a band. The point is to finish a record.
Mixing the Stack So It Still Hits
Once the layers are recorded, the job changes. Now you are not building. You are editing the skyline.
Start by choosing the true lead element in each section. In most indie songs, that is the lead vocal. Everything else exists in relation to it. If the lead gets buried when the chorus enters, the answer is not always “turn the lead up.” Sometimes the answer is “pull 2 dB of low-mid mush out of the doubles,” or “pan the support parts a little farther,” or “mute one unnecessary layer that is doing nothing but stealing center space.”
Bus your harmonies together. Bus your rhythm guitars together. Treat families like families. This helps you make broad moves instead of wrestling a hundred faders. iZotope’s harmony mixing advice explicitly points toward routing vocals to a bus, smoothing dynamics, and paying close attention to panning, because layered voices work best as a designed group rather than random individuals.
Reference tracks help too. Not to copy, but to calibrate. smart:EQ 4’s reference track feature is built for this kind of workflow. You can load a reference file and use it as a tonal target, which is useful when your ears are telling you a chorus is “not big enough” but what is really wrong is balance.
And do not forget automation. Big records move. Doubles come in and out. Harmonies rise on certain lines. Pads tuck down under the verse and widen in the chorus. Sometimes the difference between a demo and a record is not one magic plugin. It is fifty tiny level moves that guide the listener through the song.
Why This Matters Beyond the Studio
All of this may sound like pure production craft, but for indie artists it is also business strategy.
A bigger, more finished master opens more doors. It makes your direct-to-fan sales more compelling. It gives your sync catalog a better shot. It makes playlist editors, bloggers, venue talent buyers, and new fans take you more seriously faster. It helps your live audience hear the recorded version and feel that it belongs in the same world as the records they already love.
That does not mean you have to chase mainstream polish until you erase your character. Quite the opposite. The goal is to make your identity hit harder. Layering is not about pretending to be someone else. It is about presenting your song with enough size and clarity that people cannot miss what is special about it.
That is the Making a Scene edge in all this. We are not talking about layering so you can impress gear forums. We are talking about layering so you can own stronger masters, release with more confidence, and keep more of the value chain in your own hands. A bedroom record that sounds finished is not a compromise anymore. It is leverage.
The Bottom Line
If you remember nothing else, remember this: big sound is usually the result of deliberate contrast.
One lead plus one double can feel huge if the song makes room for it. Two guitars can sound wider than ten if they are played with intention and panned with purpose. A stack of harmonies can make a chorus bloom if they are edited, balanced, and placed well. A synth can make the sky open if it fills the right hole instead of every hole. And a modern DAW like Fender Studio Pro can help you move from idea to finished arrangement faster because it keeps composition, editing, layering, and tone close together.
You do not need a giant studio to make a giant feeling. You need a song worth supporting, a workflow you trust, and the guts to stop blaming the gear.
That is how indie artists win now. Not by waiting for permission. By learning the craft deeply enough to make records that carry their own weight.
 |  Spotify |  Deezer | Breaker |
 Pocket Cast |  Radio Public |  Stitcher |  TuneIn |
 IHeart Radio |  Mixcloud |  PlayerFM |  Amazon |
 Jiosaavn |  Gaana |  Vurbl | Audius |
Reason.Fm | |||
Find our Podcasts on these outlets
Buy Us a Cup of Coffee!
Join the movement in supporting Making a Scene, the premier independent resource for both emerging musicians and the dedicated fans who champion them.
We showcase this vibrant community that celebrates the raw talent and creative spirit driving the music industry forward. From insightful articles and in-depth interviews to exclusive content and insider tips, Making a Scene empowers artists to thrive and fans to discover their next favorite sound.
Together, let’s amplify the voices of independent musicians and forge unforgettable connections through the power of music
Make a one-time donation
Make a monthly donation
Make a yearly donation
Buy us a cup of Coffee!
Or enter a custom amount
Your contribution is appreciated.
Your contribution is appreciated.
Your contribution is appreciated.
You can donate directly through Paypal!
Subscribe to Our Newsletter
Order the New Book From Making a Scene
Breaking Chains – Navigating the Decentralized Music Industry

Breaking Chains is a groundbreaking guide for independent musicians ready to take control of their careers in the rapidly evolving world of decentralized music. From blockchain-powered royalties to NFTs, DAOs, and smart contracts, this book breaks down complex Web3 concepts into practical strategies that help artists earn more, connect directly with fans, and retain creative freedom. With real-world examples, platform recommendations, and step-by-step guidance, it empowers musicians to bypass traditional gatekeepers and build sustainable careers on their own terms.
More than just a tech manual, Breaking Chains explores the bigger picture—how decentralization can rebuild the music industry’s middle class, strengthen local economies, and transform fans into stakeholders in an artist’s journey. Whether you’re an emerging musician, a veteran indie artist, or a curious fan of the next music revolution, this book is your roadmap to the future of fair, transparent, and community-driven music.
Get your Limited Edition Signed and Numbered (Only 50 copies Available) Free Shipping Included
Discover more from Making A Scene!
Subscribe to get the latest posts sent to your email.


