

DI vs. Mic Recording for Guitars and Bass: What’s the Difference?




Making a Scene Presents – DI vs. Mic Recording for Guitars and Bass: What’s the Difference?
Listen to the Podcast Discussion
Two Ways to Capture the Same Player
Put a bass player or guitarist in front of a recording system and you can capture the performance in two very different places. You can take the electrical signal straight from the instrument before it reaches a loudspeaker, or you can place a microphone in front of an amplifier and record the sound after the amp, speaker, cabinet, air, and room have all changed it.
That is the basic difference between DI and microphone recording, but it is not a contest between the “real” method and the “fake” method. Both are real, both have been used on successful records, and both can be either wonderful or awful depending on the player, instrument, song, room, equipment, and decisions being made.
For an independent artist, the best method is not always the one that looks most impressive in a studio photo. It is the method that captures the emotion of the performance, fits the production, stays within the budget, and gives the artist enough flexibility to finish the record without creating a technical hostage situation.
What DI Recording Really Means
DI is short for direct injection or direct input. In the strict technical sense, a DI box accepts the unbalanced, high-impedance output of a guitar, bass, or other instrument and converts it to a balanced, low-impedance, microphone-level signal that can travel through a standard microphone cable into a preamp, mixer, or audio interface.
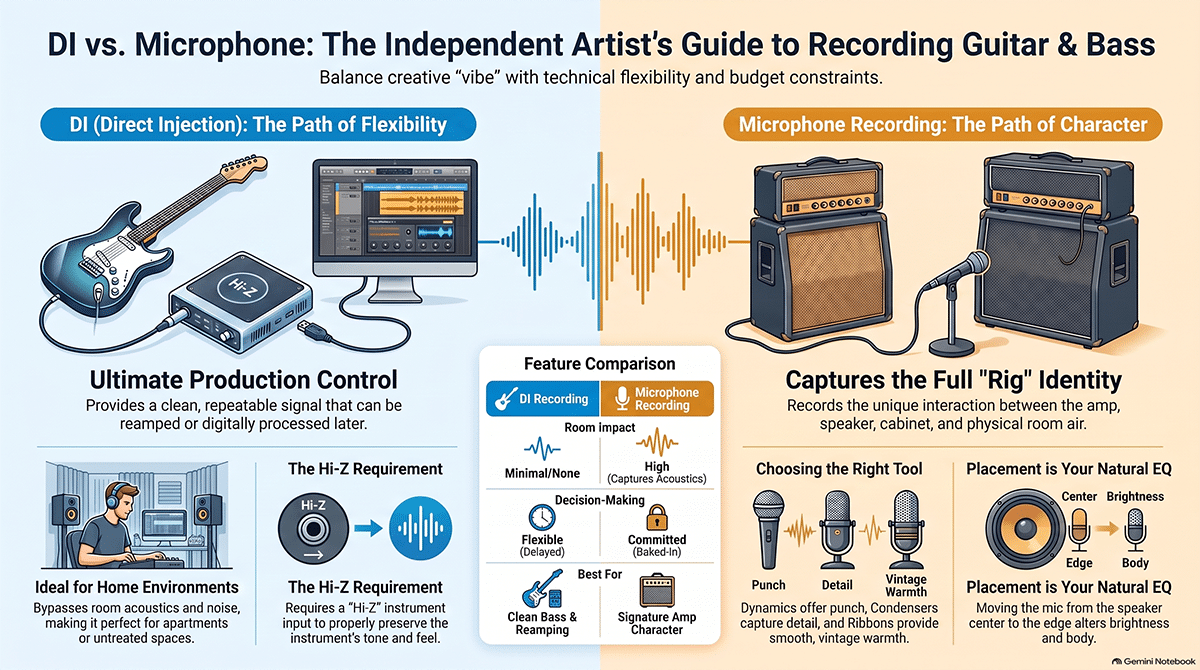
In everyday studio language, musicians also use the word DI when they plug a guitar or bass straight into the instrument input of an audio interface. A proper instrument input is often marked “Inst” or “Hi-Z,” and it is designed to accept the high-impedance signal produced by instrument pickups without loading it down the way the wrong type of input can.
This means there are two common direct-recording paths. One uses a separate DI box and then feeds a microphone preamp, while the other uses the Hi-Z instrument input already built into the interface. Neither path is automatically superior, although a good external DI may offer useful isolation, a thru output for feeding an amplifier, ground-lift options, a different input impedance, and its own subtle sonic character.
The direct track contains the instrument, the pickups, the strings, the player’s touch, the volume and tone controls, and anything placed before the DI point. It does not automatically contain the sound of a guitar amplifier, power section, loudspeaker, cabinet, microphone, or room unless those parts are later added through hardware, software, or reamping.
A DI Box Is Not Just a Fancy Adapter
A good DI box solves electrical problems as well as connection problems. Guitar and bass pickups expect to “see” a suitable input impedance, and the loading created by the next device can affect level, high-frequency response, attack, and the way the instrument feels under the fingers.
Active DI boxes contain powered electronics, while passive DI boxes usually use a transformer and require no power. A common starting rule is to try an active DI with passive pickups and a passive DI with active or high-output instruments, but that is not a law of physics carved into the back of a vintage tube amp. Radial notes that active DIs can help low-output passive instruments, while passive models can handle strong signals without needing power, yet the actual match still depends on the instrument, the DI’s design, and the sound you want.
An indie artist should not feel pressured to buy an expensive DI before making a record. Start by using the proper instrument input on the interface, compare it with any available DI box, match the gain carefully, and listen in the full mix rather than judging each option while staring at an online price tag.
What Microphone Recording Captures
A microphone records sound moving through air. When you place one in front of a guitar or bass amplifier, it captures the result of the entire chain, including the pickups, pedals, preamp, power amp, speaker, cabinet construction, microphone design, microphone position, reflections, room acoustics, and even small noises from the physical space.
This is why a miked amplifier can feel more complete before any plug-ins are added. The speaker and cabinet are not neutral delivery systems; they are major tone-shaping parts of an electric instrument rig, and the microphone hears their combined result rather than the raw electrical signal alone.
The same idea applies to an acoustic guitar, acoustic bass, resonator guitar, or other instrument fitted with a pickup. A DI captures the pickup system, while a microphone captures the instrument’s body moving air in a room, so the two signals may sound like close relatives rather than identical twins.
Microphone recording also commits more choices at the beginning. The amp setting, speaker, microphone, placement, room, and performance all become part of the recorded tone, which can be inspiring because the player reacts to a finished sound, but it can be limiting if the tone later fights the arrangement.
Why a Raw Guitar DI Can Sound Strange
A raw electric-guitar DI often sounds sharper, smaller, or more exposed than the sound a guitarist expects from an amp. That is not because the DI failed; it is because the track has not yet passed through the amplifier, speaker, cabinet, and microphone system that normally smooths, limits, compresses, distorts, and reshapes the signal.
Direct electric-guitar recording as capturing the instrument without the growl and character added by an amplifier and cabinet, which is why the direct track is commonly sent through amp-modeling and cabinet-processing tools or later played through a real amplifier. The direct signal is therefore better understood as an unfinished capture point than as a failed imitation of a finished amp tone.
That raw sound can still be useful on purpose. Clean funk parts, wiry indie textures, layered pick attacks, lo-fi passages, and highly processed sound-design parts may benefit from the direct track’s fast attack and lack of room sound, especially when it is blended quietly beneath a fuller amp sound.
Why Bass Often Works So Well Through a DI
Electric bass is frequently recorded direct because a clean DI can deliver solid low frequencies, clear note starts, low noise, and consistent tone without requiring a loud amplifier or a well-treated room. Shure identifies direct recording, microphone recording, and a combination of the two as the three main bass-recording approaches, while a Hi-Z interface input as a simple and effective way to capture bass.
A bass DI can be nearly mix-ready when the arrangement needs definition and steady support rather than obvious amplifier color. It also gives the mixer a dependable foundation that can be compressed, saturated, filtered, duplicated, or sent through an amp model without bringing room rattles and microphone bleed along for the ride.
The weakness is that a direct bass may feel too polite, too clean, or disconnected from the personality of the player’s rig. The speaker’s compression, cabinet resonance, amp drive, and physical movement of air can add growl and size that a plain DI does not naturally contain.
The Advantages of DI Recording
The biggest DI advantage is control. A direct track is usually quiet, repeatable, and largely independent of room acoustics, microphone placement, neighbors, sleeping children, barking dogs, air conditioners, traffic, and the drummer who has suddenly decided that every rehearsal requires a full stadium monitor mix.
DI recording also makes editing easier because the waveform often has clear attacks and less room decay. More important, it preserves a flexible source that can be processed later, which is especially valuable when the artist is recording at home and the final production direction has not yet been settled.
A clean direct track can become a long-term production asset. It may be reamped through a different amplifier, used to create an alternate clean version for licensing, processed into a new texture for a remix, or kept as insurance in case the original amplifier tone turns out to be less heroic after the keyboards and vocals arrive.
DI recording is also friendly to small budgets. An artist can capture a strong performance with an interface, headphones, and a properly set instrument input, then spend money later only where the song proves that extra equipment, studio time, or reamping will make a meaningful difference.
The Disadvantages of DI Recording
The direct method can encourage endless delay. Because every amp, cabinet, microphone, pedal, and room choice can remain open until later, the artist may avoid making decisions and end up auditioning tones for three weeks when the original performance already said what it needed to say.
A DI track can also change the player’s experience. Guitarists and bassists often play differently when an amplifier is pushing air, responding to feedback, compressing under the fingers, and interacting with the instrument, so monitoring through an uninspiring sound may produce a technically clean take with less attitude.
Latency is another practical concern when software processing is used for monitoring. Even a small delay between the fingers and the headphones can affect timing and feel for some players, so the recording system should use a low buffer setting, direct monitoring, hardware processing, or another setup that lets the performer hear a responsive sound.
The wrong input can make a direct recording disappointing before the session truly begins. Plugging a passive guitar or bass into a line input instead of a proper Hi-Z instrument input can load the pickups incorrectly and produce a weaker or duller result, so the input mode should always be checked before blaming the strings, pickups, or musician.
The Advantages of Microphone Recording
Microphone recording captures commitment, and commitment can be a creative advantage. When the player hears the amp tone that will appear on the record, the performance, pedals, pickup choice, and touch can all respond to that sound in real time.
A microphone also turns placement into a powerful tone control. Moving the mic across the speaker, changing its angle, or increasing its distance can alter brightness, body, room sound, and low-frequency weight before an equalizer is ever opened.
The physical rig may contribute small nonlinear details that are hard to separate into individual causes. Speaker breakup, cabinet vibration, amplifier compression, room reflections, and controlled feedback can combine into a sound that feels alive because it was created as one interacting system.
For an indie artist with a distinctive amplifier and a strong live identity, capturing that rig may also protect what makes the artist recognizable. A signature tone is part of the brand, and a record that sounds like the artist rather than the default preset menu can help live shows, videos, and future releases feel connected.
The Disadvantages of Microphone Recording
Microphones hear everything that reaches them, including things the artist did not invite to the session. A noisy amp, computer fan, loose cabinet screw, floor vibration, bad room reflection, passing truck, or buzzing light can become part of the take.
The room matters more as the microphone moves away from the speaker. Shure explains that a close microphone tends to sound dry and focused, while greater distance adds more of the amplifier, floor, and room reflections, which may sound natural in a good space and messy in a poor one.
Microphone recording can also require more time and more physical freedom. The artist needs permission to make noise, enough space to separate the cabinet from rattling objects, a stand that stays put, cables that work, and some way to hear the microphone signal while adjusting placement.
Once the tone is recorded, the main choices are baked in. Equalization and processing can reshape it, but they cannot fully remove a harsh speaker, a bad room, or the wrong microphone position without changing the performance in other ways.
Dynamic Microphones: Punch, Focus, and Forgiveness
When engineers talk about a “dynamic mic” on a guitar cabinet, they usually mean a moving-coil dynamic microphone. This design uses a diaphragm, voice coil, and magnet assembly, and it is commonly chosen for loud sources because many moving-coil models are rugged, need no phantom power, and can handle high sound-pressure levels well.
On electric-guitar amplifiers, a dynamic mic often gives a focused midrange, controlled top end, and strong sense of attack. That can help a guitar sit in a busy rock, blues, punk, country, or pop mix without requiring the full width and detail of the room.
Dynamic microphones are also practical for indie studios because they tend to reject more room sound when used close to the speaker with a directional pattern. They are not magically deaf to bad acoustics, but close placement creates a high level of direct amp sound compared with the reflections arriving later.
On bass cabinets, a dynamic microphone can provide punch and tolerate the high level near the speaker. Shure notes that dynamics are a common choice for bass amps, although a condenser can also work when its maximum SPL and pad options are suitable.
A dynamic mic is not automatically dark, cheap, or less professional than a condenser. Microphones are voiced differently, and the best choice is the one whose frequency response, polar pattern, level handling, and character solve the problem in front of you.
Condenser Microphones: Detail, Speed, and More of the Room
A condenser microphone uses a charged diaphragm and backplate system with active electronics, so it normally needs phantom power, a battery, or another specified power supply. Condensers are often more sensitive than moving-coil dynamics and can capture fine high-frequency detail and fast changes with clarity, although every model has its own response and maximum level.
On acoustic guitar, a condenser can capture string detail, body resonance, finger movement, pick texture, and the air around the instrument. This can sound open and expensive in a good room, but the same sensitivity may reveal computer fans, chair squeaks, traffic, reflections, and the player’s surprisingly loud relationship with breathing.
On an electric-guitar cabinet, a condenser may provide a wider or more detailed picture than a close dynamic. It can be used near the speaker if the microphone is rated for the sound level, and a built-in pad or preamp pad can help prevent overload when the amplifier is loud.
On bass cabinets, a condenser can capture extended detail and a more natural sense of the rig, but it should not be placed in front of a powerful speaker based on guesswork. Check the microphone’s maximum SPL, use a pad when appropriate, begin at a sensible distance and level, and listen for distortion that is coming from the microphone or preamp rather than the amplifier.
A condenser is not always the best choice simply because it captures more. Records are built by deciding what to leave in and what to leave out, and a narrower, more colored microphone can make the instrument fit the song faster than a highly detailed recording that later requires major surgery.
Ribbon Microphones: Weight, Smoothness, and a Different View
A ribbon microphone is technically a type of dynamic microphone, but it uses a very thin conductive ribbon suspended in a magnetic field rather than the moving-coil structure found in most common dynamic models. Traditional passive ribbons often have lower output than condenser microphones and may need a quiet preamp with substantial gain, while active ribbon models include electronics and may require phantom power.
Many ribbon microphones are known for a smooth high end, strong midrange weight, and a natural way of softening sharp amplifier edges without making the source disappear. Shure describes ribbons as smooth and forgiving on guitar, while Royer documents their use on loud electric-guitar cabinets and recommends placement choices that account for proximity effect and the specific model’s level handling.
Many ribbons use a figure-eight polar pattern, meaning they capture sound from the front and rear while rejecting strongly at the sides. That rear pickup can make the room part of the tone, so rotating a ribbon changes more than the amount of amplifier reaching the front; it also changes which wall, absorber, hallway, or open space reaches the back.
The figure-eight pattern can become a creative tool in a small studio. Point the front at the cabinet, then place absorption behind the microphone for a tighter sound, or place a reflective surface behind it to add a controlled sense of space without moving the mic far from the speaker.
Ribbon microphones deserve care, but the old statement that every ribbon will collapse near a loud guitar amp is not accurate. Modern designs vary widely, some are made for high-SPL cabinet work, and manufacturers such as Royer recommend slight off-axis placement to reduce stress from strong air movement while preserving tone.
Phantom power also requires a model-by-model answer. Active ribbons may need phantom power, while some passive ribbons can be damaged by faulty wiring, unbalanced connections, patching accidents, or inappropriate phantom use, so the artist should read the microphone manual and turn phantom power off while connecting or disconnecting unless the manufacturer instructs otherwise.
Microphone Placement Is an Equalizer You Use Before Recording
The speaker is not equally bright at every point. As a general starting point, aiming the microphone toward the center of the cone produces more bite and high-frequency energy, while moving toward the edge tends to sound warmer and less aggressive.
That guideline is only the beginning because speakers, cabinets, microphones, and angles differ. A movement of an inch can matter, and turning the microphone slightly off-axis can smooth the top end without changing its distance from the speaker.
Distance changes the picture as well. Very close placement emphasizes one part of one speaker and reduces the room, while backing away lets the microphone hear more of the cabinet as a complete object along with more floor and room reflections.
Directional microphones may also produce proximity effect, an increase in bass response as the microphone moves closer to the source. This can add useful weight to a thin guitar or create mud on a bass cabinet, so distance should be chosen by listening rather than by copying a photograph.
A beginner can find a useful starting point without expensive measuring tools. Record a short repeated part while moving the microphone in small steps from center to edge, label the takes, lower the listening volume, and choose the placement that fits the track rather than the one that sounds biggest by itself.
The Room Is Part of the Microphone Choice
A close dynamic microphone in a poor room may give a more dependable result than a sensitive condenser placed several feet away. The condenser is not at fault; it is simply reporting more of the truth, including the truth about bare walls, low ceilings, corners, glass, and a floor that has opinions.
Room treatment does not need to look like a commercial studio to help. Thick absorbers, packed clothing, moving blankets placed safely away from hot amplifiers, mattresses, bookshelves, and careful amp positioning can reduce harsh reflections, although soft thin material will not control deep bass as effectively as substantial treatment.
The amplifier does not always need to remain in the same room as the player. A speaker cable of the correct type can place a cabinet in another room while the amplifier head stays accessible, but instrument cables should not be substituted for speaker cables and a valve or tube amplifier should not be operated without the speaker or approved load required by its manufacturer.
A smaller room can also become an effect rather than a problem. A tiled room, hallway, stairwell, or wooden corner may create a useful character when captured intentionally, especially if a close mic provides focus and a second distant mic is added only as much as the song can afford.
Combining DI and Microphone Signals
For bass, recording a DI and a miked cabinet at the same time is one of the most useful hybrid methods. The DI can provide stable low end and note definition, while the microphone supplies speaker character, midrange growl, amp distortion, and room personality.
The blend does not need to be equal. A modern pop track may use mostly DI with a small amount of gritty amp in the middle frequencies, while a roots or rock track may feature the amplifier and use the DI quietly to stabilize the deepest notes.
Electric guitar can use the same safety-net approach. A DI split records the clean pickup signal while the thru output feeds the pedals and amplifier, giving the artist the committed amp sound and a clean source that can be reamped or processed later.
The direct track should not automatically be mixed in just because it exists. On electric guitar, adding raw DI can make the result thinner or more brittle if it creates phase cancellation or adds an unwanted attack, so treat the DI as an option rather than a required ingredient.
Phase, Timing, and Why Two Good Tracks Can Sound Bad Together
The DI signal reaches the recorder almost immediately through the electrical path, while the microphone signal arrives after the speaker moves and the sound travels through air to the mic. That small timing difference changes the way frequencies add and cancel when the tracks are combined.
This is often called a phase problem, although the practical issue may include time delay, polarity, frequency-dependent phase shift, or all three. Flipping the polarity switch can improve the blend in some cases, but it does not correct every timing difference because polarity inversion turns the whole waveform upside down rather than moving it earlier or later.
Zooming in and lining up obvious waveform peaks can be a useful test, especially with bass, but it should not become a ritual performed without listening. The speaker, microphone, cabinet, and room have already changed the waveform, so the most visually perfect alignment is not guaranteed to produce the most musical low end.
A good method is to match the track levels, listen in mono, switch the microphone in and out, try polarity inversion, then move the mic track by tiny amounts while judging the full mix. Stop when the bass becomes solid or the guitar becomes focused, and remember that a little cancellation may be the exact reason the blend leaves room for the vocal.
With two microphones on one cabinet, place their capsules as close to the same distance from the speaker as practical when you want a stable blend. You can then move one mic deliberately if you want comb filtering, space, or a more unusual tone, but deliberate trouble is much easier to manage than accidental trouble.
Reamping: Perform Now, Choose the Amp Later
Reamping means taking a previously recorded direct guitar or bass track, sending it through a device that converts the interface’s line-level, low-impedance output back to a signal suitable for pedals and an amplifier, then recording the amplifier with a microphone. A proper reamp box corrects the level and impedance mismatch that would occur if the interface output were connected directly to a guitar rig.
This approach lets the musician focus on the performance during tracking and explore amplifier, pedal, microphone, and placement choices later. It can also save money because the artist may record performances at home, then book a studio with good rooms and amplifiers for a shorter, focused reamping session.
Reamping is not a license to record careless input levels. The direct take should be clean, free from clipping, properly loaded, and performed through an inspiring monitoring sound, because no amplifier can restore dynamics that were flattened by a clipped converter or a bad performance.
The direct track is also valuable when collaborators live in different cities. An artist can send the clean performance to a trusted producer or engineer, keep ownership of the original session files, and receive several printed amp options without surrendering the only usable version of the part.
Creative Techniques That Break the Fake Rules
One useful bass method is to divide the job by frequency rather than by equipment. Keep the DI clean and strong in the low end, remove deep bass from the miked or distorted path, and let the amplifier track carry the growl and upper harmonics that help the bass speak on small speakers.
The reverse can also work. A warm cabinet mic may provide the body, while a filtered DI adds just enough finger attack or pick edge to make the rhythm readable without turning up the entire bass track.
For electric guitar, record the amp normally and place a second microphone near the player’s picking hand or the unplugged strings. That track will sound thin and strange by itself, but a tiny amount can add physical pick detail, fret noise, and human movement to a dense wall of processed guitars.
An open-back guitar cabinet offers another option because sound comes from the rear as well as the front. A rear microphone can create a darker, roomier layer, but its polarity and timing should be checked against the front mic because the speaker’s rear movement is opposite the front movement.
A ribbon microphone can be rotated so its side null rejects a noisy part of the room, while its rear lobe faces an absorber, doorway, or reflective wall. This turns the polar pattern into a room-design tool and may create a larger sound without placing the mic far enough away to lose focus.
A tiny practice amp can be more useful than a giant cabinet when the arrangement needs an angry midrange rather than huge bass. Reamp a clean guitar or bass through the small speaker, filter out the weak low end, and blend its rough personality beneath the main DI or cabinet sound.
A guitar DI can also be treated as percussion. High-pass it, compress it, distort it, or gate it, then tuck it under the amp to reinforce rhythm without adding another full guitar layer that competes with the singer.
For acoustic guitar, a pickup DI can provide consistency while a microphone supplies realism. Instead of blending both at full range, let the microphone carry the body and air while the pickup contributes controlled attack, or use the pickup only during louder sections where the microphone track needs help staying present.
Room sound can be created after the performance without using digital reverb. Play the DI or close-miked track through an amplifier or full-range speaker in a hallway, garage, sanctuary, stairwell, or other safe space, record the natural reflections, and blend that recording as a custom ambience that belongs only to the record.
DI and Mic Choices for Acoustic Guitar
An acoustic guitar with a pickup is not automatically captured accurately by plugging it in. The DI records what the pickup hears, which can be useful, clear, and resistant to room noise, but it does not contain the same balance of body resonance, string sound, and air that a microphone receives.
A microphone placed near the sound hole often produces a bass-heavy result because that opening is a strong source of low-frequency energy rather than a perfect portrait of the whole guitar. A practical starting point is near the area where the neck meets the body, then move toward the bridge for more body or toward the neck for more string and fret character.
A small-diaphragm condenser can give clear transients and a focused acoustic picture, while a large-diaphragm condenser may offer a broader sense of size depending on the model and distance. A ribbon can soften pick brightness and give the instrument weight, while a dynamic can work surprisingly well when the room is poor, the guitar is aggressive, or the arrangement needs midrange more than sparkle.
The DI may be the better choice for a scratch track, live performance, noisy apartment, or dense arrangement. The microphone may be better for a solo passage, intimate singer-songwriter production, natural ensemble, or any moment where the wood and air are part of the emotional message.
DI and Mic Choices for Acoustic Bass
Upright bass and acoustic bass instruments make the difference even more obvious. A pickup can provide useful definition and isolation, while a microphone can capture the body, fingerboard, bow, bridge, and room as a complete acoustic event.
The low frequencies of an upright bass can excite room modes, floors, walls, and microphone stands, so the most expensive mic in the building may not solve a bad position. Moving the player, microphone, or both by a small distance can change the recorded low end more effectively than a large equalizer boost.
A hybrid recording often works well because the pickup helps hold the notes steady while the microphone restores air and dimension. As with electric bass, the two sources should be checked for timing and polarity, and neither source should be kept merely because it was recorded.
Choosing Based on the Song
The arrangement should make the first decision. A dense rock mix may need a focused dynamic microphone on the guitar cabinet and a clean bass DI, while a sparse trio may benefit from ribbon depth, room sound, and the natural imperfections of a physical rig.
A modern pop production may favor direct recording because it allows precise editing and repeatable processing. A blues, roots, or live-feeling project may gain more from committing to an amplifier that pushes the player into a better performance.
Heavy music does not automatically require the loudest possible cabinet, and quiet music does not automatically require a condenser. The right method is the one that creates the needed emotional scale while leaving room for the vocal, drums, and other instruments.
Ask what the part is doing. If the bass is holding the harmony and kick drum together, DI clarity may be the priority, but if the bass is acting like a second lead instrument, the amp’s character and a microphone may deserve more space.
Choosing Based on the Room and the Real World
Use a DI when the recording space is noisy, reflective, shared, or too small for the amp to sound healthy. A great performance captured quietly is more valuable than a theoretically pure amp recording ruined by buzz, rattles, angry neighbors, and a singer who can no longer hear the cue mix.
Use a microphone when the amplifier is an important part of the musician’s identity and the room supports it. The artist should be able to hear the mic through headphones while someone moves it, because guessing from the front of a loud cabinet is a fine way to discover that ears and microphones do not occupy the same address.
Use both when the session can support one extra channel and a clean split. The DI does not need to replace the amplifier, and the amplifier does not need to prevent future choices.
Choosing Based on Money, Time, and Independence
An indie artist should think about total cost, not just the price of a microphone or DI. Microphone recording may require studio rental, stands, cables, room treatment, isolation, extra setup time, and an engineer, while DI recording may require amp-modeling tools, reamping later, or more decision time during mixing.
The cheapest method is the one that reaches a finished release without forcing the artist to redo the work. Spending nothing on tone and then paying for emergency repairs is not thrift; it is a payment plan with worse branding.
Recording both a DI and a microphone can protect the budget when done cleanly. The artist leaves the session with the emotional amp sound and an editable source, reducing the risk that a single technical decision makes the whole performance unusable.
That source file also belongs in the artist’s organized archive with clear names, sample rate, tempo, tuning, take information, and notes about the signal chain. Owning clean, well-labeled recordings makes future remixes, sync requests, alternate versions, live playback, educational products, and reissues easier to create without rebuilding the original session from memory.
A Practical Starting Method for Beginners
For electric bass, begin with a clean DI through a proper Hi-Z input or DI box and monitor through a simple amp sound that feels good to play. Set the level so the hardest notes do not clip, record at least one complete take, and add a miked amp only when it contributes something the direct track cannot provide.
For electric guitar, record a DI and a microphone together when possible. Start with one dynamic microphone close to the speaker, around the area between the center and edge of the cone, then move it in small steps until the harshness and body balance fit the song.
For acoustic guitar, start with one microphone rather than creating a stereo puzzle on the first day. Place it near the neck-body joint, listen, move it a few inches at a time, and record the pickup DI as a backup when the instrument has one.
For any two-source setup, check the blend in mono and at low listening volume. If adding the second source makes the instrument smaller, hollow, or weak, investigate timing and polarity before reaching for equalization.
Most of all, save the settings that worked. Take a photograph, measure the mic distance, write down the amp controls, label the input path, and keep the direct track, because repeatability is not the enemy of creativity; it is what lets creativity continue after lunch.
There Is No Trophy for Using the Harder Method
Musicians sometimes treat microphone recording as more authentic and DI recording as a shortcut. That belief ignores decades of creative records built with direct bass, reamped guitars, amp models, blended signals, filtered pickups, strange rooms, cheap speakers, expensive microphones, and decisions that broke somebody else’s rule.
Authenticity comes from the performance and the artist’s choices, not from the number of glowing tubes in the photograph. A DI can be raw, personal, and brave, while a miked vintage amplifier can be safe, dull, and completely wrong for the song.
The more useful question is not, “Which method do professionals use?” Professionals use whatever solves the production problem. The useful question is, “What part of this instrument’s sound do I need to capture now, and what choices should remain open for later?”
The Making a Scene Bottom Line
Choose DI when you need quiet recording, clean low end, repeatability, editing flexibility, reamping options, or protection from a poor room. Choose a microphone when the amplifier, speaker, cabinet, room, and physical interaction are essential parts of the sound.
Choose a dynamic mic when you want focus, punch, durability, and controlled room pickup. Choose a condenser when you want detail, transient clarity, and a wider picture, and choose a ribbon when you want smooth weight, natural midrange, and a polar pattern that can turn the room into part of the instrument.
Choose both when the budget and inputs allow it, but do not confuse having more tracks with having a better production. Every track should earn its place by adding emotion, definition, character, or useful future flexibility.
The independent artist’s real advantage is not access to one perfect method. It is the freedom to build a recording process that serves the song, preserves valuable source files, controls costs, and leaves the artist owning the performances and choices that can create revenue for years after the amplifier has been switched off.
 |  Spotify |  Deezer |  Breaker |
 Pocket Cast |  Radio Public |  Stitcher |  TuneIn |
 IHeart Radio |  Mixcloud |  PlayerFM |  Amazon |
 Jiosaavn |  Gaana |  Vurbl |  Audius |
 Reason.Fm | |||
Find our Podcasts on these outlets

Subscribe to Our Newsletter
Discover more from Making A Scene!
Subscribe to get the latest posts sent to your email.


