


Mixing Quietly: Why Lower Volume Makes Better Decisions


Making a Scene Presents – Mixing Quietly: Why Lower Volume Makes Better Decisions
Listen to the Podcast Discussion
There is one home studio habit that can improve almost every mix without costing a dime. It does not require a new interface, a new microphone, a new plug-in bundle, or some secret trick from a million-dollar control room. It is almost boring in how simple it is.
Turn the monitors down.
That’s it. Not forever. Not so low that you can barely hear the song. Not as a punishment. Not because loud music is bad. Music is supposed to move air. Music is supposed to hit you in the chest when the moment calls for it. But when you are making mix decisions, especially in a home studio, loud volume can lie to you. Low volume tells the truth more often.
This matters because most independent artists are not mixing in perfectly tuned commercial rooms. They are mixing in bedrooms, basements, spare rooms, apartments, garages, converted offices, church rooms, rehearsal spaces, and half-treated corners of real life. They are working around drywall, windows, desks, couches, standing waves, cheap foam, uneven speaker placement, and neighbors who may or may not appreciate a kick drum test at midnight. That does not mean great records cannot be made there. Great records are being made there every day. But it does mean the home studio mixer has to build habits that help the room tell fewer lies.
Mixing quietly is one of those habits.
When you mix at a lower volume, your brain stops being impressed by loudness and starts paying attention to balance. You hear whether the vocal is actually sitting in the song. You hear whether the snare is too loud or just exciting. You hear whether the bass is supporting the track or pretending to be bigger than it is. You hear whether the guitars, keys, percussion, synths, background vocals, and effects are helping the song or crowding each other like everyone trying to talk at once at the merch table.
A loud mix can feel finished before it is finished. A quiet mix has to earn your attention.
That is why this simple habit can change everything.
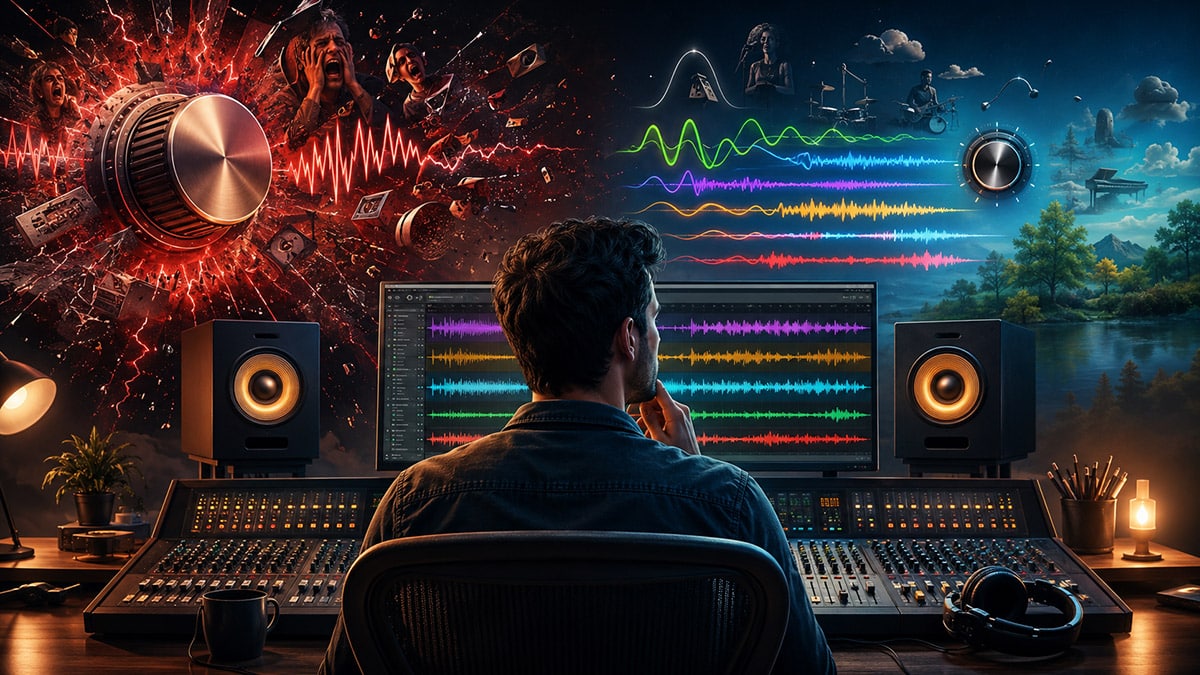
Loud Feels Good, But It Can Fool You
Every home studio engineer learns this lesson sooner or later. You work on a song for a while, push the volume up, and suddenly it feels better. The drums hit harder. The vocal feels more emotional. The guitars feel wider. The bass feels deeper. The reverb feels more expensive. The chorus feels like it grew shoulders.
So you think, “Now we’re getting somewhere.”
Maybe you are. But maybe you just turned it up.
Loud playback creates excitement. That is not a flaw. It is part of why music works. Human beings respond physically to sound pressure. A louder playback level makes the room vibrate more. It makes your chest feel more low end. It makes cymbals feel brighter. It makes compression and saturation feel more powerful. It can make an average balance feel like an event.
The problem is that the listener does not owe you that playback level.
A fan may hear your song on earbuds while walking through a grocery store. A music supervisor may audition it on small speakers in an office. A reviewer may listen on headphones while answering email. A playlist curator may hear the first thirty seconds on laptop speakers. A fan may discover the song in a car, on a Bluetooth speaker, on a phone, through a soundbar, or at low volume late at night while the rest of the house is asleep.
If your mix only works when it is loud, it does not really work yet.
That is not a moral judgment. It is a translation problem. The mix has to carry the song across many playback systems and many listening levels. The independent artist does not have the luxury of assuming a perfect listening environment. The mix has to travel.
This is where lower volume becomes powerful. When the monitors are quieter, the fake excitement drops away. The song has to stand on its own structure. The vocal has to be placed correctly. The groove has to be clear. The emotional center has to survive without brute force. If the chorus still feels bigger at a lower level, you are probably doing something right. If the lead instrument still pulls your ear without being harsh, good. If the kick and bass still make musical sense without shaking the floor, good. If the lyric still feels present, the mix is becoming dependable.
Dependable mixes make better releases. Better releases make better first impressions. Better first impressions help sell tickets, merch, fan memberships, direct downloads, licensing opportunities, and long-term fan trust. That is the real business connection. A better mix is not just an audio trophy. It is part of the artist’s income engine.
Your Ear Changes With Volume
The reason loud volume can fool you is not just emotional. It is physical.
Human hearing does not respond to every frequency equally at every volume. The basic idea is often explained through the Fletcher-Munson curves, though the more accurate modern term is equal-loudness contours. The short version is simple: at lower listening levels, our ears are less sensitive to deep bass and very high treble compared with the midrange. As the playback gets louder, bass and treble can feel more present. The official modern standards are based on equal-loudness research such as ISO 226, and practical explanations from audio education sources often show how our perception of bass, mids, and highs shifts with level. (en.wikipedia.org)
This is why a mix can sound full and exciting loud, then thin and midrangy when turned down. It is also why a mix made too loud can become weak at normal listening levels. You may under-mix the vocal because it seemed powerful when the monitors were blasting. You may under-mix the bass because the room was exaggerating it. You may over-brighten cymbals because your ears were getting tired and wanted more detail. You may add too much reverb because loud playback made it feel cinematic instead of cloudy.
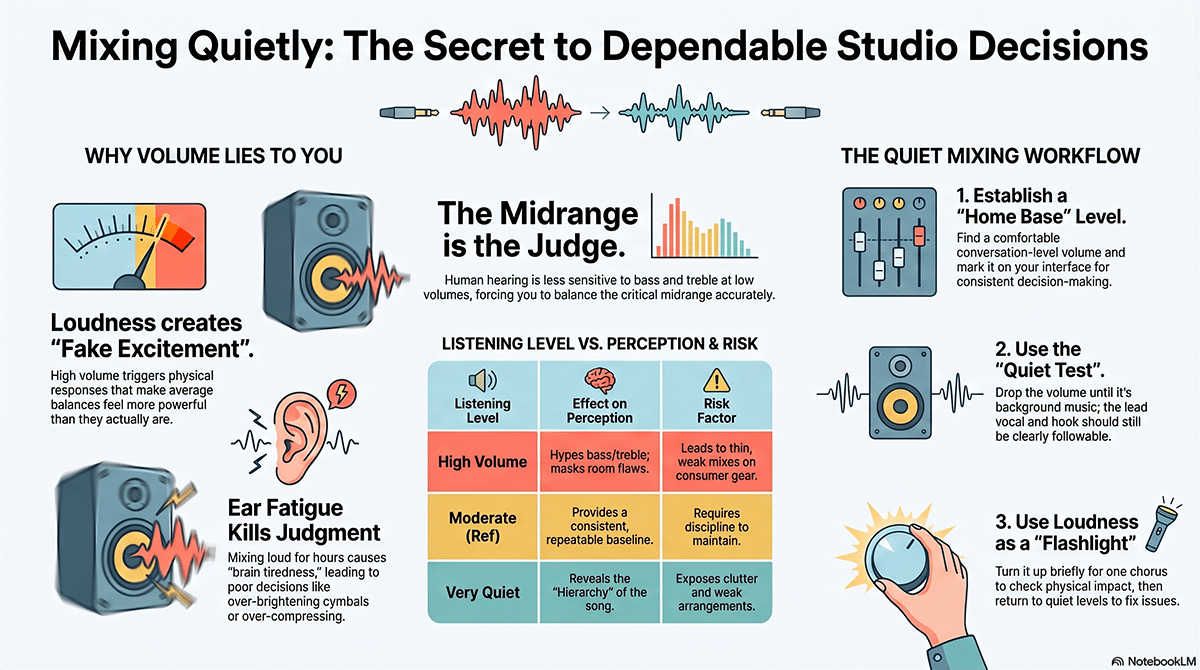
At lower volume, the midrange becomes the judge.
That is a good thing. The midrange is where a huge part of the song’s identity lives. Vocals, guitars, piano, snare body, synth hooks, horn lines, strings, room tone, and lyric intelligibility all live heavily in the midrange. If the midrange balance is wrong, the song will feel wrong almost everywhere. If the midrange balance is right, the mix has a much better chance of translating.
This is especially true for home studio mixes. Small rooms often lie about bass. A room mode can make one note sound huge while another disappears. Your speakers may be too close to a wall. Your desk may create reflections. Your listening position may sit in a low-frequency null where the bass seems missing, so you turn it up until it destroys the mix everywhere else. Low-volume mixing does not magically fix room acoustics, but it reduces how much the room’s low-end behavior dominates your decisions.
That does not mean you ignore bass. It means you stop making all bass decisions at “feel it in the floor” volume. You learn to ask better questions. Can I hear the bass notes, not just the bass energy? Does the kick have shape? Does the bass line support the chord movement? Does the low end still feel connected to the groove when the room is not hyping it? Those questions make better records.
Ear Fatigue Is a Mix Killer
The other reason to mix quietly is fatigue.
Your ears are not microphones. They are living sensors connected to a brain that gets tired. The longer you listen loudly, the more your hearing and judgment shift. You may start reaching for more top end because the mix feels dull. You may push the vocal too hard because your ears are tired of decoding it. You may over-compress because loud playback makes compression feel exciting at first. You may keep changing the snare because it no longer feels as sharp as it did an hour ago.
That is not because you suddenly became bad at mixing. It is because your listening system is wearing down.
Hearing safety organizations take loud sound seriously for a reason. NIOSH recommends an exposure limit of 85 dBA averaged over an eight-hour workday, and it warns that people exposed at or above that level are at risk for hearing loss over time. (cdc.gov) That does not mean a short loud check in the studio is the same thing as industrial noise exposure, but it does remind us that sound level and time matter. If you are mixing loud for hours, you are not just risking your hearing. You are risking the accuracy of the decisions you are making right now.
Ear fatigue is sneaky because it often feels like work ethic. You think you are grinding. You think you are pushing through. You think one more hour will get the mix there. But after a certain point, you are not really mixing the song anymore. You are mixing your tiredness.
Lower volume buys you more useful time. It lets you work longer before your ears start lying. It makes it easier to notice small balance changes. It keeps your nervous system calmer. It helps you stay in decision mode instead of survival mode.
This is a huge issue for independent artists because many home studio sessions happen after work, after family responsibilities, after gigs, after rehearsals, after social media chores, after booking emails, after editing video content, after doing all the things the modern artist has to do because the old gatekeepers no longer hand out careers like candy. You may already be tired before you open the session. Loud monitoring makes that worse.
Mixing quietly is not just about protecting your hearing. It is about protecting your judgment.
The Quiet Mix Test
One of the best practical tests in recording is brutally simple. Turn the song down until it is almost background music. Not muted. Not barely audible. Just quiet enough that you could have a conversation over it.
Now listen.
What is still obvious?
If the lead vocal disappears, you have learned something. If the snare suddenly feels too loud, you have learned something. If the guitars vanish, you have learned something. If the bass line becomes a mystery, you have learned something. If the reverb becomes more noticeable than the song, you have learned something. If the hook still pulls your attention, you have learned something very good.
This quiet test works because it strips the mix down to its hierarchy. Every song needs a hierarchy. Something has to lead. Something has to support. Something has to create motion. Something has to create space. Something has to provide impact. Everything cannot be equally important at the same time. That is not a mix. That is a crowd.
At low volume, the lead elements reveal themselves. The vocal, melody, groove, and emotional hook either hold together or they do not. You do not need golden ears to notice this. In fact, beginners often respond well to quiet mixing because it makes the basic problem easier to hear. You are not asking, “Is the upper midrange of the snare transient fighting the vocal presence range?” You are asking, “Can I still follow the song?”
That is the right question.
In a home studio, this quiet test is also a reality check against the room. You may not have expensive acoustic treatment. You may not have a subwoofer set up perfectly. You may not have full-range monitors. But you can still turn down the volume and ask whether the song feels balanced. You can still make the vocal sit better. You can still stop the hi-hat from poking holes in the listener’s forehead. You can still trim a pad that is washing over the lyric. You can still pull the kick down if it is only impressive when loud.
A quiet mix is like reading the song in plain language. If the sentence makes sense quietly, it will usually make more sense loudly.
Start With a Comfortable Reference Level
The first step is to stop changing your monitor volume every thirty seconds.
That does not mean you never change it. It means you need a home base. Pick a comfortable low-to-moderate listening level where you can work without strain. For many home studio mixers, this is around normal conversation level or slightly above it. You should be able to listen for a long time without feeling your ears tighten up. You should not feel like the speakers are shouting at you. You should not feel like the room is taking over.
Some engineers like to calibrate their monitors with an SPL meter. In a small home studio, you do not need to become obsessed with a perfect theatrical calibration standard. You just need a repeatable reference. A free tool like the NIOSH Sound Level Meter App can help you understand roughly how loud your room is, and the CDC notes that the app was designed to measure workplace noise exposure. (Noise and Hearing Loss) If you want a more serious studio measurement setup, a dedicated SPL meter or calibration microphone can be useful, but the bigger point is consistency.
Once you find a comfortable level, mark it. If your audio interface has a monitor knob, use a small piece of tape. If you use a monitor controller, mark the position. If your system is software-controlled, write down the number. This becomes your default mixing level.
In Fender Studio Pro, or any DAW, you can build this habit into the session workflow. Start the mix at your normal monitor level. Set rough balances. Adjust the vocal or lead instrument. Shape the kick and bass relationship. Work on the main groove. Then do the quiet check. Then go back to the reference level. Later, do a short louder check. The DAW does not matter as much as the discipline. Fender Studio Pro is a strong example because the modern DAW environment makes it easy to loop sections, organize buses, use metering, and compare references, but the habit translates to Pro Tools, Logic, Cubase, REAPER, Ableton Live, Studio One, FL Studio, Luna, GarageBand, and anything else that lets you balance tracks.
The key is that you are no longer mixing at random volume. You are giving your ears a stable frame of reference.
Build the Mix at Low Volume First
A strong approach for home studio mixing is to build the first real balance at low volume.
Bring up the main rhythmic foundation first. Depending on the song, that may be drums and bass, acoustic guitar and vocal, programmed beat and synth bass, piano and vocal, percussion and upright bass, or any other core. Keep the volume low enough that you are not being seduced by impact. You are listening for relationship.
Does the groove make sense? Can you hear the pulse? Does the low end feel connected to the arrangement? Is the snare or backbeat supporting the song without bullying it? Is the vocal sitting in front of the band, inside the band, or behind the band? Which one does the song need?
Then bring in the musical elements around that center. Guitars, keys, synths, loops, strings, horns, background vocals, extra percussion, samples, and effects all need a reason to exist. At low volume, unnecessary parts become easier to spot. If you mute a part and the song gets clearer, that part may need to be lower, thinner, automated, edited, or removed. This is not about being minimalist for the sake of it. It is about making sure the listener can find the song inside the production.
This is where many independent artists can make a huge leap. Home recordings often suffer from “everything I played must stay” thinking. You tracked six guitars because you were excited. You stacked harmonies because it felt big. You added percussion because the loop was fun. You put a pad under the chorus because the chorus needed lift. None of that is wrong. But once you mix quietly, you may hear that some parts are not lifting the song. They are just taking up rent.
The quiet mix exposes clutter.
It also exposes weak arrangements. If the chorus only feels bigger because it is louder, maybe the arrangement needs more contrast. Maybe the verse has too much energy. Maybe the chorus needs a different drum pattern, a harmony, an octave, a higher guitar voicing, a wider synth, or simply less stuff in the verse. Mixing quietly helps you separate a mix problem from an arrangement problem. That saves time, and time is money for an independent artist.
If a better arrangement helps the song connect with fans, that can show up later as more repeat listens, more shares, better live response, stronger merch table conversations, and more confidence when pitching the song for licensing. The mix is not separate from the business. The mix is part of the product.
Use Loud Checks Like a Flashlight, Not a Lifestyle
There is still a place for loud playback.
A mix should survive being turned up. You need to know whether the low end gets out of control, whether the vocal becomes harsh, whether the cymbals hurt, whether the limiter is choking the chorus, whether the kick loses punch, whether the reverb blooms too much, and whether the emotional impact is there when the song is played with energy.
But the loud check should be brief.
Think of loud playback like turning on a bright flashlight in a dark room. You use it to inspect something, then you turn it off. You do not stare into the flashlight for three hours and call that vision.
Once the mix is working quietly and at your normal reference level, turn it up for one chorus. Maybe one verse and one chorus. Listen for physical impact and pain points. Does anything jump out in a bad way? Does the vocal get aggressive? Does the bass get boomy? Does the kick vanish because the limiter is working too hard? Does the high end feel exciting or sharp? Does the mix open up or fall apart?
Make a few notes. Turn it back down. Fix the problems at your normal level.
This is important because loud playback often tempts you to make loud-playback fixes. You turn it up, hear too much bass, pull down too much bass, then later the mix feels thin everywhere else. Or you turn it up, hear too much vocal bite, dull the vocal, then later the lyric disappears. The better move is to use loud playback to identify the issue, then make the decision at a calmer level.
That is how you keep loudness from becoming the producer.
Check Very Quiet, Normal, Loud, And Real World
A practical home studio level-checking routine can be simple.
First, mix mostly at your comfortable low-to-moderate reference level. This is where most balance decisions happen.
Second, turn the mix way down for the quiet test. The vocal or lead element should still be understandable. The groove should still make sense. The hook should still feel like the hook. If the song becomes a vague wash, the mix probably needs better hierarchy.
Third, listen at a normal consumer level. This is not studio-hero volume. This is “someone actually living their life” volume. Imagine the song playing while someone cooks dinner, drives to work, edits photos, or gets ready for a show. Does the song feel natural? Does anything feel annoying?
Fourth, do a short loud check. This is where you test excitement, low-end behavior, harshness, and impact. Keep it short. Your ears are not disposable.
Fifth, check outside the studio. Use headphones. Use earbuds. Use a phone speaker. Use a car. Use a Bluetooth speaker. Use a laptop if you have one. You are not trying to make every system sound identical. That is impossible. You are trying to make the song’s identity survive.
This is also where reference tracks help. A reference track is not something you copy. It is something you use to reset your ears. Pick a professionally released song in a similar general lane of energy, arrangement density, and low-end style. It does not have to be the same genre. If you are mixing a sparse acoustic song, compare it to another sparse, vocal-forward recording. If you are mixing a dense full-band track, compare it to a dense full-band track. If you are mixing electronic low end, compare it to something with controlled electronic low end.
A reference plugin like ADPTR AUDIO Metric AB can make this easier by letting you switch between your mix and reference tracks from one place. Metering tools like iZotope Insight 2, Youlean Loudness Meter, Voxengo SPAN, NUGEN Audio Visualizer, and FabFilter Pro-L 2 can help you see loudness, spectrum, true peak behavior, and stereo information. These tools do not replace listening, but they can confirm what your ears suspect, especially in a room you do not fully trust.
In a home studio, that matters. A meter will not write a better chorus. It will not make a bad vocal performance honest. But it can help you avoid being tricked by volume, room buildup, or tired ears.
Watch the Vocal at Low Volume
For most songs, the vocal or main melodic voice is the emotional front door. That does not mean every song is vocal-heavy. Instrumental music has a lead voice too. It might be a guitar, saxophone, synth, piano, violin, sample, or melodic bass line. Whatever carries the story needs to survive low-volume listening.
When you turn the mix down, ask whether the listener can still follow the main idea. If the vocal disappears, the problem may not be as simple as “turn up the vocal.” It might be masking. Guitars may be covering the same frequency range. A piano may be too wide and too bright. A synth pad may be filling every hole. Background vocals may be too close to the lead. Reverb may be pushing the vocal back. Delay may be cluttering the phrases. The vocal compressor may be grabbing the loud words but leaving quiet words behind. The singer may need volume automation before compression.
Low-volume listening helps you hear this because you stop being distracted by the thrill of the track. You notice whether the words are actually landing.
In Fender Studio Pro, a practical workflow would be to loop the verse and chorus, set the monitor level low, and ride the vocal with clip gain or volume automation before reaching for more compression. Then use EQ to clear space around the vocal rather than simply boosting the vocal until it sits on top like a sticker. If the guitars are crowding the vocal, you might dip a little presence range in the guitar bus or automate the guitars down a touch during important lines. If reverb is washing out the lyric, shorten the decay, filter the reverb, lower the send, or automate the effect between phrases.
The quiet test will tell you quickly whether those changes helped. If the vocal stays emotionally present at low volume, it will usually feel stronger everywhere else.
This is not just about sonic polish. A clear vocal helps fans connect with the lyric. Connection is what turns a casual listener into someone who follows the artist, buys a ticket, scans a QR code at the merch table, joins an email list, supports a membership, or comes back for the next release. The vocal is often where the relationship starts.
Watch the Low End Without Worshiping It
Low end is the great home studio trap.
At loud volume, bass can feel amazing even when it is wrong. At low volume, bass can seem too small even when it is right. This is where many mixers get into trouble. They chase the physical feeling of bass in a room that cannot reproduce bass accurately, then wonder why the mix sounds bloated in the car or weak on earbuds.
The goal is not to make bass huge in your studio. The goal is to make bass translate.
At lower levels, listen for bass definition rather than bass pressure. Can you hear the notes? Does the kick have a clear relationship with the bass instrument? Is the low end rhythmically tight? Is there a low-mid buildup making the whole mix feel cloudy? Does the bass vanish on small speakers because it has no harmonic content above the sub range?
Sometimes the fix is not more low bass. Sometimes the fix is saturation, upper harmonics, better EQ, better arrangement, or less competition. A bass guitar or synth bass may need a little harmonic color so the line can be heard on smaller speakers. A kick may need more beater or click to define the rhythm without adding more sub. A muddy guitar or keyboard part may need low-end filtering so it stops stealing room from the real bass instruments.
Mix quietly, then check loud briefly. If the low end feels balanced quietly but explodes loudly, the room or sub area may be fooling you. If the low end feels missing quietly but right on every outside system, learn to trust that. If the bass notes are uneven, check the arrangement and performance before reaching for a giant EQ curve.
Tools can help here. Voxengo SPAN gives you a spectrum view, and SoundID Reference can help calibrate supported headphones and speaker setups for a more consistent reference. Sonarworks describes SoundID Reference as a standalone app and DAW plugin for speaker and headphone calibration. (Speaker & Headphone Calibration) That does not replace room treatment or experience, but it can be useful for home studios where translation is a constant fight.
Again, the goal is not perfection. The goal is fewer lies.
Headphones Can Help, But They Need Rules
Many home studio artists mix partly or mostly on headphones. Sometimes that is because of neighbors. Sometimes it is because the room is bad. Sometimes it is because headphones reveal details that speakers hide. Headphones are useful, but they can also fool you.
At low volume, headphones can be excellent for checking clicks, edits, distortion, breath noise, reverb tails, vocal automation, stereo effects, and tiny arrangement conflicts. They also remove some room problems from the equation. If your bedroom has wild bass behavior, headphones can give you a second opinion.
But headphones can exaggerate stereo width. They can make hard-panned elements feel more separated than they will on speakers. They can make reverb and delay feel more dramatic. Depending on the headphone model, they can hype bass, scoop mids, or brighten highs. This is why headphone calibration tools can help, and why reference tracks matter so much.
The biggest rule is volume discipline. Headphones make it easy to listen too loud because the sound is direct and private. You may not realize how hard your ears are working. Keep headphone levels comfortable. Take breaks. Use low-volume checks there too.
A good workflow is to build the mix on monitors quietly if possible, check details on headphones, return to monitors for balance, then use earbuds as a consumer reality check. If you must mix mostly on headphones, use reference tracks constantly and check mono often. The mix may sound wide and impressive in headphones but collapse strangely in mono or feel hollow on speakers.
Low-volume headphone mixing can be powerful because it keeps you focused on balance, not adrenaline. But the rules still apply: do not let loudness make decisions for you.
The Mono Check Gets Better Quiet
Mono is not glamorous, but it is useful.
When you collapse a mix to mono at low volume, you find out what is truly fighting. Wide guitars may cover the vocal. Stereo synths may disappear. Phasey effects may lose power. Background vocals may crowd the lead. A stereo widener may be doing more damage than good. A reverb may be filling the center in a way that makes the lyric harder to hear.
You do not need to mix in mono forever. But checking mono quietly is one of the fastest ways to reveal balance problems. If the song still makes sense in mono at low volume, the core is probably strong. When you go back to stereo, the width becomes a bonus instead of a crutch.
In Fender Studio Pro, you can use mono monitoring options through your interface, monitor controller, or DAW routing depending on your setup. Many metering plugins also include correlation meters that show potential phase problems. iZotope Insight 2 and NUGEN Audio Visualizer are examples of deeper analysis tools that can help you understand stereo and phase behavior.
But the simplest version is still this: press mono, turn it down, listen to the song.
If the vocal gets swallowed, fix the arrangement or EQ. If the snare vanishes, check phase or sample layering. If the guitars become a wall of midrange, carve space or automate. If the hook disappears, the stereo image may have been doing too much of the work.
Mono at low volume is not a punishment. It is a stress test.
Automation Beats Volume Creep
One reason people keep turning up the monitors is that the mix stops feeling exciting. Instead of fixing the song’s movement, they raise the playback level. That creates a temporary thrill, but it does not solve the mix.
Automation solves the mix.
If the chorus needs to lift, automate the chorus elements. If the vocal needs to speak more intimately in the verse, ride it closer. If the guitar hook needs to answer the vocal, bring it up for that moment and tuck it back after. If the reverb should bloom at the end of a line, automate the send. If the final chorus needs more energy, push the background vocals, widen a double, open a filter, or add a subtle parallel bus.
When you mix quietly, automation becomes easier to judge because you are listening to movement instead of volume. You can hear whether the song grows. You can hear whether sections have contrast. You can hear whether a part steps forward at the right time.
This is where home studio productions can become much more professional. Many beginner mixes are static. The faders get set, the plugins get loaded, and the song just sits there. But records move. Vocals ride. delays appear and disappear. Guitars lean into hooks. Drum rooms push choruses. Bass notes get controlled. Effects return for emotional moments. The mix breathes.
Low-volume listening makes that movement obvious. If the chorus does not feel like it lifts quietly, it may need automation, arrangement contrast, or tonal change. If the bridge does not feel different, turning the monitors up will not fix it. If the last chorus does not feel earned, volume is not the answer.
The answer is intention.
Don’t Confuse Mixing Loudness With Release Loudness
Mixing quietly does not mean releasing quietly. These are different stages.
During mixing, you are balancing the song. You are shaping tone, dynamics, width, depth, emotion, and arrangement. During mastering, you are preparing the final version for release, translation, sequencing, and competitive playback. Loudness matters in mastering, but it should not dominate the mix stage.
If you slam a limiter on the mix bus too early just to make the song feel finished, you may make bad balance decisions. The limiter may pull down drums, distort bass, flatten transients, or make the chorus feel smaller. Then you start mixing into the damage. Sometimes mixing into a gentle bus chain is fine if you know what you are doing. But crushing the mix because loud feels better is a trap.
Use loudness meters for information. Youlean Loudness Meter is a popular free/pro option for LUFS and true peak style checks. FabFilter Pro-L 2 includes loudness and true peak metering, and FabFilter’s own page notes support for standards such as EBU R128, ITU-R BS.1770-4, and ATSC A/85. (Limiter Plug-In) iZotope Insight 2 is another full metering suite. These tools are useful, but they should not bully the song.
A good mix has internal balance before it has final loudness. If the vocal is too quiet, mastering will not magically fix it. If the kick and bass are fighting, mastering will expose it. If the chorus is smaller than the verse, mastering may make that even more obvious. If the high end is harsh, louder playback will punish the listener.
Mix quietly first. Make the song work. Then worry about final level.
Breaks Are Part of the Mix
One of the least glamorous professional habits is taking breaks.
That sounds too simple, but it matters. After forty-five minutes or an hour, your perspective changes. After several hours, your confidence may go up while your accuracy goes down. You start making moves because you are tired of the same loop. You stop hearing the song and start hearing your frustration.
Take short breaks. Leave the room. Do not scroll through loud videos on your phone and call that rest. Give your ears actual quiet. Drink water. Come back and listen at low volume from the top. The first thirty seconds after a break are valuable. Your instincts are fresh. You will often notice the biggest problem immediately.
The trick is to believe yourself.
If you come back and the vocal is obviously too loud, it probably is. If the hi-hat hurts right away, fix it. If the bass feels cloudy, investigate. If the chorus does not lift, do not spend two more hours pretending it does. Fresh ears tell the truth quickly.
Independent artists need this discipline because most are working without a separate producer, engineer, assistant, editor, and mastering engineer in the room. You are wearing too many hats. Breaks help you change hats without losing your mind.
Quiet listening and breaks go together. They keep you from chasing ghosts. They help you finish.
A Practical Low-Volume Mixing Routine
Here is a simple routine that works in a home studio.
Open the session and set your monitor level to your marked reference point. Keep it comfortable. Listen to the rough mix or current mix from the top without touching anything. Write down the first three things that bother you. Do not fix while listening. Just listen.
Now loop the most important section of the song. That may be the first chorus, the biggest chorus, or the verse where the vocal has to carry the story. Set the lead element first. Build the rhythm section around it. Bring in the supporting instruments until the song feels complete, not crowded.
Turn the volume down for the quiet test. Ask whether the vocal or lead line still leads. Ask whether the groove still moves. Ask whether anything pokes out. Make small balance moves. Avoid giant EQ decisions unless the problem is obvious.
Return to your reference level. Check the verse-to-chorus transition. If the chorus does not lift, try automation or arrangement changes before reaching for more master bus level.
Check mono quietly. Fix masking and phase problems. Return to stereo.
Take a break.
Come back and listen at normal consumer volume. Compare briefly to a reference track. Do not obsess over matching loudness exactly, but do turn the reference down so it is not winning just because it is louder. If you use ADPTR AUDIO Metric AB, this kind of level-matched comparison becomes easier.
Do one short loud check. Listen for bass overload, harshness, vocal aggression, cymbal pain, and limiter stress. Turn it back down.
Print a test mix. Listen outside the studio. Take notes in plain language: vocal low in verse two, bass too big in car, chorus vocal harsh, kick missing on phone, outro too long, reverb cloudy. Then return to the session and fix those notes at your reference level.
This routine is not flashy. That is why it works.
The Business Case for Quiet Mixing
Making a better mix is not just about impressing other engineers. Most fans do not care what compressor you used. They do not care whether the vocal EQ was expensive. They do not care whether your interface has elite converters. They care whether the song connects.
A clear, balanced mix helps that connection happen faster.
That matters because the modern independent artist lives in a world of short attention windows. Social media platforms, streaming platforms, and video feeds are built to keep people moving. Your song may get a few seconds to earn attention. If the vocal is buried, the low end is muddy, the cymbals are harsh, or the chorus does not lift, the listener may not stick around long enough to become a fan.
A better mix improves the odds.
It can help a song feel more professional when sent to reviewers, blogs, playlist curators, radio hosts, DJs, music supervisors, venues, booking agents, and fans. It can make live-show promotion stronger because the recording represents the artist well. It can make merch and direct support easier because fans believe in what they are hearing. It can help licensing because sync buyers need tracks that work quickly and translate across systems. It can help the artist build trust with their audience over time.
This is the Making a Scene point: the mix is part of artist independence.
Owning your music is important. Owning your fan relationships is important. Owning your data is important. But the product still has to hit people in the heart. A strong mix helps the song do its job. Quiet mixing is one of the simplest ways to get there because it puts the focus back where it belongs: on balance, emotion, translation, and listener connection.
The old industry loved mystery. It loved making artists feel like good sound required permission from expensive rooms and gatekeepers. The truth is more useful. Good sound comes from better decisions, repeated over time. Some tools help. Some rooms help. Some engineers are worth every penny. But no one can sell you the habit of listening honestly.
You have to build that.
Lower Volume, Higher Standards
Mixing quietly does not mean making timid records. It does not mean removing power. It does not mean your drums should be polite or your guitars should behave or your bass should sit in the corner with a permission slip. It means you are making decisions in a way that reveals the truth.
A mix that works quietly can still explode when turned up. In fact, it usually explodes better because the balance is right. The vocal is not fighting. The low end is not a swamp. The snare is not stabbing. The hook is not buried. The arrangement has shape. The effects have purpose. The song has a center.
That is what lower volume gives you. It gives you distance from hype. It gives you longer-lasting ears. It gives you a clearer view of the midrange. It helps you hear the song instead of the speakers. It makes home studio problems easier to manage. It turns mixing from a volume contest into a decision-making process.
The next time a mix feels wrong, resist the first urge to turn it up. Turn it down.
If the song still speaks, you are close.
If it falls apart, good. Now you know what to fix.
That is not failure. That is the mix finally telling you the truth.
 |  Spotify |  Deezer | Breaker |
 Pocket Cast |  Radio Public |  Stitcher |  TuneIn |
 IHeart Radio |  Mixcloud |  PlayerFM |  Amazon |
 Jiosaavn |  Gaana |  Vurbl | Audius |
Reason.Fm | |||
Find our Podcasts on these outlets
Buy Us a Cup of Coffee!
Join the movement in supporting Making a Scene, the premier independent resource for both emerging musicians and the dedicated fans who champion them.
We showcase this vibrant community that celebrates the raw talent and creative spirit driving the music industry forward. From insightful articles and in-depth interviews to exclusive content and insider tips, Making a Scene empowers artists to thrive and fans to discover their next favorite sound.
Together, let’s amplify the voices of independent musicians and forge unforgettable connections through the power of music
Make a one-time donation
Make a monthly donation
Make a yearly donation
Buy us a cup of Coffee!
Or enter a custom amount
Your contribution is appreciated.
Your contribution is appreciated.
Your contribution is appreciated.
You can donate directly through Paypal!
Subscribe to Our Newsletter
Order the New Book From Making a Scene
Breaking Chains – Navigating the Decentralized Music Industry

Breaking Chains is a groundbreaking guide for independent musicians ready to take control of their careers in the rapidly evolving world of decentralized music. From blockchain-powered royalties to NFTs, DAOs, and smart contracts, this book breaks down complex Web3 concepts into practical strategies that help artists earn more, connect directly with fans, and retain creative freedom. With real-world examples, platform recommendations, and step-by-step guidance, it empowers musicians to bypass traditional gatekeepers and build sustainable careers on their own terms.
More than just a tech manual, Breaking Chains explores the bigger picture—how decentralization can rebuild the music industry’s middle class, strengthen local economies, and transform fans into stakeholders in an artist’s journey. Whether you’re an emerging musician, a veteran indie artist, or a curious fan of the next music revolution, this book is your roadmap to the future of fair, transparent, and community-driven music.
Get your Limited Edition Signed and Numbered (Only 50 copies Available) Free Shipping Included
Discover more from Making A Scene!
Subscribe to get the latest posts sent to your email.


