


Subtractive EQ vs Additive EQ: The Secret to Clean Mixes


Making a Scene Presents – Subtractive EQ vs Additive EQ: The Secret to Clean Mixes
Listen to The Podcast Discussion
There is a reason so many home studio mixes sound busy, cloudy, and weirdly tired even when every track is “exciting” on its own. It is not always the mic. It is not always the room. It is not always that you need some expensive boutique plugin blessed by a guy on YouTube wearing a beanie in July. A lot of the time, the problem is simpler and a little more humbling. We boost before we listen. We decorate before we clean. We keep reaching for more when the track is begging for less. That is where subtractive EQ comes in, and it is why this one move can make a mix feel more expensive, more open, and more professional without adding a single new sound. Fender Studio Pro is built on the Studio One platform, and Fender’s current Studio Pro pages describe its Standard EQ as a parametric EQ with dynamic EQ and visual feedback, while the platform also includes broader mix tools like multiband dynamics and a modernized workflow in version 8. That makes it a very good place to learn restraint instead of hype.
For indie artists, this matters more than people like to admit. Clean mixes do not just sound better in some abstract engineer way. They travel better. They hold up on playlists, in cars, on earbuds, in clubs, on laptops, and in the phone speaker your next fan is using while deciding whether you are worth following. A better mix also saves money. It means fewer rescue plugins, fewer revision rounds, fewer mastering surprises, and fewer moments where you think the answer is buying another shiny piece of software. Good subtractive EQ is part craft, part discipline, and part refusal to be manipulated by the louder-is-better lie. That is very much a Making a Scene mindset. Stop throwing more stuff at the song. Make the song tell you what needs to get out of the way.
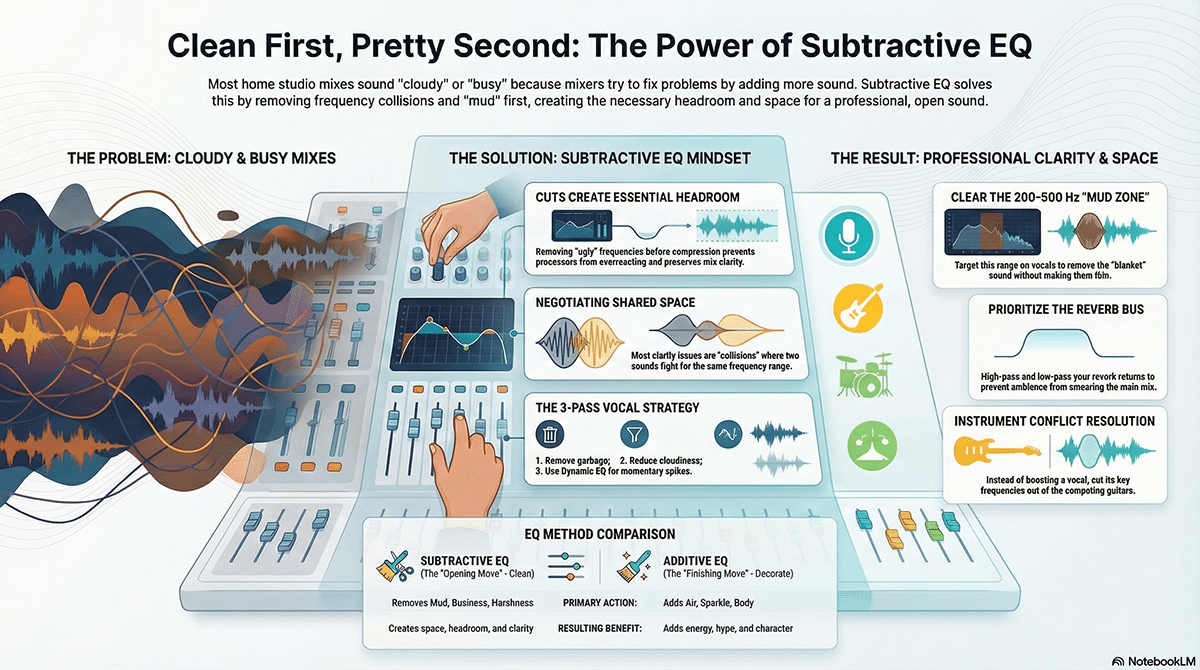
Let’s get the terms straight. Additive EQ means boosting a frequency range because you want more of something. More air. More bite. More body. More crack. More sparkle. Subtractive EQ means cutting a frequency range because there is too much of something. Too much mud. Too much harshness. Too much boxiness. Too much wool. iZotope’s EQ articles describe the difference plainly: additive EQ boosts a range to achieve a desired effect, while subtractive EQ reduces a specified range to shape the sound. That sounds basic, and it is. But basic does not mean small. Most mix problems are not mysterious. They are collisions. Two or more sounds are fighting in the same space, and you are hearing the fight.
Here is the secret that newer mixers usually learn late: cutting often works better than boosting because cuts create room instead of just making one thing louder. When you boost, you are adding energy. That can be useful, but it can also make the mix more crowded, push processors harder, and exaggerate the very thing that is already causing trouble. iZotope notes that subtractive EQ before compression can improve compressor behavior because it restores headroom, and the same basic logic applies in mixing more broadly. If you remove the ugly low-mid build-up on a guitar, you may no longer feel the need to boost the vocal presence as hard. If you clear the harsh upper mids from a cymbal wash, the snare may suddenly feel bigger without touching it. This is why good engineers sound calm. They are not painting over a wall stain. They are scraping it off first.
That does not mean additive EQ is bad. It means additive EQ is powerful enough that it should be used on purpose. If a vocal really does need more air, a broad gentle boost can be beautiful. If a kick drum needs a little more beater click to speak through a dense arrangement, that can be the right move. If an acoustic guitar needs a little lift around the top to feel alive, do it. But do not boost because the solo button made you lonely and insecure. In context, many things that sound “small” by themselves sound exactly right in a mix. That is another trap subtractive EQ helps you avoid. It teaches you to judge parts by what they contribute, not by how flattering they sound in isolation.
Inside Fender Studio Pro 8, the smartest way to work is boring in the best possible way. Pull up the stock Standard EQ first. Start with a high-pass filter only when there is actually useless low junk to remove. Then listen for the range that makes the track feel cloudy, nasal, brittle, or boomy. Sweep a bell band with a temporary boost if you need help finding the problem, but once you find it, turn that move into a cut. The point of the sweep is diagnosis, not style. This is where Fender Studio Pro’s visual feedback is useful, but your ears still have to lead. The graph can help you spot build-up. It cannot tell you what the song wants.
The first big habit change is this: stop asking, “What can I add to make this track impressive?” Start asking, “What is masking the part I actually care about?” Those are not the same question. The first one feeds plugin addiction. The second one leads to a mix. A vocal may not need more 5 kHz. It may need the guitars to stop camping there. A bass may not need more low end. It may need the kick’s tubby area cut a little higher up. A piano may not need more brightness. It may need the pad to lose some haze. Mixing gets a lot easier when you realize that most clarity is relational. You are not mixing tracks. You are negotiating shared space.
The Vocal Example: Clean First, Pretty Second
Let’s start with a lead vocal, because vocals are where bad EQ choices get exposed fast. In Fender Studio Pro 8, insert the Standard EQ on the vocal before you start chasing compression, saturation, or sweetening. Listen to the vocal with the instrumental, not just soloed. If the vocal feels cloudy, look first in the low mids. Many vocals gather mud somewhere between roughly 200 Hz and 500 Hz, but the exact area depends on the singer, the mic, and the room. Use a medium bell, sweep until the “blanket” sound gets obvious, then cut just enough to make the lyric step forward. Not enough to make the vocal thin. Just enough to make it stop sitting on its own tongue. If there is real rumble or room junk below the useful body of the voice, use a gentle high-pass filter. But do not high-pass just because some tutorial told you every vocal must be rolled off at the same number. That is how you erase authority from a singer.
Next, listen for boxiness and cheap-room tone. That ugly cardboard feeling is often what makes people overboost presence later. They hear dullness, but the problem is not a lack of top end. It is a pile-up of stale midrange. Cut the congestion first. Then listen again. Only after that should you decide if the vocal truly needs additive EQ. If the top still feels closed in, try a broad, small boost up high. Small means small. Think in terms of a nudge, not a rescue mission. If the vocal gets harsh fast, back up. Remember, once you boost top end on a vocal, you are also boosting mouth noise, breaths, consonant bite, and whatever ugly thing the mic already disliked. Pretty second. Clean first.
This is where dynamic EQ becomes a grown-up move. PreSonus introduced dynamic EQ into Pro EQ3, and later articles show it being used for vocal leveling and sidechain ducking. In practical terms, dynamic EQ lets a problem frequency move only when it becomes a problem. That matters on vocals because harshness, sibilance, and nasal spikes are often not constant. They jump out on certain words. Instead of carving a permanent hole in the tone, you can set a dynamic band so the cut only happens when that range crosses a threshold. In Fender Studio Pro 8’s EQ environment, that means you can tame a pokey upper-mid bark or a sharp top-end bite without making the entire vocal sound dull. That is not cheating. That is precision.
A great working method for vocals is to do three passes. On pass one, remove obvious garbage. On pass two, reduce the broad areas that cloud clarity. On pass three, use dynamic EQ for momentary spikes. Then bypass the whole plugin and level-match it. If the processed vocal is only “better” because it is louder, you did not really win. If it sounds smaller but sits better and reads the lyric more clearly, you probably did. A lot of smart vocal EQ is slightly disappointing in solo and deeply satisfying in the full mix. Get used to that feeling. It means you are serving the song instead of auditioning plugins for applause.
The Instrument Example: Guitars, Keys, and the Fight for the Middle
Now let’s talk instruments, because this is where additive EQ can wreck a song fast. Take an acoustic guitar in a genre-neutral indie mix. It often arrives with too much boom, too much body, or too much pick clatter, depending on how it was recorded. The lazy move is to boost top for sparkle and low end for warmth until it sounds giant alone. Then the vocal disappears and the whole mix gets papery. The smarter move is subtractive. Clear any unnecessary lows first. Then listen for the cloudy low-mid area that keeps the guitar from feeling open. A small cut there can make the instrument seem brighter without touching the high shelf. If the pick attack is annoying, look for the harsh zone and trim that before reaching for air. Once again, cuts often create the illusion of boosts because removing what is in the way lets your ear notice what was already there.
Electric guitars follow the same rule, but with different consequences. Distorted guitars already contain a ton of harmonic information. Boosting them can feel satisfying for about eight seconds, then exhausting for the next three minutes. If the guitars are stepping on the vocal, try cutting a little of the vocal’s key intelligibility zone in the guitars rather than boosting the vocal into pain. If the guitar stack is eating the snare, find the barky area that keeps leaping forward and trim it. If the guitars feel fizzy, do not be afraid to low-pass them more than your ego wants. The audience does not care that your isolated guitar had “air.” They care whether the chorus hits. Subtractive EQ is often how the chorus gets to hit.
Keys and pads are another place where restraint wins. Sustained instruments can quietly fill every open crack in a mix. You do not notice it at first because they sound smooth. Then suddenly nothing else has any edges left. With pads, subtractive EQ is often about deciding what job the sound is allowed to have. Is it carrying warmth? Then maybe it does not need much top. Is it adding shimmer? Then maybe it should lose a lot of low-mid weight. Is it supporting harmony under a vocal? Then dynamic EQ can be brilliant. You can let the pad stay lush most of the time and gently duck only the vocal-sensitive ranges when the singer comes in. PreSonus has published examples of using Pro EQ3’s dynamic EQ and sidechain routing to reduce masking and prioritize a vocal, and that same logic works beautifully on dense instrument beds.
Low End: Where Good Intentions Go to Die
Bass and kick are where people get emotionally manipulated by additive EQ. Everyone wants “big.” Nobody wants “mud.” But the shortest path to mud is usually boosting low end on both sources and calling it power. Try the opposite. Figure out which source owns the true low foundation and which one speaks a little higher. Then cut the competing area on each. Maybe the kick owns the thump and the bass owns the growl above it. Maybe the bass owns the deep floor and the kick owns the point of impact. There is no universal map. But there is a universal principle: if both want all the same space, both sound weaker. Subtractive EQ turns a blob into roles.
Dynamic EQ can help here too, especially when the conflict is not constant. If the bass only covers up the kick on bigger notes, or if the kick only smears the bass on certain hits, a dynamic band can step in only when needed. That is often cleaner than carving permanent static holes. Think of it like good stage management. You do not demolish the whole set because one actor needs to cross. You move what is blocking the path when the moment arrives. Used this way, dynamic EQ sounds less like processing and more like arrangement.
Additive EQ Still Matters, But It Comes Later
Now for the part that keeps this from becoming fake minimalist dogma. Additive EQ still matters. Sometimes it matters a lot. But the best boosts usually come after the cuts have done their work. Once the mud is gone, a gentle shelf can bring breath to a vocal. Once the boxiness is trimmed, a guitar may take a little lift beautifully. Once cymbal harshness is under control, a broad top boost on the overhead bus may create excitement instead of pain. Additive EQ is often the finishing move, not the opening move. It is the stage light after the room has been cleaned.
There is also a psychological benefit here. If you always boost first, you start chasing emotional reactions. “That sounds bigger.” “That sounds brighter.” “That sounds expensive.” But bigger and better are not the same thing. If you cut first, your decisions get more honest. You hear what the source actually is. You stop asking the EQ to invent a new identity for the part. For indie artists mixing their own work, that matters. It keeps you from wasting hours polishing the wrong thing. It keeps your arrangement honest. And in practical terms, it helps you finish music faster.
The Reverb Bus: The Part Most People Leave Messy
Now let’s get to the reverb bus, because this is where subtractive EQ quietly saves mixes. Reverb is supposed to create depth and emotion, but it also loves to collect mud, smear transients, and turn lyrics into fog. Fender’s Studio Pro plugin pages describe reverb tools with tone shaping and visual feedback, and that is important because reverb is not just “more space.” It is another sound source entering your mix. Treat it like one. That means EQ it like one. Do not assume the reverb return gets a free pass because it is “just ambience.” Ambience can absolutely wreck a mix.
Start with subtractive EQ on the reverb bus itself. Eventide’s reverb guide recommends high-pass and low-pass filtering to keep the return from overwhelming the mix, and specifically notes cutting lows to keep bass tight and rolling off highs to tame sharp reflections. This is not optional in busy modern mixes. A high-pass on the reverb return can stop low-end bloom from clouding the center of the song. A low-pass can keep the tail from hissing around the edges and competing with vocal clarity. You are not making the reverb smaller. You are making it useful.
The next big lever is pre-delay. iZotope’s reverb guide explains that pre-delay offsets the signal feeding the reverb, which helps avoid muddiness and keeps the initial attack of the source clear. In plain English, pre-delay lets the dry sound speak before the room answers. That one timing move is often the difference between “lush” and “washed out.” On vocals, even a moderate pre-delay can let the lyric stay intelligible while the tail blooms behind it. On drums, a shorter pre-delay can keep punch intact. iZotope also gives practical starting ranges, like roughly 20 to 80 milliseconds for vocals and shorter values for drums, and Eventide offers a tempo-based starting formula of 7,500 divided by BPM for aligning pre-delay to the song. These are starting points, not laws, but they are useful because they force you to think of reverb as rhythm, not wallpaper.
Then there is damping, one of the most ignored controls in reverb and one of the most useful. iZotope defines damping as the absorption of high frequencies in the reverb. Lower damping keeps the high end alive longer, while higher damping makes the tail darker by letting those highs die off faster. That means damping is not the same thing as a static EQ after the reverb. It is about how the reverb decays over time. If your vocal reverb feels brittle and splashy, more damping can make it feel more expensive without changing the source vocal at all. If a guitar room sounds too dark and lifeless, less damping can help the tail stay alive. Damping is a tone decision, but it is also a depth decision. Bright long tails feel closer and more obvious. Darker tails often sit back more naturally.
Now let’s talk about EQ before versus EQ after the reverb, because they do not do the same job. EQ before the reverb shapes what enters the reverb algorithm. If you roll low end out before the send, the reverb never gets fed that mud in the first place. If you soften a harsh upper-mid edge before the send, the tail will be built from a friendlier source. This often gives you a smoother, more controlled space. EQ after the reverb shapes the return after the space has already been created. That is better for trimming what the effect produced, like excess rumble, glare, or general buildup. In practice, this means EQ before the reverb when you want to change how the room is being excited, and EQ after the reverb when you want to fit the finished tail into the mix. Use both when needed. They are not redundant. They are two different steering wheels.
A practical vocal reverb chain in Fender Studio Pro 8 might look like this. Put a gentle EQ before the reverb send to remove unnecessary lows and maybe a little harshness from the source feeding the verb. Set the reverb with enough pre-delay that the vocal still leads the moment instead of disappearing into mist. Use damping to keep the tail from turning splashy. Then insert another EQ after the reverb on the bus and high-pass it more aggressively than you think you need. Low-pass it until the tail stops pulling your attention away from the lyric. Finally, listen in the chorus, not the verse. Reverb lies in sparse sections. The chorus tells the truth.
Advanced Moves That Actually Matter
One advanced move that is worth learning is dynamic EQ on a reverb bus. Suppose your reverb sounds beautiful until the singer hits certain consonants or loud notes, then suddenly the whole return gets sharp and messy. Instead of permanently darkening the verb, use a dynamic band on the harsh zone so it only tucks down when the return gets aggressive. Same idea with low-mid buildup. If a snare plate gets too thick only on big fills, let a dynamic cut grab that area only when it blooms too much. This is how you keep motion without letting the effect run the mix. Dynamic EQ is one of those tools that feels advanced until you use it once and realize it is really just selective restraint.
Another strong move is sidechained dynamic EQ for vocal priority. PreSonus has shown Pro EQ3 being fed from a vocal sidechain so a target range ducks only when the vocal is active. You can apply that same thinking to guitars, pads, synths, even a reverb return. Instead of boosting the vocal harder and harder, you can let other elements politely move aside in the exact ranges where the lyric needs room. This is subtle, musical, and often much cleaner than extreme static EQ. It is also very indie-artist friendly because it helps you get a more finished result with stock-style tools instead of buying your way into complexity.
AI as a Learning Tool, Not a Replacement for Your Ears
AI belongs in this conversation, but not as some fantasy robot mixer that replaces judgment. Fender Studio Pro’s current feature pages describe AI-powered audio-to-note conversion and intelligent chord tools, and ChatGPT is positioned by OpenAI as a general-purpose AI assistant for learning and problem-solving. The useful role of AI in EQ is education and reflection. You can use it to build ear-training drills, create troubleshooting checklists, translate technical language into plain English, and help you document what you are hearing. That is valuable, especially for indie artists building their own engineering skills at home.
Here is the smart way to use it. After a mix session, write down what you heard in simple words. Maybe, “The vocal felt boxy and got harsh on loud words. The guitar felt full alone but buried the vocal in the chorus. The reverb sounded pretty in the verse and muddy in the hook.” Feed that to ChatGPT and ask for likely EQ zones to investigate, plus a listening checklist, not a magic preset. Then go back to the mix and confirm it with your ears. AI is great for turning confusion into a plan. It is bad at replacing context, taste, and emotional judgment. In other words, it is a good assistant and a terrible ego trip. Use it like a notebook that talks back, not like a guru.
So What Is the Real Difference?
The real difference between subtractive and additive EQ is not just cut versus boost. It is attitude. Subtractive EQ asks what does not belong. Additive EQ asks what is missing. Both questions matter. But if you start with what is missing, you can spend the whole session decorating a crowded room. If you start with what does not belong, you usually end up hearing the song more clearly and needing fewer dramatic moves later. That is why subtractive EQ so often leads to clean mixes. It is not because cutting is morally superior. It is because cutting is usually the fastest way to remove the thing that is blocking clarity, headroom, and separation.
A clean mix is not a mix with no boosts. It is a mix where every boost had to earn its way in. It is a mix where the vocal is clear because the arrangement and the EQ work together. It is a mix where the guitars feel wide without eating the middle. It is a mix where the reverb creates depth without throwing a wet blanket over the hook. It is a mix where you stopped trying to impress yourself in solo and started trying to move a listener in context. That is the whole game. And yes, it is a little rebellious, because the market loves selling “more.” More plugins. More presets. More sparkle. More thickness. More sauce. But songs rarely suffer from a lack of sauce. They suffer from a lack of decisions.
If you want one line to keep taped above your monitor, make it this: cut first, then decide if the boost is still necessary. Do that on vocals. Do that on guitars. Do that on keys. Do that on your reverb bus. Do that before compression when a problem frequency is triggering the processor the wrong way. Do that with dynamic EQ when the problem only shows up sometimes. The result is not just cleaner mixes. It is more confidence, faster decisions, and fewer moments where you mistake loudness for truth. For a working indie artist, that is not some tiny technical win. That is creative control.
 |  Spotify |  Deezer | Breaker |
 Pocket Cast |  Radio Public |  Stitcher |  TuneIn |
 IHeart Radio |  Mixcloud |  PlayerFM |  Amazon |
 Jiosaavn |  Gaana |  Vurbl | Audius |
Reason.Fm | |||
Find our Podcasts on these outlets
Buy Us a Cup of Coffee!
Join the movement in supporting Making a Scene, the premier independent resource for both emerging musicians and the dedicated fans who champion them.
We showcase this vibrant community that celebrates the raw talent and creative spirit driving the music industry forward. From insightful articles and in-depth interviews to exclusive content and insider tips, Making a Scene empowers artists to thrive and fans to discover their next favorite sound.
Together, let’s amplify the voices of independent musicians and forge unforgettable connections through the power of music
Make a one-time donation
Make a monthly donation
Make a yearly donation
Buy us a cup of Coffee!
Or enter a custom amount
Your contribution is appreciated.
Your contribution is appreciated.
Your contribution is appreciated.
You can donate directly through Paypal!
Subscribe to Our Newsletter
Order the New Book From Making a Scene
Breaking Chains – Navigating the Decentralized Music Industry

Breaking Chains is a groundbreaking guide for independent musicians ready to take control of their careers in the rapidly evolving world of decentralized music. From blockchain-powered royalties to NFTs, DAOs, and smart contracts, this book breaks down complex Web3 concepts into practical strategies that help artists earn more, connect directly with fans, and retain creative freedom. With real-world examples, platform recommendations, and step-by-step guidance, it empowers musicians to bypass traditional gatekeepers and build sustainable careers on their own terms.
More than just a tech manual, Breaking Chains explores the bigger picture—how decentralization can rebuild the music industry’s middle class, strengthen local economies, and transform fans into stakeholders in an artist’s journey. Whether you’re an emerging musician, a veteran indie artist, or a curious fan of the next music revolution, this book is your roadmap to the future of fair, transparent, and community-driven music.
Get your Limited Edition Signed and Numbered (Only 50 copies Available) Free Shipping Included
Discover more from Making A Scene!
Subscribe to get the latest posts sent to your email.


