


Unreal Engine 5.7 For Music Videos A Deep Dive Review


Making a Scene Presents – Unreal Engine 5.7 For Music Videos A Deep Dive Review
Listen to the Podcast Discussion to Gain More Insight into using Unreal Engine!
Epic Games built Unreal Engine to make video games, but that is no longer the most interesting use case. Over the last few years, Unreal has quietly become one of the most powerful tools for film, television, and music visuals. Version 5.7 continues that shift. It is not a toy, and it is not a filter. It is a real-time world-building engine that lets independent musicians create cinematic environments that used to require soundstages, location permits, crews, and serious money.
Here is the honest version. Unreal Engine is not about making one flashy music video. It is about building visual leverage. You trade time and learning for long-term control. Once you build a few worlds, they become reusable stages. One environment can power ten songs. One shoot day can feed months of content. That is the kind of leverage independent artists need if they want to stop begging algorithms for attention and start building recognizable visual identity.
Unreal Engine 5.7 matters because Epic keeps pushing the engine away from “game-only” thinking and closer to real-time cinema. Rendering is more stable. World building tools are faster. The cinematic toolset is more mature. None of this removes the learning curve, but it does make the payoff more realistic for artists who are not full-time technical directors.
This article assumes you are making 16:9 YouTube music videos, working on either Windows or Mac, and that your main workflow is rendering Unreal environments and compositing them in DaVinci Resolve. That is the sweet spot for most indie musicians right now.
Official Unreal Engine download and documentation live here:
https://www.unrealengine.com
https://docs.unrealengine.com
DaVinci Resolve can be downloaded here:
https://www.blackmagicdesign.com/products/davinciresolve
Think of Unreal as a place, not an effect
Most people struggle with Unreal because they approach it the wrong way. They treat it like a plugin, something you drop onto footage at the end to make it look cooler. Unreal does not work like that. It is not an effect you add. It is a place you build, light, and film inside. Once that mental shift clicks, Unreal stops feeling overwhelming and starts feeling logical.
A real music video shoot always starts with a location. Before a camera ever rolls, someone decides where the performance lives. Is it a huge empty warehouse with dramatic shafts of light cutting through dust? Is it a glowing digital cathedral that feels larger than life? Is it a gritty alley behind a club that feels raw and underground? Or is it a dreamlike space that shifts and reacts to the music itself? Unreal works the exact same way. You are not choosing a visual effect. You are choosing a world.
After the world exists, everything else follows the same rules as a traditional film shoot. You place cameras where a camera operator would stand. You decide how the camera moves through the space. You choose where the light comes from and what it feels like. Is it harsh and directional, or soft and ambient? Unreal will not make those decisions for you. It waits for direction. That is why two people can use the same engine and get wildly different results. One looks cheap and artificial. The other looks cinematic and intentional. The difference is not the software. It is the choices.
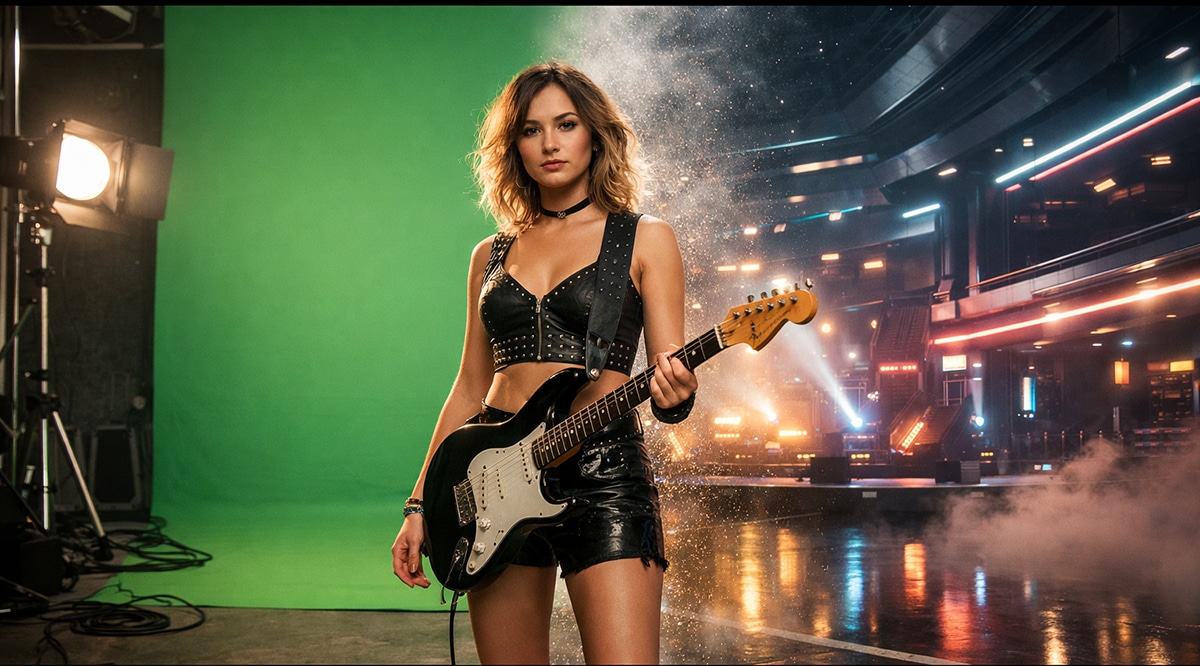
This mindset is also why Unreal pairs so naturally with green screen. Instead of shooting a performance and then desperately trying to find a background that kind of works, you flip the process. You design the environment first, with the performance in mind. Then you shoot the performer to fit that world. When the background and the performance are designed together, the composite feels cohesive instead of forced. Unreal stops being a digital trick and starts behaving like a real set that just happens to be virtual.
What actually changed in Unreal Engine 5.7 for video creators
Epic’s release notes are written for developers, not musicians, so they can feel abstract and hard to connect to real creative work. Let’s translate what Unreal Engine 5.7 actually means in practical terms for someone making music videos.
At its core, Unreal Engine 5.7 continues improving three things that directly affect your day-to-day experience: how smoothly it runs, how fast you can build worlds, and how usable it feels as a filmmaking tool. None of these sound flashy on paper, but together they make the engine far more realistic to use in a music workflow instead of just a tech demo environment.
The first major win is performance consistency. Earlier versions of Unreal 5 gained a reputation for pushing hardware extremely hard, especially when using modern systems like advanced lighting and high-detail geometry. Scenes could look incredible but feel unstable, with stutters, dropped frames, or laggy previews. That instability kills creative momentum. When the engine struggles, you stop experimenting and start second-guessing every decision. Unreal Engine 5.7 continues Epic’s effort to make complex scenes behave more predictably on real-world machines, not just high-end demo rigs. Smoother previews mean you can stay in a creative flow instead of constantly troubleshooting.
The second big improvement is world-building speed. Procedural Content Generation tools allow Unreal to help with the heavy lifting. Instead of hand-placing every building, rock, light, or background detail, you can let the engine distribute elements intelligently while you stay in control of the overall look. This does not mean giving up creative direction. It means spending less time doing repetitive setup work and more time shaping mood, composition, and emotion. For music video creators, this is huge. The faster you can block out a believable world, the more energy you have for lighting, camera movement, and storytelling.
The third and quietest upgrade is cinematic workflow polish. Tools like Sequencer, Take Recorder, and Movie Render Queue continue to move away from feeling like “game cutscene editors” and toward functioning like a real filmmaking pipeline. Timelines feel more dependable. Recording takes feels more natural. Final renders feel more intentional and professional. This is the part that does not get flashy headlines, but it is what makes Unreal viable as a serious visual production tool instead of an experimental one.
Taken together, these changes represent a slow but important shift. Unreal is becoming less about showing what is technically possible and more about supporting repeatable creative workflows. That is the real evolution musicians should pay attention to.
Release notes and documentation for current Unreal Engine versions can be found here and are worth checking as features continue to evolve:
https://docs.unrealengine.com/5.0/en-US/whats-new/
The Unreal tools musicians actually use (and can ignore the rest)
Unreal is a huge piece of software, and that is often what scares people off. The truth is you do not need most of it to make strong music videos. Unreal can do games, simulations, VR, and things you may never touch. Music video work usually lives inside a very small, focused set of tools. Once you stop trying to learn everything, Unreal becomes much more approachable.
At the center of almost all music video work is Sequencer. Sequencer is Unreal’s timeline editor, and this is where musicians usually feel the first sense of familiarity. If you understand how a DAW timeline works, you already understand the basic idea. Instead of audio tracks, you are working with cameras, lights, fog, and objects in a scene. You place keyframes over time. You build shots. You decide when things move, when they stop, and how fast or slow the visual story unfolds. Sequencer is where Unreal stops feeling like a game engine and starts feeling like a filmmaking tool.
https://docs.unrealengine.com/5.0/en-US/sequencer-in-unreal-engine/
Cine Camera Actor is Unreal’s virtual film camera, and it is one of the most important pieces of the puzzle. This camera behaves like a real one. You control focal length, depth of field, framing, and perspective. These details matter more than most beginners realize because lens choice shapes emotion. A wide lens feels intimate and immersive. A longer lens feels compressed and dramatic. Getting this right is half the battle in making Unreal footage feel cinematic instead of artificial.
https://docs.unrealengine.com/5.0/en-US/cinematic-cameras-in-unreal-engine/
Take Recorder is what turns Unreal from a technical tool into a performance-driven one. It allows you to record motion inside Unreal the same way you would record audio takes in a studio. This is not limited to animated characters. You can record camera movement as a performance, do multiple passes, and choose the take that feels right. One take might feel stiff. Another might feel rushed. One will land emotionally. That approach alone can elevate your visuals more than hours of tweaking curves by hand.
https://docs.unrealengine.com/5.0/en-US/take-recorder-in-unreal-engine/
Movie Render Queue is the final step and one of the most misunderstood. Unreal’s viewport is great for previews, but it is not meant for final output. Movie Render Queue is where you tell Unreal to slow down, focus on quality, and produce clean, professional renders. This is where lighting looks richer, motion looks smoother, and details hold up in editing and color grading. When you use Movie Render Queue, Unreal stops feeling like a real-time toy and starts behaving like a serious production renderer.
https://docs.unrealengine.com/5.0/en-US/movie-render-queue-in-unreal-engine/
Everything else in Unreal can wait. You do not need to learn Blueprints, advanced physics, AI systems, or gameplay logic to make great music visuals. Master these few tools first. They cover almost everything you need to build cinematic worlds, move a camera with intention, and render footage that holds up in DaVinci Resolve. Once these tools feel comfortable, you can expand if you want, but you do not need to in order to start creating work that looks confident and professional.
Building worlds fast without becoming a 3D artist
You do not need to model everything yourself, and trying to do that is one of the fastest ways to burn out. Modeling is its own full-time skill. Learning it well enough to build entire environments while also writing music, recording, mixing, and promoting releases is a losing game for most independent artists. The goal is not to prove you can do everything. The goal is to get strong results without exhausting yourself.
Epic now centralizes assets through Fab, which includes full environments, props, materials, and visual effects. This is where most indie musicians should start, and there is no shame in that at all. In fact, this is exactly how real studios work. They reuse assets constantly. The creative work is not in modeling every brick from scratch. The creative work is in choosing the right pieces, lighting them with intention, framing them with purpose, and making them support the music.
https://www.fab.com
Another major resource is Quixel Megascans, which provides scanned real-world materials and objects. These assets are built from real locations and surfaces, which means they carry natural imperfections that are hard to fake by hand. Using Megascans assets is one of the fastest ways to get rid of the “plastic CG” look that screams amateur. Even a simple scene can feel grounded and believable when the materials behave like the real world.
https://quixel.com/megascans
The smarter way to think about Unreal is in sets, not scenes. Instead of building a brand-new environment for every song, you build one strong environment that works from multiple angles. You design it like a stage or a film set. Then you change lighting, adjust fog, swap textures, and move the camera to create different moods. One lighting setup might feel dark and intimate. Another might feel aggressive and high-energy. Another might feel dreamy and distant. The world stays the same, but the emotion changes.
This approach is how one Unreal environment turns into ten music videos instead of one. It saves time, keeps your visuals consistent, and builds a recognizable visual identity over time. More importantly, it keeps you focused on creative direction instead of technical exhaustion. When you stop rebuilding everything from scratch, Unreal becomes a sustainable tool instead of a never-ending project.
Photorealistic versus stylized worlds (and why both matter)
Not every song wants to look real, and that is an important thing to understand before you ever open Unreal. Unreal is not locked into one visual style. It works just as well for grounded realism as it does for wild, impossible worlds. The mistake many artists make is thinking they have to chase realism because the engine can do it. You don’t. The right look depends on the song, not the software.
Photorealistic worlds work best when the music feels human, emotional, and close to real life. Think live-feeling performances, singer-songwriter tracks, roots music, soul, indie rock, or anything where the performance itself is the message. In these cases, realism helps the viewer believe what they are seeing. Lighting feels natural, like it comes from lamps, windows, or stage lights. Colors stay controlled instead of screaming for attention. Camera movement slows down and feels intentional, like someone is actually standing there filming you. These choices help the world disappear so the emotion can come forward. The goal is not to impress. The goal is to feel honest.
Stylized worlds are the opposite, and Unreal handles them just as well. These are perfect for electronic music, experimental projects, concept albums, or songs that are more about mood than realism. This is where neon colors, oversized spaces, floating architecture, glowing objects, and surreal motion make sense. You are not trying to convince the viewer that this place exists. You are inviting them into a feeling. Unreal does not care which direction you choose. The engine uses the same tools for both. What changes is your intent.
This is where most people go wrong. They mix styles without meaning to. A realistic character in a world that half follows physics and half ignores it feels confusing. A stylized neon city with one random realistic lamp feels out of place. The fix is simple but requires discipline: consistency. Every world needs rules, even dream worlds. If everything glows, decide what glows and what does not. If gravity feels strange, make it strange everywhere, not just in one shot. If colors are exaggerated, exaggerate them on purpose and across the whole scene.
Consistency is what turns visuals from “that looks cool” into “that feels like you.” When viewers recognize the rules of your world, they stop questioning the visuals and start focusing on the music. That is when Unreal stops being a gimmick and starts becoming part of your identity as an artist.
Rendering Unreal backgrounds for green screen compositing
This article focuses on rendering Unreal backgrounds and then compositing everything inside DaVinci Resolve because it is the most stable, flexible, and forgiving path for musicians. It keeps Unreal doing what it does best, which is building cinematic worlds, and it keeps Resolve doing what it does best, which is editing, compositing, and finishing video. You are not trying to force one tool to do everything. You are letting each tool stay in its lane, and that alone removes a lot of frustration.
The workflow itself is simple once you understand the roles. Inside Unreal, your job is to build an environment and decide how the camera experiences it. You create a world, place a camera, and animate a camera move that lasts anywhere from ten seconds to the full length of the song. Shorter camera loops are often smarter because they can be reused across multiple videos, teasers, and social clips without feeling repetitive. You are not trying to tell the whole story with movement. You are creating a visual space that supports the performance.
After the camera move is set, you bring the world to life with subtle animation. Lights slowly shift or pulse. Fog drifts. Reflections move. Nothing needs to be dramatic. Small changes are what make the environment feel alive instead of frozen. Think of it like stage lighting at a live show. The crowd may not notice each individual light move, but they feel the atmosphere it creates.
When the scene feels right, you render the background using Movie Render Queue. This is where Unreal stops being a real-time tool and becomes a serious production renderer. You choose a high-quality output, usually either an image sequence or a high-bitrate video file, depending on how much storage space you have and how comfortable you are managing files. The goal here is clean, detailed footage that will hold up during color grading and compositing later.
Once the render is complete, you bring it into DaVinci Resolve and treat it like any other video clip. From this point on, Unreal steps out of the way. Resolve becomes the place where you edit the song, composite your green screen footage, balance color, and shape the final look. Unreal is no longer a “video effect.” It becomes your virtual location department. DaVinci Resolve becomes your editor, colorist, and finishing suite. When you think about it this way, the entire process feels less technical and more like a traditional film workflow, just without the crew and the permits.
Shooting green screen that actually works
Bad green screen almost never comes down to the software. It is almost always a planning and setup problem. No plugin, no AI tool, and no fancy keyer can fix footage that was poorly lit or badly shot. The good news is that clean green screen does not require expensive gear. It requires intention.
The green screen itself needs to be lit evenly, from edge to edge. That means no bright hot spots and no dark corners. The screen should look boring on camera. Flat, smooth, and consistent is exactly what you want. Your performer should not be lit by those same lights. You need separate lighting for the person and the screen so you can control each one independently. This is where Unreal comes into the picture. If the main light in your Unreal environment comes from the left, your real-world key light should also come from the left. When the lighting direction matches, the composite immediately feels more believable, even before any color grading.
Distance is another detail that makes a huge difference. The closer you stand to the screen, the more green light bounces onto your skin, clothes, and hair. This is called spill, and it is what makes people look muddy or outlined after keying. By standing farther away from the screen, you reduce that spill and make the key cleaner. You also reduce shadows, which are another common source of trouble.
Camera settings matter more than most people realize. Auto exposure and auto white balance are designed for convenience, not compositing. As you move or gesture, the camera can subtly change brightness or color, which makes the green screen shift from frame to frame. That shift forces the keyer to chase a moving target. Lock your exposure and white balance so the image stays consistent from start to finish.
If you handle these basics before you ever hit record, DaVinci Resolve does not need to perform miracles. Its keying tools work best when the footage is predictable and clean. When the planning is right, pulling a solid key feels almost effortless, and the focus stays on the performance instead of fixing problems later.
Compositing Unreal backgrounds in DaVinci Resolve
DaVinci Resolve is ideal for this workflow because it keeps everything in one place. Editing, compositing, and color grading all live inside the same project, which means you are not bouncing files between apps or locking decisions too early. For musicians, this matters because you are often refining visuals while listening to the song over and over. Resolve lets you shape the picture with the same kind of flexibility you expect from a DAW.
The basic setup is simple. You import your Unreal render and place it on the timeline as your background layer. This is your virtual location. Then you place your green screen footage on a layer above it. Using Resolve’s keyer, you remove the green and reveal the Unreal environment behind you. At this stage, the composite will usually look “okay” but not believable yet. That is normal. The real work happens in the matching.
Color and contrast are what sell the illusion. You adjust the performer and the background so they feel like they were captured by the same camera in the same space. If the background is dark and moody but your footage is bright and clean, the layers will fight each other. You bring them into balance by matching overall brightness, contrast, and color tone.
Resolve’s color page is where this comes together. You start by matching black levels so the darkest parts of the image sit at the same depth. Then you match highlights so bright areas feel consistent instead of pasted on. Small adjustments go a long way here. Once the levels match, you add subtle finishing touches like a bit of grain, a hint of softness, or slight color texture. These imperfections are important because real cameras are not perfect. They help the performer feel embedded in the world instead of cut out and floating on top of it.
If you want to go deeper, Blackmagic provides excellent official training that walks through Resolve’s tools step by step, from editing to color grading and compositing. The documentation and training materials are available here and are well worth the time:
https://www.blackmagicdesign.com/products/davinciresolve/training
Making Unreal shots feel human, not robotic
The fastest way to spot amateur Unreal work is camera movement that feels too perfect. The motion is smooth, precise, and technically correct, but emotionally empty. Real cameras do not move like that. Even on professional film sets, cameras drift slightly, hesitate for a beat, and adjust as the operator reacts to the moment. Those tiny imperfections are what make motion feel alive.
When every camera move is built purely with keyframes, the result often feels mechanical. The timing is exact, the curves are clean, and nothing ever feels surprised. That might look impressive at first, but it quickly starts to feel fake, especially in a music video where emotion matters more than technical accuracy.
The fix is to treat camera movement like a performance instead of a calculation. Unreal gives you this option through Take Recorder. Instead of plotting every move by hand, you record camera motion the way a person would actually move it. You push in a little slower than planned. You drift past your mark and correct. You pause because the music tells you to pause. You let instinct guide the motion.
You do not need to nail it in one pass. You record a few takes, just like tracking vocals or guitar. One take might feel too stiff. Another might feel messy. One will feel right. You keep that one and throw the rest away. This approach instantly makes Unreal shots feel more human because they are human.
This single habit can upgrade your visuals more than any advanced effect, expensive asset, or complicated lighting setup. When the camera feels alive, the entire world feels alive.
Where AI generative tools fit without breaking your workflow
AI video tools are excellent at one thing: exploration. They can generate ideas, textures, motion, and visual moods faster than any human team. Where they struggle is consistency and control. Ask them to repeat the same look across a full song, hit exact beats, or keep a visual identity stable from shot to shot, and things start to fall apart. That is not a flaw. It is just how generative systems work.
The mistake most artists make is using AI at the very end of the process and expecting it to behave like a traditional video editor. That is when frustration sets in. The smarter move is to use AI upstream, before you commit to final visuals. Think of AI as a sketchbook, not a finishing tool.
This is where tools like Runway shine. You can use Runway to generate abstract textures, animated backgrounds, motion loops, or even rough concept frames that capture a feeling. You are not looking for perfection. You are looking for inspiration and raw material. These outputs become visual ingredients, not the finished meal.
https://runwayml.com
Once you have those ingredients, you bring them into Unreal. A generated texture can become a glowing wall material. A motion loop can be mapped onto screens inside a virtual stage. A concept frame can guide how you light and dress an environment. Unreal gives those ideas structure. It lets you lock camera movement, lighting direction, scale, and timing so the visuals stay consistent across an entire song or project.
In this workflow, Unreal becomes the system that turns generative chaos into repeatable visuals. AI helps you explore possibilities quickly and without fear. Unreal helps you make decisions and commit to them. Used together this way, AI stops being unpredictable and starts becoming a powerful creative partner instead of a wildcard.
Hardware reality for Windows and Mac users
Unreal does run best on modern Windows machines with dedicated GPUs, and there is no point pretending otherwise. That said, a lot of musicians work on Macs, and that does not disqualify you from using Unreal. It just means you need to approach it with realistic expectations and smarter planning instead of brute force.
The most important mindset shift is understanding that Unreal does not have to run at full quality all the time. While you are building scenes, you can work at lower preview settings so the engine stays responsive. You save the high-quality settings for final renders. This is no different from working on a rough mix and only worrying about polish at the end. Rendering overnight is a normal part of the process, not a failure.
You also do not need massive open worlds to make cinematic visuals. Music videos are about framing and intention, not scale. If the camera never sees beyond a small area, there is no reason to build anything bigger. A controlled set that looks great from a few planned angles will always beat a huge environment that barely runs and never gets used fully.
If your machine starts to struggle, the solution is almost always simplification, not upgrades. Reduce the number of dynamic lights. Use fog carefully instead of everywhere. Keep particle effects subtle. Limit how much of the environment is visible at once. These choices do not make your visuals worse. They make them more focused.
Cinematic does not mean big, dense, or complex. It means intentional. When every element in the frame has a purpose, even a modest system can produce visuals that feel polished, professional, and expressive.
Licensing and money questions
Unreal’s licensing sounds intimidating at first, but for most independent musicians it is far simpler than the internet makes it seem. The key thing to understand is that Epic looks at what you are shipping, not what tool you used to make it. Rendering video is very different from shipping interactive software, and that distinction matters.
When you use Unreal to build environments and render music video backgrounds, you are using it as a production tool, the same way you would use a camera, a DAW, or a video editor. You are not selling a game. You are not distributing an app that runs Unreal code on someone else’s device. You are exporting finished video files. In that scenario, Unreal is essentially free for indie artists. Epic only requires royalty payments from companies that cross a very high revenue threshold, currently over one million dollars in annual gross revenue. Most independent musicians are nowhere near that line, and if you ever are, it means your project is already wildly successful.
This is why so much fear around Unreal licensing is misplaced. Forum posts often mix together rules for game developers, enterprise software, and interactive products, then apply them to music videos, which leads to confusion. For a typical indie artist making YouTube videos, Unreal functions like a zero-cost, high-end production engine.
That said, licensing terms can change, and edge cases exist. The smart move is always to read Epic’s official licensing page yourself and match it to what you are actually releasing, not what someone online thinks applies. Epic lays out the rules clearly when you go to the source.
Epic’s official Unreal Engine licensing overview is here:
https://www.unrealengine.com/en-US/license
Do not rely on forum hearsay or secondhand summaries. Read the current license, understand your use case, and move forward with confidence. For most indie musicians using Unreal to render music video visuals, licensing is not a barrier. It is one of the few truly powerful tools in this space that does not demand money upfront just to let you create.
Unreal as a long-term visual system, not a one-off trick
The real power of Unreal is not about making one impressive video. It is about reuse. Once you understand that, the value of the engine changes completely. Unreal is not just a tool for visuals. It is a system for building long-term visual identity.
You build a stage once. That stage might be a club, a warehouse, a digital landscape, or something entirely imagined. For the next song, you do not rebuild it. You light it differently. You change the color palette. You adjust the fog. You move the camera in a new way. The same environment suddenly feels like a different place, even though it is built from the same foundation. With a few texture swaps or lighting changes, one world can support an entire era of music.
Over time, this creates something much bigger than a single video. It creates a visual universe that fans start to recognize. They may not consciously think about it, but they feel it. Your visuals begin to look connected. Releases feel like chapters instead of random posts. That kind of continuity is what major artists spend huge money to achieve with sets, locations, and creative teams.
This is how independent artists compete visually without spending like majors. You do not outspend them. You out-system them. Instead of starting from zero every release, you build a reusable visual foundation and refine it over time. Each new song gets easier. Each new video gets stronger. Unreal stops being a production expense and starts becoming creative infrastructure.
Final reality check
Unreal Engine 5.7 is not a shortcut to fame. It will not save a weak song, and it will not magically clarify an artistic vision that has not been thought through. No piece of software can do that. Music still has to connect. The message still has to be real. The performance still has to matter.
What Unreal does do is remove excuses. You no longer need access to expensive locations, large crews, or someone else’s permission to create something visually ambitious. You are not limited to what you can afford to rent or what happens to be nearby. You can build worlds that actually match the emotion and identity of your music instead of settling for whatever location happens to be available that day.
This is the quiet revolution Unreal brings to independent musicians. It shifts control over place, image, and repetition back into your hands. You decide where your music lives visually. You decide how often that world appears. You decide how it evolves over time. When you control those things, visuals stop being a bottleneck and start becoming part of your creative language.
Once you experience that level of control, it is very hard to go back. Not because Unreal is flashy, but because it lets you create with intention instead of compromise.
 |  Spotify |  Deezer | Breaker |
 Pocket Cast |  Radio Public |  Stitcher |  TuneIn |
 IHeart Radio |  Mixcloud |  PlayerFM |  Amazon |
 Jiosaavn |  Gaana |  Vurbl | Audius |
Reason.Fm | |||
Find our Podcasts on these outlets
Buy Us a Cup of Coffee!
Join the movement in supporting Making a Scene, the premier independent resource for both emerging musicians and the dedicated fans who champion them.
We showcase this vibrant community that celebrates the raw talent and creative spirit driving the music industry forward. From insightful articles and in-depth interviews to exclusive content and insider tips, Making a Scene empowers artists to thrive and fans to discover their next favorite sound.
Together, let’s amplify the voices of independent musicians and forge unforgettable connections through the power of music
Make a one-time donation
Make a monthly donation
Make a yearly donation
Buy us a cup of Coffee!
Or enter a custom amount
Your contribution is appreciated.
Your contribution is appreciated.
Your contribution is appreciated.
You can donate directly through Paypal!
Subscribe to Our Newsletter
Order the New Book From Making a Scene
Breaking Chains – Navigating the Decentralized Music Industry

Breaking Chains is a groundbreaking guide for independent musicians ready to take control of their careers in the rapidly evolving world of decentralized music. From blockchain-powered royalties to NFTs, DAOs, and smart contracts, this book breaks down complex Web3 concepts into practical strategies that help artists earn more, connect directly with fans, and retain creative freedom. With real-world examples, platform recommendations, and step-by-step guidance, it empowers musicians to bypass traditional gatekeepers and build sustainable careers on their own terms.
More than just a tech manual, Breaking Chains explores the bigger picture—how decentralization can rebuild the music industry’s middle class, strengthen local economies, and transform fans into stakeholders in an artist’s journey. Whether you’re an emerging musician, a veteran indie artist, or a curious fan of the next music revolution, this book is your roadmap to the future of fair, transparent, and community-driven music.
Get your Limited Edition Signed and Numbered (Only 50 copies Available) Free Shipping Included
Discover more from Making A Scene!
Subscribe to get the latest posts sent to your email.


