


Blending Reality and AI: Using Green Screen to Build Modern Music Videos


Making a Scene Presents – Blending Reality and AI: Using Green Screen to Build Modern Music Videos
Listen to the Podcast Discussion to gain More Insight on Green Screen Video
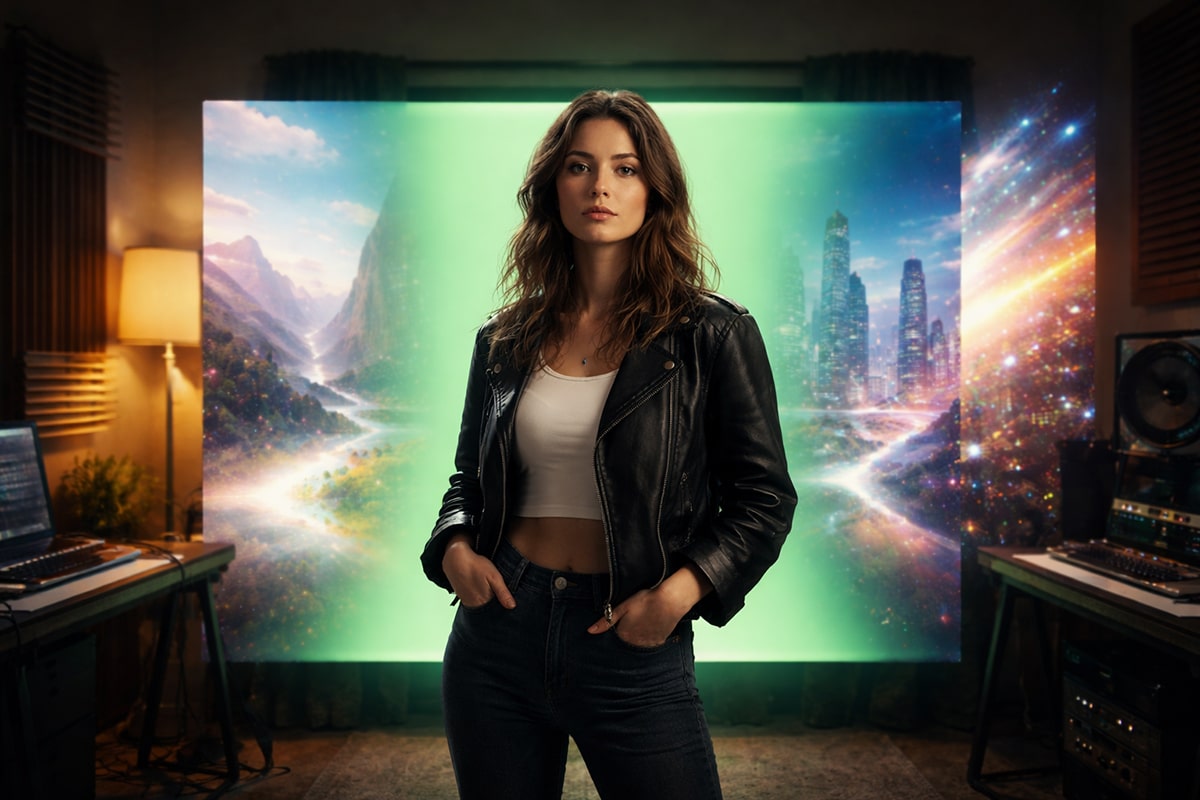
If you’re an indie artist working from home, green screen might sound like something left over from old Hollywood movies. It can feel outdated, expensive, or disconnected from the way modern AI video works. That assumption couldn’t be more wrong. Green screen is actually one of the most important tools you can pair with AI today, especially if you want your music videos, branding visuals, and short-form content to look cinematic without burning money on locations, crews, travel, or permits.
At its simplest level, green screen is about control. When you shoot in front of a green background, you are separating yourself from the space around you. That means you don’t have to decide where the video “takes place” while you’re filming. You can make that decision later. AI works in a very similar way, except it creates environments digitally instead of physically. When you combine these two ideas, something powerful happens. You stop chasing real-world locations and start designing worlds that serve the song, the brand, and the moment. For independent musicians who have been told for years that professional visuals require money, connections, or label backing, this is a real shift in power.
This article is written specifically for DIY artists working at home. You don’t need film school. You don’t need a big crew. You don’t need to know fancy industry terms. What you do need is a clear understanding of how these tools work together and how to use them in a simple, repeatable way. We’ll break down where green screen came from, how and why it works, how to light it correctly so it actually looks good, and how to use common editing software to remove the background cleanly. From there, we’ll connect those skills to modern AI video tools and show how they fit into real-world music video creation and marketing workflows.
The bigger idea here isn’t just making one cool video. It’s about building a system you can reuse over and over. One shoot can turn into many different worlds. One performance can become a full music video, short vertical clips, teasers, and branded visuals. Instead of constantly starting from scratch, you’re creating a flexible setup that puts you in control of how you show up visually. One artist. One setup. Many possibilities.
A Short History of Green Screen (And Why It Never Went Away)
Green screen didn’t start with YouTube, TikTok, or social media. It goes back almost a hundred years to the early days of filmmaking. Long before computers existed, filmmakers were already trying to place actors into worlds that couldn’t be filmed in real life. They did this with painted backdrops and a technique called “traveling mattes,” which allowed parts of an image to be masked out and replaced with something else. In the very early days, black backgrounds were used. Later, blue became more popular because film stock could separate blue more cleanly than other colors.
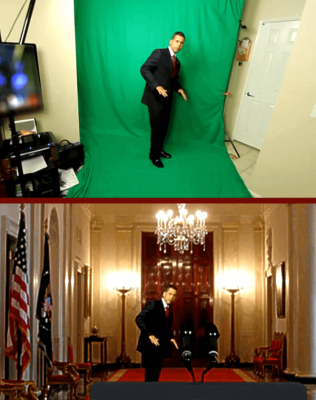
When digital video came along, green replaced blue as the standard. Digital cameras can “see” green with more detail than any other color, and human skin almost never contains pure green. That combination makes green easier for software to recognize and remove. The basic idea behind green screen is simple. You film a person in front of a color that doesn’t appear anywhere else in the shot. The software looks for that color, removes it, and leaves everything else behind. If you’ve ever watched a weather forecast on TV, you’ve already seen this in action. The meteorologist isn’t standing in front of a map at all. They’re standing in front of a green wall, and the weather graphics are placed behind them in real time.
The most important thing to understand is that green screen has always been about separating the subject from the space they’re in. That idea hasn’t changed. AI hasn’t replaced it. It has made it more powerful. AI-generated environments are really just modern versions of those old painted backdrops, with one major difference. They can move, shift, react, and change style instantly. Hollywood still relies heavily on green screen, and so do big-budget streaming shows, even if you don’t always notice it. Indie artists should care for one simple reason. The exact same technique works just as well in a bedroom studio as it does on a soundstage. The scale changes, but the principle stays the same, and that puts a professional-level tool directly in your hands.
Understanding Keying in Plain Language
 Keying can sound technical and intimidating at first, but the basic idea is actually very simple. A keyer is just a tool that looks for one specific color in your video and makes that color transparent. That’s all it does. When you use a green screen, the software finds the green and removes it. Everything that isn’t green stays exactly where it is. Once you understand that, keying stops feeling like magic and starts feeling like a practical editing step.
When people have trouble with green screen, it’s rarely because the software isn’t good enough. Modern editing programs are very capable. The problem almost always starts during filming. Uneven lighting on the green screen creates lighter and darker shades of green, which confuses the keyer. Wrinkles in the fabric create shadows that look like different colors. Green light bouncing off the screen and onto your skin or clothes, called spill, makes parts of you blend into the background. All of these issues make it harder for the software to know what should disappear and what should stay.
A good way to think about keying is to imagine cutting someone out of a photo with scissors. If the background is smooth and clean, the cut is easy and the edges look natural. If the background is cluttered, wrinkled, or full of shadows, the cut looks jagged and sloppy. Your goal when shooting green screen is to make that edge as clean as possible before you ever open your editing software. The better the footage looks going in, the less the software has to guess.
This becomes even more important when you plan to place yourself into AI-generated environments. AI backgrounds often have bold lighting, movement, and detailed textures. They look polished and intentional. If your key is messy, it will stand out immediately against those clean, dramatic visuals. A bad key draws attention to itself. A good key does the opposite. When it’s done right, the viewer doesn’t think about green screen at all. You simply look like you belong in the world you’re standing in.
Choosing a Green Screen That Actually Works at Home
You don’t need a professional studio or a curved cyclorama wall to get good green screen results. What you actually need is much simpler: a flat surface that’s one solid, even color. Fabric green screens work perfectly fine as long as you take the time to pull them tight. Wrinkles might not seem like a big deal, but they create shadows, and shadows create different shades of green. Different shades of green make the key harder and less clean.
Painted walls can also work very well, especially in a home setup. The key is using matte paint and applying it evenly. Glossy or semi-gloss paint reflects light, which creates bright spots and uneven color. Those reflections turn into trouble later when the software tries to remove the background. A dull, flat green surface is exactly what you want because it stays consistent under light.
Portable pop-up green screens are a good option if you’re short on space, but size matters. You need extra room around your body so the software can clearly see what is green and what is you. If your hands, hair, or shoulders get too close to the edge of the screen, the key becomes harder to control and can start eating into your image. Giving yourself some breathing room makes everything easier.
Distance is another important factor that beginners often overlook. The more space you can put between yourself and the green screen, the better your results will be. When you stand too close, green light reflects off the screen and spills onto your skin or clothing. This is called green spill, and it can make parts of you disappear or look strange after keying. Even stepping three or four feet forward can dramatically reduce this problem and give you a cleaner, more professional-looking result.
Lighting a Green Screen the Right Way (This Is Where Most People Mess Up)
 Lighting is the real secret to making green screen work. More than the camera. More than the software. The green screen and the subject need to be treated as two separate things. That’s the rule. The green screen needs even, boring light. You, on the other hand, need lighting that creates shape, mood, and style.
Start by lighting the green screen itself. Use soft, diffused light so the color stays smooth and consistent from edge to edge. LED panels are great for this because they spread light evenly and don’t generate much heat. Place the lights at angles so they wash across the screen instead of blasting it straight on. You’re not trying to make the green screen bright. You’re trying to make it uniform. Dark corners, bright hot spots, or uneven patches all turn into problems later when you try to remove the background.
Once the screen is evenly lit, move on to lighting yourself. This is where you can think like a music video director instead of a technician. You can use dramatic shadows, colored lights, or high-contrast setups to match the emotion of the song. The only hard rule is that green light should never hit you. Any green reflection on your skin or clothes makes the key harder and less clean.
Backlighting plays a big role here. Placing a light behind you and aiming it at your shoulders or hair creates a thin outline of light around your body. This is called a rim light, and it helps separate you from the background. It makes the edges cleaner and instantly adds a more cinematic look. If you notice green light reflecting onto your skin, take a step forward or block the light. Something as simple as a piece of black fabric, cardboard, or foam board can stop the spill. That small adjustment can save you hours of frustrating cleanup once you start editing.
Camera Settings That Make Keying Easier
You don’t need an expensive cinema camera to get good green screen results, but you do need clean, reliable footage. The quality of what you shoot directly affects how easy the key will be later. Always record in the highest quality your camera allows. Higher quality means more color information and fewer compression artifacts. Heavy compression breaks the image into blocks and smears colors together, and that makes it harder for the keyer to clearly separate the green from everything else.
If your camera allows it, use manual exposure instead of automatic settings. Auto exposure can change brightness in the middle of a take if you move or gesture, which causes the green background to shift slightly in color. Even small shifts can confuse the keyer and create flickering or uneven edges. Locking your exposure keeps the green consistent from start to finish.
Depth of field is another area where simple choices help a lot. If you’re new to green screen, avoid shooting with a very blurry background. While shallow depth of field looks cinematic in normal footage, it makes green screen harder because the software has to deal with soft, uneven color. Keeping enough focus so the green stays solid and clear will give you much cleaner results. Once you’re more experienced, you can experiment, but starting simple will save frustration.
Finally, think about how the footage will be used. Shoot horizontal if you’re creating a full music video. Shoot vertical if the goal is short-form content like reels or stories. You can even do both in one session by planning ahead, framing your shots so they work in multiple formats. That way, one shoot gives you everything you need for long-form videos and ongoing marketing without starting over.
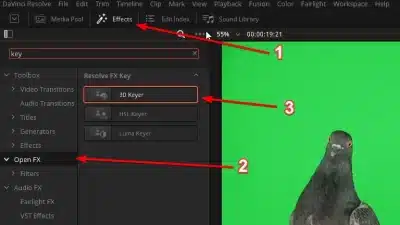
Keying in DaVinci Resolve for DIY Artists
 DaVinci Resolve is one of the best tools available to indie artists because the free version is genuinely powerful. You’re not getting a watered-down demo or a limited trial. You can do real, professional-level green screen work without spending a dollar, which makes it perfect for artists working from home who want results without subscriptions piling up.
Resolve includes several different keying tools, but the Delta Keyer is the one most people use for green screen work. The process itself is very straightforward once you understand what’s happening. You tell the software which color you want to remove, usually by clicking on the green screen. Then you refine the edges so hair, hands, and clothing look natural instead of jagged. After that, you clean up the matte, which simply means making sure the background is fully transparent and your subject stays solid. The interface can look intimidating at first, but the logic is simple. You are guiding the software on what should disappear and how clean the transition should be between you and the background.
One of Resolve’s biggest strengths is how it handles color. You can color correct your footage before you even apply the key, which helps make the green screen more even and easier to remove. After the key is done, you can then color grade yourself separately to match whatever AI-generated environment you’re placing behind you. This is a huge advantage because it lets you blend into the scene instead of looking pasted on top of it. This kind of before-and-after workflow is exactly how professionals work on larger productions, and Resolve gives you access to that same approach at home.
If you want to get started, you can download DaVinci Resolve directly from Blackmagic Design at
https://www.blackmagicdesign.com/products/davinciresolve
Using Keyers in Adobe Premiere and Final Cut Pro
If you’re already working in Adobe Premiere Pro, you don’t need to switch tools to handle green screen. Premiere includes an effect called Ultra Key, and for most indie music videos and short-form content, it does exactly what you need. The workflow is simple and fast. You sample the green screen color, adjust how the matte is generated, clean up any green spill that hits your skin or clothing, and refine the edges so they look natural. You’re not fighting the software. You’re just guiding it.
One of Premiere’s strengths is how well it connects with After Effects. If you ever want deeper control, more advanced masking, or layered visual effects, you can move your shot over without rebuilding everything. That said, most artists never need to go that far. For performance-based music videos, branding visuals, and social clips, Ultra Key is more than capable when the footage is shot cleanly.
Adobe Premiere Pro is available here:
https://www.adobe.com/products/premiere.html
Final Cut Pro takes a slightly different approach, but the results can be just as good. Apple built its keyer to be fast and user-friendly. You apply the keyer, select the green background, and then adjust a small set of sliders to clean things up. It doesn’t feel as technical as some other tools, which can be a good thing if you want to move quickly and stay focused on the creative side. Despite the simpler interface, the keying quality is strong and works very well for home studio setups.
Final Cut Pro is available here:
https://www.apple.com/final-cut-pro/
The most important thing to understand is that all three editors follow the same basic logic. They’re all doing the same job: identifying the green and removing it. If your footage is clean, evenly lit, and well shot, all of these tools will give you solid results. If the footage is messy, none of them can fully save it. The software matters far less than the preparation. Clean footage in almost always means a clean key out, no matter which editor you use.
Creating AI-Generated Environments for Backgrounds
This is where the process really opens up creatively. Once your green screen footage is cleanly keyed, you’re no longer locked into the space where you filmed. You can place yourself into almost any world you can imagine. At that point, your performance becomes flexible, and the environment becomes a creative choice instead of a limitation.
One of the most practical tools for this right now is Runway. Runway allows you to generate AI video backgrounds or extend existing scenes, which makes it especially useful for music videos and branding visuals. Instead of a static image behind you, you can create environments that move, shift, and feel alive. These backgrounds can be abstract, cinematic, surreal, or dreamlike, depending on the style of the song. Once generated, you can export the video clips and drop them directly into your editor, whether that’s DaVinci Resolve or Adobe Premiere, just like any other piece of footage.
Runway is available at https://runwayml.com
Sora represents where AI video environments are heading. It focuses on generating more complex scenes with realistic motion, depth, and continuity. As access becomes more widespread, tools like this will give artists the ability to build entire narrative worlds that evolve throughout a song, not just looping backgrounds. For artists interested in storytelling and cinematic music videos, this kind of technology will be a game changer.
Gemini plays a different but still important role. Right now, it’s especially useful for planning and ideation. You can use it to think through visual concepts, refine prompts, sketch out storyboards, and map the emotional arc of a video before you ever generate footage. That planning step helps you stay intentional instead of randomly generating visuals and hoping something works.
The key idea tying all of this together is simple. AI environments are just layers. They function like digital backgrounds. Once you understand how green screen works, AI stops feeling complicated. You’re no longer learning a completely new system. You’re just swapping one background for another. At that point, AI becomes plug-and-play, and your creative options expand dramatically without adding complexity to your workflow.
In this video they use AI generated backgrounds and green screen to place the artist in those scenes
Matching Yourself to the AI World
One of the biggest mistakes artists make when combining green screen with AI is placing themselves into an AI-generated scene without matching the lighting and color. Even if the key itself is technically clean, your brain will instantly sense when something feels wrong. Humans are very good at spotting visual inconsistencies, especially with light. If the lighting on you doesn’t match the lighting in the background, the illusion breaks right away.
Before you even start editing, take a close look at the AI background you plan to use. Notice where the light appears to be coming from. Is it coming from the side or straight on? Is it warm and golden, or cool and blue? Does it feel soft and diffused, or sharp and dramatic? If you can, try to match that lighting direction and style when you shoot yourself on the green screen. Doing a little planning up front can save a lot of fixing later.
If you can’t match the lighting perfectly during the shoot, color grading becomes your best friend. This is where DaVinci Resolve really shines. Its color tools let you adjust contrast, brightness, temperature, and saturation so you blend into the AI environment instead of floating on top of it. You’re not trying to make yourself look “better” in isolation. You’re trying to make yourself look like you belong in that world.
Small details make a big difference here. Adding a subtle shadow beneath your feet or behind your body can help anchor you to the scene. Even a soft, slightly blurred shadow can trick the eye into believing you’re standing on the ground instead of hovering in space. It’s a tiny step, but it dramatically improves realism and helps the final image feel cohesive and intentional.
Using AI Video in the Foreground with Keying
This is where the workflow really starts to evolve creatively. You don’t always have to be the main subject in the foreground. Sometimes, the most interesting results come from flipping that idea around and using AI-generated video as a layer on top of real footage. Instead of placing yourself into an AI world, you let AI elements interact with the real world you already filmed.
The same keying principles still apply. If you generate AI video that has a solid background or strong contrast, you can remove parts of it just like you would with a green screen. Once keyed, those AI elements can float, pulse, or move over your original footage. This opens the door to a wide range of creative effects, like animated textures drifting across the frame, abstract shapes responding to the music, ghosted duplicates of yourself moving in slow motion, or streaks of animated light that wrap around your performance.
This approach works especially well for lyric videos, visualizers, and ongoing branding content. Because you’re layering elements instead of building full environments every time, you can develop a consistent visual style that repeats across your videos. Fans start to recognize the look before they even hear the song. That kind of visual consistency is powerful for building identity.
The technique itself hasn’t changed. You’re still keying, layering, and blending footage. What changes is the mindset. You’re no longer just placing yourself into different worlds. You’re merging real and artificial elements together in a way that feels intentional and expressive. Instead of choosing between reality and AI, you’re blending them into a single visual language that belongs to you.
Shooting Once, Creating Many Videos
This is where indie artists really gain an advantage. With green screen and AI working together, you can film a single performance and reuse it across multiple visual worlds. Instead of treating every video as a separate project, you’re creating a piece of content that can live in many forms. One well-planned shoot can turn into a full-length music video, vertical clips for social media, short teasers, background visuals for live shows, and even looping visuals for branding or streaming platforms.
The key is intention. You’re not performing the song over and over, hoping one take works for each platform. You’re performing it once with focus and purpose, knowing that the environment can change later. That shift alone saves time, energy, and burnout. It also keeps your performance consistent, which helps your visuals feel connected across different formats.
This is how small teams start thinking like studios. Studios don’t rely on constant reshoots. They build systems that let them get the most value out of each production day. For indie artists, this approach isn’t about cutting corners or taking shortcuts. It’s about working smarter, creating repeatable workflows, and building a sustainable way to show up visually without exhausting your creativity or your budget.
Using Green Screen and AI for Branding and Short-Form Content
Short-form content and green screen are a natural fit. When you use green screen, you don’t need to change locations or set up a new shoot every time you want to post something. You can react, point, walk, or even just stand still, and completely change the world around you from one clip to the next. The performance stays simple, but the visuals stay dynamic.
This approach helps your brand stay visually consistent without becoming boring. Even as the backgrounds change, your face, your movement, and your presence remain familiar. Over time, fans stop focusing on where you are and start recognizing you. That kind of recognition is far more valuable than constantly chasing new locations or visual gimmicks.
It also saves a huge amount of time. Instead of scrambling to film new footage for every post, you build a small library of clean, reusable performances. From there, you’re not just making content, you’re designing it. You choose the environment, the mood, and the message after the fact, which gives you more flexibility and far less stress.
Final Thoughts: This Is About Ownership
Green screen and AI working together give indie artists something the traditional music industry was never comfortable handing over: real control. You get to decide how you look on screen. You get to decide where your music lives visually. You get to decide how often you show up and how consistent that presence is. None of that depends on budgets, gatekeepers, or outside approval anymore.
This isn’t about replacing reality or pretending the real world doesn’t matter. It’s about choosing your reality intentionally. You decide when to use real spaces and when to design new ones. You decide how your visuals support the song instead of fighting it. That kind of choice is powerful, especially for independent artists who have been told for years that they had to work within someone else’s system.
Once you understand how green screen works, AI stops feeling overwhelming or mysterious. It becomes just another instrument in your creative setup. Another studio tool you can reach for when you need it. Another way to tell your story on your own terms, without waiting for permission. From there, it’s not hard to imagine what comes next. We can build a simple, step-by-step shoot-day workflow designed specifically for indie artists, or create a reusable green screen system that feeds music videos, short-form marketing clips, and long-term branding from a single setup.
 |  Spotify |  Deezer | Breaker |
 Pocket Cast |  Radio Public |  Stitcher |  TuneIn |
 IHeart Radio |  Mixcloud |  PlayerFM |  Amazon |
 Jiosaavn |  Gaana |  Vurbl | Audius |
Reason.Fm | |||
Find our Podcasts on these outlets
Buy Us a Cup of Coffee!
Join the movement in supporting Making a Scene, the premier independent resource for both emerging musicians and the dedicated fans who champion them.
We showcase this vibrant community that celebrates the raw talent and creative spirit driving the music industry forward. From insightful articles and in-depth interviews to exclusive content and insider tips, Making a Scene empowers artists to thrive and fans to discover their next favorite sound.
Together, let’s amplify the voices of independent musicians and forge unforgettable connections through the power of music
Make a one-time donation
Make a monthly donation
Make a yearly donation
Buy us a cup of Coffee!
Or enter a custom amount
Your contribution is appreciated.
Your contribution is appreciated.
Your contribution is appreciated.
You can donate directly through Paypal!
Subscribe to Our Newsletter
Order the New Book From Making a Scene
Breaking Chains – Navigating the Decentralized Music Industry

Breaking Chains is a groundbreaking guide for independent musicians ready to take control of their careers in the rapidly evolving world of decentralized music. From blockchain-powered royalties to NFTs, DAOs, and smart contracts, this book breaks down complex Web3 concepts into practical strategies that help artists earn more, connect directly with fans, and retain creative freedom. With real-world examples, platform recommendations, and step-by-step guidance, it empowers musicians to bypass traditional gatekeepers and build sustainable careers on their own terms.
More than just a tech manual, Breaking Chains explores the bigger picture—how decentralization can rebuild the music industry’s middle class, strengthen local economies, and transform fans into stakeholders in an artist’s journey. Whether you’re an emerging musician, a veteran indie artist, or a curious fan of the next music revolution, this book is your roadmap to the future of fair, transparent, and community-driven music.
Get your Limited Edition Signed and Numbered (Only 50 copies Available) Free Shipping Included
Discover more from Making A Scene!
Subscribe to get the latest posts sent to your email.


