

Recording Vocals at Home: From Living Room to Radio-Ready


Making a Scene Presents – Recording Vocals at Home: From Living Room to Radio-Ready
Listen to the Podcast Discussion to gain more insight into Recording Vocals in your Home Studio
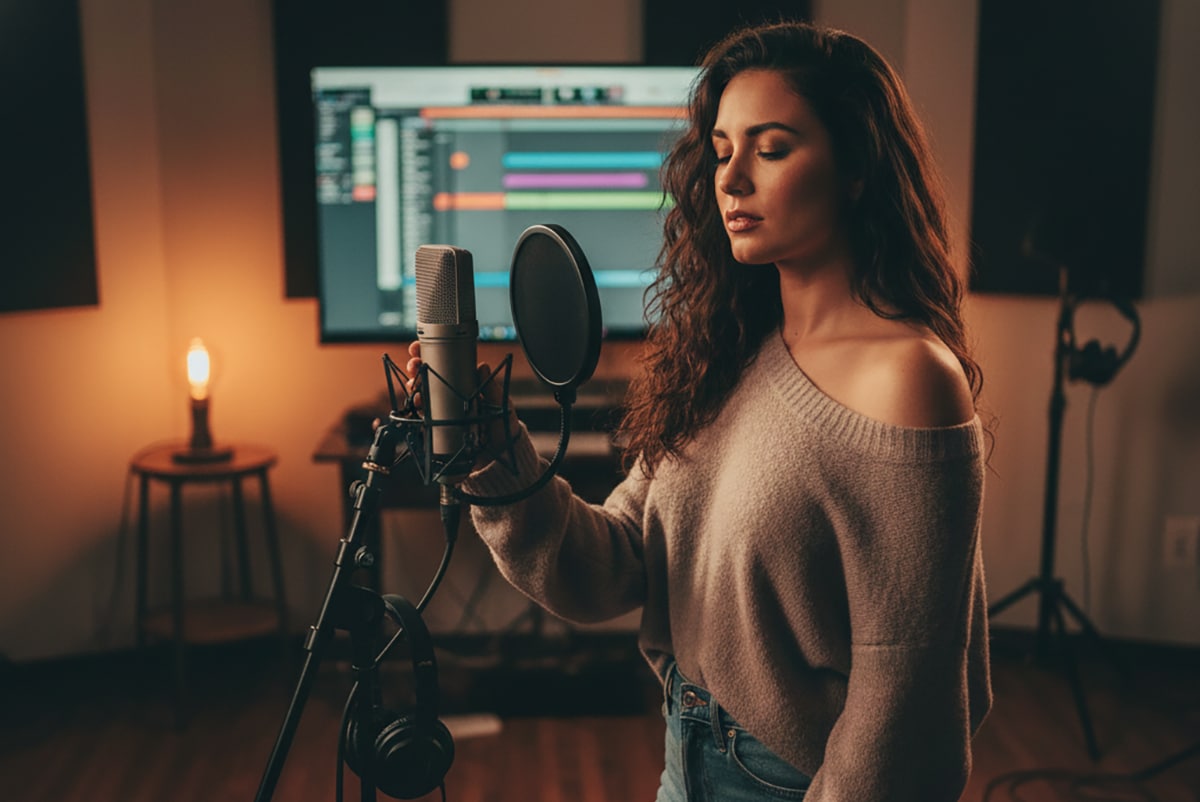
Recording vocals at home used to feel like settling. You’d stand in a bedroom or living room, sing into a mic, and then hope the computer could “fix it” later. That old approach is done. These days, an indie singer with a normal room, a few smart choices, and good habits can record vocals that sit right next to commercial releases without sounding out of place. Not because home gear is some kind of magic cheat code, but because the real process of making great vocal recordings is finally available to everyone.
This article is about capturing a vocal the right way at the source, meaning at the moment you sing it. Not perfect. Not over-polished. Just correct and usable. When the recording is clean and controlled, everything that happens after becomes easier. Mixing takes less time, costs less money, and feels less like a desperate rescue mission. “Radio-ready” vocals are not created by expensive studios alone. They come from controlled sound in the room, a clean signal path from mic to computer, and a performance that feels confident and real.
We’re going to go through this step by step using PreSonus Studio One Pro as the example DAW. Studio One Pro is a great teaching tool because it mirrors how modern studios work while keeping the workflow clear and visual. But nothing in this article is locked to one program. If you use a different DAW, the ideas still apply. The concepts matter far more than where the buttons live.
This is written for singers who are brand new to recording, singers who have tried before and felt disappointed by the results, and singers who are tired of being sold the same lazy answer over and over. You do not need “better plugins.” You need better recordings. Once you start recording with intention, your vocals stop sounding like home demos and start sounding like finished records waiting for a final polish.
The Vocal Recording Mindset: Performance Comes First
Before we touch a microphone, we need to clear out one bad idea that ruins more home recordings than cheap gear ever will. Recording vocals is not about chasing a perfect take. It is about capturing a performance that feels real and believable. A vocal that connects emotionally will always matter more than one that is technically flawless but lifeless. Listeners forgive small flaws. They do not forgive boredom.
Home studios make this harder because they put the singer under a microscope. When you are recording at home, there is no control room, no engineer behind glass, and no sense of separation between you and the technology. You see every meter move. You hear every breath. You become hyper-aware of your voice in a way that almost never happens on stage. That pressure causes singers to push too hard, sing louder than they should, and tense their bodies without realizing it. The result is a strained performance that sounds nervous, thin, or aggressive, even if the notes are technically correct.
Commercial studios are designed to protect singers from that headspace. The lights are low. The room is soft and quiet. The singer cannot see the screen or the meters. They are encouraged to focus inward instead of outward. That environment is not about luxury. It is about psychology. Comfort creates confidence, and confidence creates better performances.
Your job in a home studio is to recreate that feeling as best you can. This does not require expensive renovations or special gear. It requires intention. Lower the lights so the room feels less exposed. If staring at the DAW makes you self-conscious, turn the screen away or close your eyes while singing. Place the microphone at a height and distance that feels natural to sing into, not something that makes you feel like you are being interrogated by equipment. The mic should feel like a partner, not a threat.
Treat your warm-up like you would before a live show. Do not rush straight into recording cold vocals. Take a few minutes to loosen your voice, breathe deeply, and settle into the song. When you start recording, give yourself permission to make mistakes. Do not stop every time something feels off. Keep singing. Emotion often lives in the take you almost deleted.
This is where working in PreSonus Studio One Pro becomes a real advantage. Studio One Pro’s loop recording and comping tools allow you to sing the same section multiple times without breaking your focus. You can stay in the performance, let the song unfold naturally, and worry about choosing the best moments later. Instead of stopping and restarting, you stay connected to the emotion of the song. You can learn more about Studio One Pro at https://www.presonus.com.
The most important truth to remember is this. A relaxed singer recorded cleanly in a simple home setup will always sound better than a tense singer recorded through expensive gear. Technology does not create emotion. It only captures what you give it. When you feel comfortable, grounded, and confident, the microphone hears that. And that is what makes a vocal feel finished before any plugin is ever added.
Choosing the Right Microphone Without Going Broke
Microphone choice is where confusion spreads fastest, mostly because it is wrapped in myth and marketing. Many singers believe they need the exact microphone their favorite artist used, or that a higher price automatically means a better vocal. Neither of those ideas is true, especially in a home studio. What actually matters is whether a microphone works with your voice and behaves predictably in a small, untreated or lightly treated room. A great mic for one singer can sound wrong on another, and a great mic in a million-dollar studio can sound awful in a bedroom if it is the wrong type.
Most vocals today are recorded with large-diaphragm condenser microphones because they are sensitive and detailed. They capture the breath, the tone, and the small emotional changes in a singer’s voice. That sensitivity is a gift when the microphone is well designed. It becomes a problem when it is not. Many very cheap condenser microphones sound harsh, brittle, or thin because they exaggerate high frequencies and lack a solid midrange. They often make vocals sound sharp and tiring instead of warm and present. In a home studio, that harshness gets even worse because the mic also picks up room reflections and noise.
This is where companies like Warm Audio have changed the game for indie artists. Warm Audio focuses on building microphones inspired by classic studio designs that have proven themselves over decades of real recordings. Instead of chasing hype or flashy features, they focus on tone, balance, and musicality, and they do it at prices working musicians can realistically afford.
The WA-87 R2 is a strong example of this approach. It is based on one of the most widely used vocal microphones in recording history, but it is not priced like a museum piece. What makes this mic useful at home is not just how it sounds, but how it behaves. The top end is smooth instead of sharp, which helps avoid harsh “S” sounds. The midrange is solid, which allows vocals to sit in a mix without sounding thin or weak. That balance makes it forgiving in small rooms and reliable across different vocal styles. You can explore the WA-87 R2 and other Warm Audio microphones at https://www.warmaudio.com.
The WA-47 Jr offers a different flavor that many singers prefer, especially voices that feel bright or edgy on other microphones. It has a fuller low end and a softer top, which helps vocals feel grounded and natural instead of hyped. One of its strengths is how it reacts to distance. As you move closer or farther from the mic, the tone changes in a musical way instead of falling apart. This makes it easier for singers to find a comfortable position without constantly fighting the sound. Another important advantage is that it does not exaggerate bad room acoustics as aggressively as ultra-cheap condensers, which is a major win in home recording situations.
Dynamic microphones deserve a quick but honest mention. A microphone like the SM7B from Shure is famous for rejecting room noise and background reflections, which sounds appealing for home studios. The tradeoff is that it requires a lot of clean gain to work properly. Many beginner interfaces struggle to provide that gain without adding noise, which leads to frustration and weak recordings. For most home vocal setups, a condenser microphone paired with a clean, decent preamp is simply easier to manage and more forgiving.
The most important takeaway here is not loyalty to a brand or model. It is consistency and familiarity. Choose one solid microphone that fits your budget and your voice, and then spend time learning it. Pay attention to how it sounds when you sing softly, when you sing loud, when you step closer, and when you step back. The better you understand how your microphone responds, the less you will fight it, and the more confident your recordings will become. That confidence is what turns a decent vocal into a professional one, long before any plugin ever touches it.
Understanding Distance and Why It Changes Everything
Mic distance is one of the most powerful and overlooked tools you have as a singer, and it does not cost a single dollar. Long before plugins, microphones, or expensive rooms, distance is what shapes how your voice hits the recording. The problem is that most singers are never taught what mic distance actually does. They are either right on top of the microphone because they think closer means better, or they pull back too far because they are afraid of sounding harsh. Both approaches create problems when used without intention.
When you sing very close to the microphone, your voice sounds larger and deeper because of something called proximity effect. This is a natural behavior of most directional microphones, especially large-diaphragm condensers. As you move closer, the low frequencies are boosted, which can make a vocal feel intimate, warm, and powerful. Used carefully, this is a beautiful tool for emotional or quiet performances. The downside is that it also magnifies everything else. Breath noise becomes louder. Plosive sounds from letters like P and B hit harder. Mouth clicks and lip noise suddenly feel front and center. If you stay too close for too long, the vocal can quickly turn muddy and overwhelming, especially in a mix.
When you step farther back from the microphone, the sound changes in the opposite direction. Your voice becomes more open and natural, and the low-end buildup relaxes. This can be great for louder singers or more dynamic performances. The tradeoff is that the microphone now hears more of the room. In a professionally treated studio, that room sound adds depth and space. In most home studios, it adds boxiness, echo, or a hollow tone that is hard to remove later. This is why distance and room treatment are always connected decisions.
A reliable starting point for most singers is about six to eight inches from the microphone. At this distance, you get clarity without excessive low-end buildup, and the microphone stays focused on your voice instead of the room. Placing the mic slightly above mouth level and angling it down toward you is another small adjustment that makes a big difference. This position helps soften harsh consonants and reduces the force of direct air hitting the microphone capsule. It also encourages better posture and more relaxed breathing while you sing.
From there, you adjust based on what you hear, not on rigid rules. If the vocal sounds thin or lacks body, move a little closer. If it feels boomy, muddy, or overly aggressive, take a small step back. These changes do not need to be dramatic. An inch or two can completely reshape the sound.
Working in PreSonus Studio One Pro makes this learning process easier because you can record short test takes, listen back immediately, and compare them without breaking your creative flow. Record the same line at different distances and listen carefully to how the tone changes. This trains your ears and builds confidence far faster than reading settings or copying someone else’s setup. You can learn more about Studio One Pro at https://www.presonus.com.
The real goal is not to memorize a distance number. The goal is to understand the relationship between your voice and the microphone. Once you feel how distance affects tone, clarity, and emotion, you stop guessing and start choosing. That is when your recordings begin to sound intentional instead of accidental.
Pop Filters Are Not Optional
If you record vocals without a pop filter, you are making a choice to fight avoidable problems later in the process. Plosive sounds like P, B, and even some hard T sounds create fast bursts of air that shoot straight out of your mouth. When that air hits the microphone capsule directly, it causes a low-frequency thump that has nothing to do with your voice. It is not tone. It is air pressure. Once that sound is recorded, it becomes part of the vocal track, and there is no clean way to remove it without hurting the vocal itself. EQ can thin the voice. Editing can make the performance sound unnatural. No plugin truly fixes plosives without tradeoffs.
A pop filter solves this problem before it ever reaches the microphone. Placed a few inches in front of the mic, it acts like a soft barrier that breaks up fast air blasts while letting sound pass through naturally. Instead of one hard gust hitting the capsule, the air is diffused and slowed down. That simple physical step protects the mic and keeps the low end of the vocal clean and controlled.
A pop filter also helps in a less obvious but equally important way. It gives you a physical reference point. When the filter stays in one place and your mouth stays behind it, your distance to the microphone stays consistent. That consistency is a huge part of why professional vocals sound smooth and balanced. When your distance stays steady, the tone stays steady. The mix engineer does not have to fight sudden changes in volume, bass buildup, or harshness from one line to the next. Even if you are mixing your own vocals later, you are making your job much easier.
Pop filters are one of the most affordable tools in a vocal setup, and they all do essentially the same job. A basic mesh pop filter is more than enough for professional results. This is not an area where spending more money improves the sound in a meaningful way. It is an area where using the tool at all makes the difference. Being practical here pays off every time you hit record, and it removes a whole category of problems before they ever start.
Building a Vocal Chain That Works
Let’s slow this down and talk clearly about what actually happens to your voice from the moment you sing to the moment it appears on your screen. This path is called the signal chain, and understanding it removes a huge amount of confusion and fear for singers who are new to recording. Once you understand this flow, the gear stops feeling mysterious and starts feeling manageable.
Everything begins at the microphone. Your voice hits the mic and is converted into an electrical signal, but that signal is extremely quiet. On its own, it is far too weak to be recorded properly. This is where the preamp comes in. The preamp’s job is to boost that tiny signal up to a usable level without changing its tone or adding noise. Think of the preamp like a clean magnifying glass. It should make the sound bigger without making it uglier.
After the signal is amplified by the preamp, it needs to be turned into digital data so your computer can understand it. That job belongs to the audio interface. The interface converts the analog signal into digital audio and sends it into your DAW, in this case PreSonus Studio One Pro, where it gets recorded and saved as a vocal track.
Here’s the good news. Affordable audio interfaces today are far better than what professional studios had access to not that long ago. You do not need exotic or expensive hardware to capture clean, professional vocals. Companies like MOTU, Universal Audio, and PreSonus build interfaces with clean preamps, reliable converters, and stable drivers that work day after day. An interface like the MOTU M2 or a PreSonus Studio series interface is more than capable of handling professional vocal recordings when used correctly.
Standalone preamps can add another layer of tone if you choose to use them, but they are not required. Companies like Warm Audio offer preamps such as the WA-12 that are designed to add subtle character and weight without sacrificing clarity. When used gently, these can make a vocal feel a little fuller or more forward. The key word is gently. A preamp should enhance the sound, not overpower it. Many great vocal recordings are made every day using only the built-in preamps on a good interface.
The most important concept in this entire chain is gain staging. Gain staging simply means setting your levels correctly at each step so the signal stays clean from start to finish. When recording vocals, your loudest singing moments should peak somewhere around minus ten to minus six decibels inside Studio One Pro. That range gives you headroom, which is extra space that prevents distortion and keeps the sound open and natural. If your meters are constantly hitting the top or turning red, you are recording too hot.
This is where another common myth needs to die. Louder is not better. Recording louder does not make your vocal sound more professional. It only increases the risk of distortion and makes mixing harder later. Clean recordings with plenty of headroom are easier to shape, easier to mix, and far more forgiving. When in doubt, turn the gain down slightly. You can always make a clean vocal louder later. You cannot fix distortion once it is baked in.
Compression While Recording: Use Less Than You Think
This is one of the places where bad advice causes real, permanent damage to home recordings. Many beginners are told they need to compress vocals heavily while recording in order to sound “professional.” That advice comes from old commercial studio workflows that do not translate well to modern home setups. In large studios, engineers used compression on the way in because they knew exactly how the singer would behave, they trusted their rooms, and they were recording to formats with limited headroom. None of that matches the reality of most home studios today.
Compression works by reducing dynamic range. In simple terms, it makes loud parts quieter and quiet parts louder. That can be useful, but it comes with a serious warning. Once compression is recorded into the vocal, it cannot be undone. If you push it too hard while tracking, you permanently flatten the performance. The natural rise and fall of your voice, the emotional push in a chorus, the intimacy of a quiet line, all of that can get crushed into something lifeless. No plugin later can restore dynamics that were never captured.
This is especially risky for singers recording themselves. When you are performing and engineering at the same time, it is very easy to overdo compression without realizing it. You may think it sounds controlled in the moment, but later it feels small, choked, or dull. What you actually compressed was the emotion, not just the volume.
If you choose to use compression while recording, it should be extremely gentle. The goal is not to shape the sound or make it exciting. The goal is simply to prevent occasional loud peaks from jumping out. A slow attack allows the natural punch of the voice to come through. A medium release lets the compressor recover smoothly between phrases. Only a few decibels of gain reduction on the loudest moments is enough. If you see the compressor working constantly, you are already doing too much.
Some modern interfaces offer built-in DSP compression that runs before the signal hits your computer. Interfaces from Universal Audio are especially well known for this feature. Used carefully, it can be helpful. Used aggressively, it causes the same problems as any other heavy tracking compression. Even with high-end tools, subtlety always wins.
If there is any doubt in your mind, the safest and smartest move is to record without compression at all. Modern DAWs give you more flexibility than engineers ever had in the past. PreSonus Studio One Pro includes excellent stock compressors that you can apply after the performance is captured. At that stage, you can listen objectively, adjust settings calmly, and undo anything that does not serve the song. You are no longer guessing while trying to sing.
The truth is simple. A clean, dynamic vocal recording gives you options. A heavily compressed vocal takes options away. Control can always be added later. Emotion cannot.
DIY Vocal Booths That Actually Work Long Term
You do not need to build a permanent vocal booth or tear apart your room to get professional results, but you absolutely do need to control reflections. This is one of the most misunderstood parts of home recording. When you sing in a room with bare walls, sound leaves your mouth, hits those walls, and bounces right back into the microphone a split second later. The mic does not know which sound came first. It captures both. That is what creates vocals that sound boxy, hollow, or like they are trapped inside a cardboard tube. No plugin truly fixes that after the fact.
The goal in a home studio is not isolation. You are not trying to block outside noise like traffic or neighbors. The real enemy is reflections inside the room. That is why absorption matters more than almost anything else. Absorption means soaking up sound energy before it can bounce back into the microphone. When reflections are reduced, the mic hears more of your voice and less of the room, and the vocal instantly sounds closer, clearer, and more professional.
This is where long-term DIY solutions shine. Heavy moving blankets, thick curtains, and proper acoustic foam all work because they absorb sound instead of reflecting it. You do not need to cover every surface. Strategic placement makes a massive difference. Treat the area behind the microphone first, because that is where your voice is headed. Add absorption to the side walls near the mic, and suddenly the vocal tightens up in a way that feels almost magical the first time you hear it.
Foam By Mail is a trusted resource for affordable acoustic foam that actually does what it claims. Their foam is used in everything from home studios to professional spaces, and it is designed to absorb mid and high frequencies where vocal problems usually live. One of the biggest advantages is that their products can be mounted without permanent damage, which matters if you are recording in an apartment or shared space. You can explore their options at https://www.foambymail.com.
A simple setup goes a long way. Foam panels placed behind the microphone help stop reflections from bouncing straight back into the mic. Blankets or curtains on nearby side walls reduce flutter and slap echo. A rug under your feet absorbs reflections from hard floors that most people never think about. Even ceilings can contribute to ugly reflections, especially in low rooms, so overhead treatment can help if the space feels especially boxy.
Closets filled with clothes are another surprisingly effective solution. Clothing absorbs mid and high frequencies naturally, which is why closet vocals often sound tighter than vocals recorded in open rooms. This is not a gimmick. It is physics. Fabric breaks up sound energy and prevents it from returning to the microphone.
These approaches are not temporary hacks or beginner shortcuts. Many professional voiceover artists, podcasters, and singers work this way every single day. They focus on controlling reflections instead of chasing perfect rooms. When absorption is done correctly, the microphone stops fighting the space, and your vocal immediately feels more controlled, more intimate, and easier to mix. That is the sound people describe as “studio quality,” and it is far more achievable than most singers realize.
What you hear in your headphones while recording has a direct impact on how you sing, whether you realize it or not. Monitoring shapes performance. If your headphones exaggerate bass, your voice may feel too big and heavy, causing you to hold back or under-sing. If they exaggerate highs, your voice can feel thin or sharp, which often makes singers push harder to compensate. That extra pushing changes your tone, your breathing, and your pitch, even though nothing about your actual voice has changed. The problem is not your singing. It is what you are hearing.
This is why neutral monitoring matters so much during recording. You do not want headphones that hype the sound or make everything feel exciting. You want headphones that tell the truth. When what you hear is balanced and natural, you sing more naturally. Your dynamics settle. Your pitch improves. Your tone stays consistent from line to line because you are no longer fighting a distorted version of your own voice.
Closed-back headphones are the best choice for recording vocals because they keep the headphone sound from leaking back into the microphone. Open-back headphones may sound more spacious, but they allow click tracks, backing vocals, and music to bleed into the mic, especially during quiet passages. That bleed becomes a problem later, even if you cannot hear it clearly in the moment. Comfort also matters more than people admit. If the headphones clamp too hard or feel heavy, your body tenses up, and that tension shows up in your voice. Choose something comfortable, balanced, and reliable. You do not need excitement. You need honesty.
Latency is another silent performance killer. If there is a delay between when you sing and when you hear yourself, even a small one, your brain has to work harder to stay in time. Many singers instinctively pull back or sing behind the beat to compensate, which drains energy and confidence from the performance. Modern DAWs solve this problem when used correctly.
PreSonus Studio One Pro includes low-latency monitoring options that allow you to hear yourself in real time while recording. When this is set up properly, the vocal feels immediate and connected, the way it does when you sing live. Use it. The difference in performance is not subtle. When timing feels solid and the sound responds instantly, singers relax, phrasing improves, and confidence returns. That confidence is audible, and it is one more step toward vocals that feel finished before mixing ever begins.
Multiple Takes and Vocal Comping Explained Simply
Professional vocals are almost never a single perfect take from start to finish, no matter how effortless they sound. What you hear on records is usually built from multiple performances that capture different moments of emotion, tone, and energy. This process is called comping, short for composite, and it is one of the most important techniques in modern vocal recording. Understanding this alone can completely change how you approach recording at home.
Even artists known for intimate, raw-sounding vocals rely heavily on comping. Billie Eilish is a great example. Her vocals often sound close, emotional, and almost conversational, which leads people to assume they are single takes. In reality, many of her performances are carefully comped together from multiple passes. The goal is not perfection. The goal is preserving emotion while choosing the moments where that emotion lands most clearly. Comping allows singers to give their best without the pressure of having to be flawless in one uninterrupted performance.
This is where working in PreSonus Studio One Pro becomes especially powerful. Studio One Pro makes comping simple by allowing you to loop a section of a song and record several takes back to back. You stay in the performance instead of constantly stopping, resetting, and second-guessing yourself. That continuity matters. When you keep singing, your body relaxes and your phrasing becomes more natural.
Each take should be treated as a complete performance, even if you know there are small mistakes. Do not stop because you missed a word or cracked slightly on a note. Keep going. Often the emotional shape of a line is more important than technical precision. A take with a small flaw but strong feeling is far more valuable than a sterile, over-controlled performance. Later, when you are listening back calmly, you can choose the strongest moments from each pass and combine them into one cohesive vocal.
This approach removes a huge amount of pressure from the recording process. You are no longer trying to “win” the song in one shot. You are collecting options. That mindset shift alone helps singers relax, take risks, and deliver more honest performances. Instead of chasing perfection in the moment, you focus on communication. The result is vocals that feel confident, expressive, and finished, even before any mixing or effects are applied.
Comping is not a trick or a shortcut. It is how professional vocals are made, from bedroom studios to major releases. When used well, it does not make a vocal feel artificial. It makes it feel human, intentional, and emotionally consistent from start to finish.
Common Myths That Hold Singers Back
Let’s be direct and clear about this, because a lot of singers are held back by ideas that simply are not true. You do not need a five-thousand-dollar microphone to record professional vocals. You do not need to sing louder to sound more powerful or more “pro.” You cannot fix a bad recording with plugins, no matter how expensive or advanced they are. And you do not need a perfect room before you are allowed to start recording. Those beliefs stop more artists than lack of talent ever does.
What actually matters is control, consistency, and patience. Commercial studios do not succeed because they own magical gear. They succeed because they control variables. The room behaves the same way every session. The microphone stays in the same position. Levels are set carefully. Performances are recorded without rushing. When something works, it gets repeated. That repeatability is what creates reliable results.
You can apply that exact mindset at home. Use the same microphone placement each time so your tone stays consistent. Control reflections so the room stops changing the sound from take to take. Set your levels once and resist the urge to chase louder meters. Give yourself time to record multiple takes instead of trying to force a perfect one. None of this requires expensive equipment. It requires intention.
This is where many home recordings fail. Not because the artist lacks gear, but because the process changes every time. One day the mic is closer. The next day it is farther away. One day the singer is pushing. The next day they are holding back. When nothing stays consistent, improvement feels impossible. When you lock down the basics, progress becomes obvious.
The truth is simple and empowering. You do not need permission, perfection, or premium gear to start sounding professional. You need a repeatable setup, a calm approach, and the patience to let your skills grow. Control what you can. Stay consistent. Trust the process. That is how home recordings stop sounding like demos and start sounding like finished records.
The Final Truth About Radio-Ready Vocals
Radio-ready does not mean your vocal has been scrubbed until it sounds like a robot. It does not mean every breath is removed, every emotion is flattened, and every line is squeezed into the same volume. Radio-ready means the vocal is clear enough that people understand every word, controlled enough that it sits in the track without jumping out in weird places, and emotionally believable enough that it feels like a real human talking to you through the song. The best vocal recordings still sound alive. You hear tiny shifts in tone. You hear the breath before a line. You feel the energy change between verses and choruses. That movement is not a mistake. That is the point.
This is why “polished to death” often backfires. When singers over-edit, over-compress, and over-tune, they usually remove the very details that made the performance connect in the first place. The vocal becomes technically neat but emotionally empty. People might not know why it feels wrong, but they feel it. A vocal that is slightly imperfect but emotionally honest will almost always land harder than one that is perfectly cleaned up but lifeless.
The good news is that home studios are no longer the weak link. The gear is good. The software is powerful. The knowledge is everywhere. The weak link is rushing. Rushing the setup. Rushing the performance. Rushing the takes. Rushing the decision-making. When you rush, you record tense vocals in a messy room at levels that are too hot, and then you spend hours trying to “fix it” later. That is backwards. Real professional results come from slowing down at the start so you do not have to fight the track later.
If you focus on performance first, learn how your microphone reacts to your voice, treat your space so reflections stop coloring the sound, and record cleanly into PreSonus Studio One Pro, you are already working at a professional level. At that point, everything after recording becomes refinement instead of rescue. Mixing becomes shaping and enhancing, not damage control. That is the difference between a home demo and a record that can stand next to commercial releases.
And if you want to go one level deeper, we can absolutely walk through a real-world vocal session from start to finish, step by step, using Studio One Pro exactly the way an engineer would. We would cover physical setup, mic placement, headphone mix, low-latency monitoring, take structure, comping, and how to know when you actually have “the take” without second-guessing yourself to death.
 |  Spotify |  Deezer | Breaker |
 Pocket Cast |  Radio Public |  Stitcher |  TuneIn |
 IHeart Radio |  Mixcloud |  PlayerFM |  Amazon |
 Jiosaavn |  Gaana |  Vurbl | Audius |
Reason.Fm | |||
Find our Podcasts on these outlets
Buy Us a Cup of Coffee!
Join the movement in supporting Making a Scene, the premier independent resource for both emerging musicians and the dedicated fans who champion them.
We showcase this vibrant community that celebrates the raw talent and creative spirit driving the music industry forward. From insightful articles and in-depth interviews to exclusive content and insider tips, Making a Scene empowers artists to thrive and fans to discover their next favorite sound.
Together, let’s amplify the voices of independent musicians and forge unforgettable connections through the power of music
Make a one-time donation
Make a monthly donation
Make a yearly donation
Buy us a cup of Coffee!
Or enter a custom amount
Your contribution is appreciated.
Your contribution is appreciated.
Your contribution is appreciated.
You can donate directly through Paypal!
Subscribe to Our Newsletter
Order the New Book From Making a Scene
Breaking Chains – Navigating the Decentralized Music Industry

Breaking Chains is a groundbreaking guide for independent musicians ready to take control of their careers in the rapidly evolving world of decentralized music. From blockchain-powered royalties to NFTs, DAOs, and smart contracts, this book breaks down complex Web3 concepts into practical strategies that help artists earn more, connect directly with fans, and retain creative freedom. With real-world examples, platform recommendations, and step-by-step guidance, it empowers musicians to bypass traditional gatekeepers and build sustainable careers on their own terms.
More than just a tech manual, Breaking Chains explores the bigger picture—how decentralization can rebuild the music industry’s middle class, strengthen local economies, and transform fans into stakeholders in an artist’s journey. Whether you’re an emerging musician, a veteran indie artist, or a curious fan of the next music revolution, this book is your roadmap to the future of fair, transparent, and community-driven music.
Get your Limited Edition Signed and Numbered (Only 50 copies Available) Free Shipping Included
Discover more from Making A Scene!
Subscribe to get the latest posts sent to your email.


