
What Actually Matters When Building a Home Recording Studio


Making a Scene Presents – What Actually Matters When Building a Home Recording Studio
A no-BS guide for indie artists who want results, not gear lust
Listen to the Podcast Discussion to gain more insight into Building your Home Studio
Let’s be honest. Most home recording studios fail long before the first note is ever recorded. Not because the artist lacks talent. Not because the gear is cheap or outdated. They fail because the studio was built around shopping instead of decision-making. Money gets spent before the purpose is clear, and gear piles up without a plan for how it will actually be used.
Social media doesn’t help. Instagram studios look polished and impressive, but a good-looking room doesn’t tell you if the recordings coming out of it are any good. YouTube walkthroughs sound confident, but confidence on camera doesn’t equal experience in real sessions. Gear ads promise “pro sound” in a box, as if great records come from purchases instead of process. None of that answers the questions that really matter. Can you capture a strong performance without fighting the setup? Can you actually hear what you’re doing when you mix? And do you enjoy being in the space enough to come back to it day after day?
A real home recording studio is not a flex or a photo opportunity. It’s a working system. It’s a system designed to help you make music consistently, clearly, and without friction. When a studio works, you stop thinking about the gear and start thinking about the music. That’s the point.
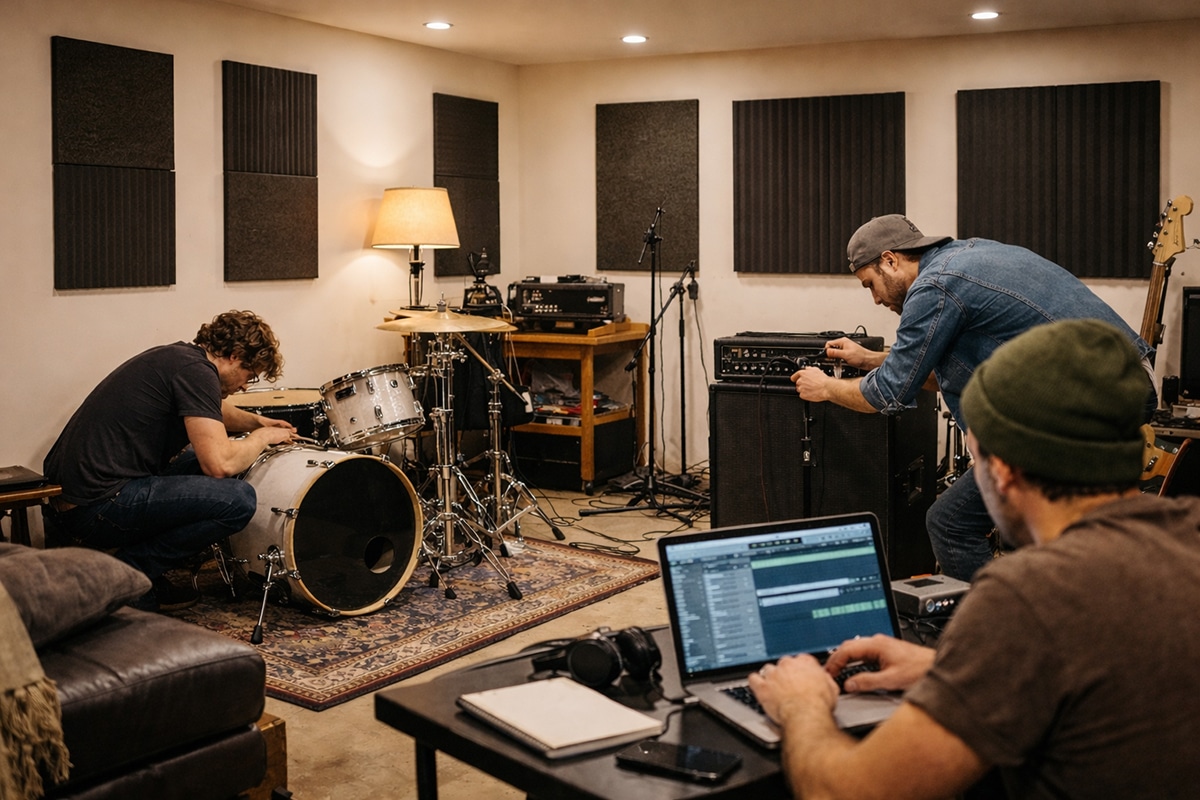
Whether you’re an indie singer-songwriter recording in a bedroom, a band rehearsing and tracking in a basement, or a full group recording live in a garage, the fundamentals stay the same. The room still shapes the sound. Monitoring still determines what you hear. Workflow still affects creativity. The only thing that changes is scale. Bigger spaces need more inputs and more planning, but the underlying principles never change.
This article is here to cut through the noise. No hype. No brand worship. No false promises. Just a clear look at what actually affects recording quality and workflow, and what you can control right now to build a studio that works instead of one that just looks impressive.
The Room Is the Studio (Everything Else Is Secondary)
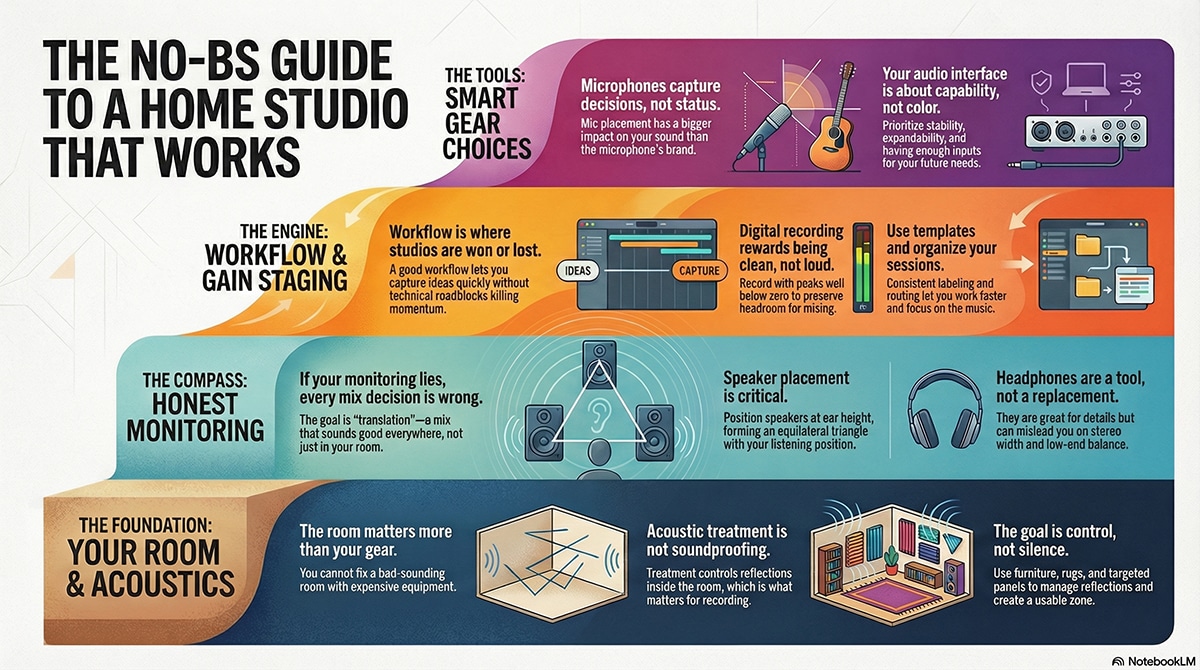
If there is one truth that upsets people early on, it’s this: the room matters more than your gear. You can record great music on modest tools in a controlled room. You cannot fix a bad room with expensive equipment.Every sound you record is shaped by the space it exists in. When you sing or play, sound travels outward, hits walls, floors, and ceilings, and comes back at the microphone slightly delayed and slightly changed. Those reflections can blur clarity, exaggerate bass, or make things harsh and thin. This happens whether you acknowledge it or not.
Bedrooms tend to sound boxy. Basements often exaggerate low end. Garages can be loud, reflective, and unforgiving. None of these spaces are unusable. They just have behaviors you must learn.One of the most common mistakes is confusing soundproofing with acoustic treatment. Soundproofing keeps sound from escaping or entering and requires construction. Acoustic treatment controls reflections inside the room. For recording and mixing, treatment is what matters.
You do not need to cover every surface with foam. In fact, that often makes recordings lifeless and unnatural. The goal is control, not silence. Treat early reflection points near microphones and speakers. Use rugs, furniture, bookshelves, and uneven surfaces to break up sound. Create a consistent recording zone instead of trying to fix the entire room.For vocals and acoustic instruments, focus on what the microphone hears, not what the room looks like. For bands, focus on spacing and balance so instruments are not fighting each other acoustically.
A room you understand beats a room you try to overpower.
Bedroom Studios: Small Space, Big Discipline
The bedroom studio is where most real careers begin. It’s available, affordable, and personal. This setup usually serves singer-songwriters, producers, and solo artists recording vocals, guitars, bass, keys, and overdubs. The mistake people make here is trying to turn a bedroom into a commercial studio. That will always feel frustrating. A bedroom studio is about clarity and repeatability, not volume or spectacle.
You’re working in a small reflective box. Your job is to control reflections near the microphone and listening position. Treat the wall behind the singer. Manage side reflections. Use soft surfaces intelligently. You are shaping a focused capture area, not redesigning architecture. Monitoring is always compromised in a bedroom, so honesty matters more than size. Smaller monitors placed correctly and listened to at reasonable levels are better than large speakers crammed against walls. Headphones become essential, not optional, but they are a supplement, not a replacement.
Your interface only needs a few clean inputs at this stage, but it must be stable and quiet. Reliability matters more than features. This is where a DAW like Fender Studio Pro shines. It offers professional tools without dragging you into technical complexity or expensive ecosystems. The technology stays out of the way, which is exactly what a bedroom studio needs. Workflow is everything here. Templates, labeling, routing, and quick setup matter more than plugins. If recording feels slow or annoying, creativity dies. A good bedroom studio lets ideas move quickly from your head to the speakers.
Basement Studios: Where Bands Become Practical
Basement studios are the turning point. This is where recording a full indie band stops feeling like a compromise and starts feeling intentional. Basements bring more space, which is power if you use it correctly. They also bring challenges. Low ceilings and concrete surfaces can exaggerate bass and dampen highs. This isn’t a flaw. It’s a characteristic.
You work with the room, not against it. Strategic absorption, rugs, and thoughtful placement matter more than covering every wall. You want control, not dead silence. This is where input count becomes a real decision. If you plan to record drums properly, you need to stop pretending two inputs will work. A realistic band-ready basement setup needs access to at least sixteen simultaneous inputs, either directly or through expansion. That gives you freedom instead of forcing compromises every session.
Drum recording at home is absolutely doable. Anyone who says otherwise either hasn’t tried or hasn’t learned. A great drum recording starts with a tuned kit, balanced playing, and thoughtful mic placement. Phase and balance matter more than mic price. The basement gives drums room to breathe if you let it. Monitoring improves here too. You can place speakers properly, treat reflection points more effectively, and trust what you hear. That trust speeds up decision-making and improves mixes faster than any plugin.
Workflow now includes people. Headphone mixes must work. Communication must be clear. Bands lose energy fast when technical issues interrupt flow. A smooth setup keeps performances strong, and performance always matters more than perfection. Learning becomes targeted at this stage. You’re no longer watching random tutorials. You’re solving specific problems. Platforms like Groove3 are useful because they teach fundamentals without hype. Tools like ChatGPT become practical helpers for troubleshooting signal flow, session planning, and recording concepts when you hit a wall.
Garage Studios: The Semi-Pro Home Facility
The garage studio is where “home studio” and “real studio” start to blur. This is the space for indie bands that rehearse, record, and release everything in-house. Garages are acoustically harsh by default. Hard surfaces and parallel walls create strong reflections. But garages also offer volume, and volume gives sound room to develop. The key is control.
You are not trying to make the garage silent. You are managing decay, reflections, and bleed so the room sounds musical instead of chaotic. Treatment focuses on taming harsh reflections and creating usable zones for vocals, drums, and amps. Isolation strategies matter now. Amp placement. Drum positioning. Sight lines. Bleed is not the enemy. Uncontrolled bleed is. When musicians can see each other and hear comfortably, performances improve immediately. At this level, your interface and converters are infrastructure. Reliability and expandability matter more than brand character. Your system should support ADAT expansion, multiple headphone mixes, and stable performance under load.
Monitoring should include multiple references. Nearfields for detail. Headphones for isolation. Even consumer speakers for reality checks. Translation becomes the goal, not impressiveness. A DAW that reduces friction earns its keep here. Fender Studio Pro works well in this role because it offers depth without burying you in complexity. You get professional capability without fighting the software. Creative AI tools like Suno can also play a role here, not as replacements, but as sketchpads. Exploring arrangements, harmonies, and structures before committing time to tracking sharpens decision-making instead of diluting it.
Monitoring is how you hear what you are doing. If your monitoring lies to you, every decision you make will be wrong, even if it feels right in the moment. This is where a lot of indie artists get stuck. They buy decent monitors, put them on a desk, and assume the problem is solved. It is not. Monitors do not work in isolation. They work in a room, at a position, at a level.
Speaker placement matters. Listening position matters. Volume matters. If your monitors are too close to walls, bass builds up. If they are too far apart, stereo imaging falls apart. If you listen too loud, your ears lie to you and fatigue sets in. Headphones are not a replacement for monitors. They are a tool. A powerful one. Headphones remove the room from the equation, which is great for details, editing, and late-night work. But they exaggerate stereo width and hide low-end balance issues. That is why mixes done only on headphones often fall apart in the real world.
The goal is translation. Your mix should sound reasonable everywhere, not perfect in one place. That only happens when your monitoring setup is honest and consistent. A simple rule that works is this. Set your monitors at ear height, forming an even triangle with your head. Sit in the same spot every time you work. Keep your listening level moderate, not loud. Learn what commercial music sounds like in your room. That becomes your reference.
Monitoring is not about impressing anyone. It is about building trust with your ears over time.
Interfaces and Converters Are About Capability, Not Color
Your audio interface is the bridge between the real world and your computer. It takes sound that exists in the air and turns it into clean digital information your DAW can work with. That’s it. Its job is not to add magic, color, or “vibe.” Its job is to translate sound accurately, consistently, and without getting in the way of the creative process.
For singer-songwriters working in a bedroom studio, a smaller interface with a few solid inputs is often enough. You’re usually recording one thing at a time. A vocal, a guitar, a bass DI, or a stereo keyboard. In that situation, two to four good inputs can cover a lot of ground. What matters most is that the interface is quiet, stable, and predictable. If it powers on, locks in, and records cleanly every time, it’s doing its job.
Once you move into recording a band, especially drums or live sessions, the rules change quickly. Capacity becomes critical. A drum kit alone can easily require eight to twelve microphones if you want real control over the sound. Add bass, guitars, scratch vocals, and room mics, and you run out of inputs fast. That’s why a band-ready home studio usually needs access to at least sixteen simultaneous inputs. Those inputs might be built directly into one unit, or they might come from a system that supports modern network-based expansion and flexible routing. The specific transport method matters less than the outcome. You need a system that can grow without forcing you to rebuild your studio every time your needs expand.
This flexibility is not optional if you want to work efficiently. You cannot record a full drum kit properly with two inputs and hope to “fix it later.” And you should not be unplugging microphones and repatching your studio every time you want to try something new. Constant rewiring kills momentum. A studio that is always ready to record gets used. A studio that needs to be reconfigured before every session slowly stops being a creative space.
Now let’s talk about resolution and bit depth, because this is where a lot of confusion lives.
When your interface records audio, it takes thousands of snapshots of the sound every second. The sample rate, often referred to as resolution, describes how many of those snapshots are captured per second. Common rates like 44.1 kHz and 48 kHz are already more than capable of capturing full-range music accurately. Higher sample rates can be useful in specific workflows, but they are not automatically better for everyday recording. They increase CPU load and storage demands, which can actually make a home studio less stable if the system isn’t designed for it.
Bit depth is even more important for most home recording situations. Bit depth determines how much dynamic range your system can capture. In simple terms, it controls how much space there is between the quietest sound and the loudest sound before noise or distortion becomes a problem. A higher bit depth gives you more headroom and smoother level transitions. This is why 24-bit recording has become the standard. It allows you to record safely at conservative levels without sacrificing clarity.
This directly connects to gain staging. With 24-bit audio, you do not need to push levels close to zero. Leaving headroom is not a mistake. It is good practice. It keeps your recordings clean, helps plugins behave more predictably, and gives you flexibility later in the mix. Once again, the interface’s role is not to enhance the sound, but to capture accurate, usable information.
This is where many people go wrong. They obsess over tiny differences in converters or chase higher sample rates thinking that will fix bad recordings. In reality, modern converters are very good across the board. The differences people argue about online are small compared to the things that actually shape the sound, like mic placement, performance, room acoustics, and basic level control.
What matters far more than converter “character” is stability. Driver quality affects latency, dropouts, and whether your system behaves under real session pressure. Expandability matters because your needs will change as you grow. Practical routing matters because headphone mixes, talkback, and session flow matter, especially when working with other musicians. Reliability matters because nothing kills a great take faster than gear that glitches at the wrong moment.
The smartest way to choose an interface is to think long-term. Don’t buy only for what you are recording today. Buy for what you expect to record six months or a year from now. If you know you will be tracking drums or full bands, choose a system that can scale. If you plan to stay solo, don’t let internet hype push you into a setup that adds complexity without adding real value.
In the end, don’t chase spec-sheet bragging rights. Chase a system that records cleanly, gives you plenty of headroom, expands gracefully, and stays out of your way. Capacity, stability, sensible resolution, and proper bit depth will move your studio forward far more than chasing tiny technical differences most listeners will never hear.
Gain Staging Is About Headroom, Not Loudness
Gain staging sounds technical, but in practice it’s simple. It’s about setting levels so your entire recording system works comfortably instead of being pushed to its limits. When levels are sensible, everything feels easier. When levels are wrong, problems stack up fast and follow you all the way through the mix.
Digital recording does not reward being loud. It rewards being clean. Unlike analog systems of the past, where pushing levels could add pleasing saturation, digital systems are unforgiving when they run out of space. When you record too hot, you eat up headroom, make plugins work harder than they should, and box yourself into decisions you can’t undo later. When you record too quietly, you raise the noise floor and end up compensating with unnecessary gain later. The goal is not extremes. The goal is a comfortable middle where the signal is healthy but relaxed.
Modern converters are designed to sound their best when they are not being slammed. You do not need peaks anywhere near zero, and in fact, you should actively avoid that. Recording with peaks well below zero leaves you headroom. Headroom is freedom. It gives you space to EQ, compress, and balance without distortion, clipping, or brittle digital artifacts creeping in. With today’s 24-bit systems, there is no penalty for leaving space. There is only upside.
This becomes even more important when recording bands. Levels add up quickly when you have multiple microphones open at once. A single drum kit can easily use ten or more mics. If each one is recorded too hot, the combined level will overload your mix bus before you even touch a fader. Suddenly you’re pulling everything down, fighting distortion, and wondering why the mix feels cramped and aggressive.
Good gain staging always starts at the source. It begins with a controlled performance and a properly set preamp. If the source is balanced and the preamp is not being pushed unnecessarily, you’re already most of the way there. From there, sensible levels inside the DAW keep the signal flowing smoothly through plugins and buses. The result is a mix that breathes instead of fights you at every step.
This is not exciting advice. It doesn’t come with flashy screenshots or dramatic before-and-after demos. It doesn’t sell gear. But it is one of the biggest differences between recordings that sound amateur and recordings that feel professional. Engineers who understand gain staging work faster, struggle less, and get better results long before anyone asks what gear they’re using.
Preamps and Outboard Gear
Now let’s talk about preamps, because this is where a lot of confusion sneaks in.
A preamp’s primary job is simple. It takes a very quiet microphone signal and raises it to a usable level without adding noise or distortion. That’s it. Everything else people argue about comes after that basic responsibility. A good preamp gives you clean, predictable gain. It doesn’t need to sound exciting. It needs to sound reliable.
Many modern audio interfaces have excellent built-in preamps. For most home studios, especially at the bedroom and basement level, these preamps are more than capable of producing professional results. Chasing external preamps too early is a common mistake. If your recordings sound harsh, thin, or muddy, the problem is almost never that your interface preamps aren’t “high-end enough.” The problem is usually mic choice, mic placement, room behavior, or gain staging.
That said, external preamps can be useful tools once you understand why you want them. Some preamps are designed to stay extremely clean no matter how hard they’re driven. Others are designed to add subtle character when pushed. The key is intention. If you don’t know what problem you’re solving, adding outboard gear just adds complexity.
This is where people often misunderstand analog gear. They think it’s about making things louder or more aggressive. In reality, good preamp use is about control. You want enough gain to capture the source comfortably, without forcing the preamp into distortion unless that distortion is a deliberate creative choice.
Outboard compressors fall into the same category. They are tools, not necessities.
An outboard compressor controls dynamic range before the signal ever hits the converter. Used carefully, it can gently tame peaks, smooth performances, and make recording feel more controlled. Used poorly, it can permanently damage a take before it ever reaches your DAW.
This is why beginners are often better off not using outboard compression while tracking. Once compression is printed, it cannot be undone. If you don’t yet trust your ears, it’s safer to record clean and make compression decisions later in the mix. Modern plugins give you incredible flexibility without risk.
Outboard compressors make the most sense when you already understand gain staging and dynamics. They are often used very gently while tracking, shaving off a few peaks rather than crushing the signal. The goal is not to hear the compressor working. The goal is to make the performance easier to capture and easier to mix later.
Preamps and compressors should support the performance, not control it. If the musician has to fight the gear, something is wrong. If the gear quietly helps everything sit in place, it’s doing its job.
This is not exciting advice. It doesn’t sell flashy hardware or promise instant results. But it is one of the biggest differences between amateur and professional-sounding recordings. Engineers who understand gain staging, preamps, and dynamics don’t rely on luck. They rely on systems that work calmly and predictably every time they hit record.
Microphones Capture Decisions, Not Status
Microphones are tools, not trophies. They are not status symbols, and they are not shortcuts to great sound. A microphone does not magically make something sound good. What it really does is reveal what is already there. If the performance is strong, the instrument sounds right, and the room is working with you, the microphone captures that honestly. If those things are off, the microphone will expose the problems just as clearly.
This is why you do not need a locker full of microphones to make great recordings. More microphones do not automatically mean better recordings. In fact, too many options often slow people down and lead to second-guessing instead of progress. What you actually need are a few reliable workhorse microphones and the knowledge to use them well. A microphone you understand deeply will outperform an expensive microphone you barely know every time.
Mic placement matters more than mic brand. Moving a microphone a few inches can completely change the tone, clarity, and balance of a recording. Angle, distance, and position relative to the source all have a bigger impact than the logo on the grille. This is where real skill lives, and it’s also where most home recordings improve dramatically once people stop chasing gear and start listening.
That said, value does matter, and there are companies that consistently deliver solid tools without inflated hype. I’m personally a big fan of Warm Audio microphones because they offer excellent value for the money. They give independent artists access to dependable, great-sounding tools without forcing them to overspend. The key point, though, is not the brand itself. It’s choosing microphones that are dependable, familiar, and used often enough that you know how they respond in your space.
Different sources demand different priorities. For vocals, consistency matters most. A stable mic position, a controlled distance, and a repeatable setup will do more for your vocal sound than endlessly swapping microphones. When a singer knows where to stand and how the mic reacts, performances improve immediately.
For guitars and bass, positioning is everything. Small changes in where the microphone sits relative to the speaker or instrument can drastically change tone. Closer placement increases focus and punch. Pulling back adds space and air. Off-axis placement can tame harshness without touching an EQ. These decisions shape the sound far more than the microphone’s price tag.
For drums, phase and balance matter more than anything else. A great drum recording starts with a well-tuned kit, a drummer who plays with balance, and a room that supports the sound. Microphones are there to capture that reality, not fix it. If the drums sound good in the room, they will usually record well even with modest microphones. If they sound bad in the room, no amount of expensive mics will save them.
When recordings sound thin, harsh, or muddy, the problem is almost never that the microphone isn’t “good enough.” More often, the issue is mic placement, room behavior, or the performance itself. Buying a new microphone rarely fixes those problems. Learning how to listen and adjust does.
The real progress comes when you stop swapping tools and start making decisions. Learn how your microphones behave. Use them often. Move them deliberately. Listen critically. Once you do that, microphones stop being objects of obsession and start becoming what they’re supposed to be: reliable tools that help you capture music honestly and confidently.
Desktop Power and the Laptop as the Studio’s Center
Computers are the engine of the modern home studio, but not all engines serve the same role. Understanding how to use a desktop and a laptop together can give you power, flexibility, and longevity without turning your setup into a fragile science experiment.
A desktop computer is about raw strength and stability. Desktops can run more tracks, more plugins, and larger sessions without breaking a sweat. They handle high track counts, heavy virtual instruments, and complex mixes far better than most laptops. They also stay cooler, run quieter under load, and are easier to upgrade over time. More RAM, more storage, and better cooling mean your studio grows without forcing a full system replacement.
For band recording, mixing dense sessions, or long-term production work, a desktop becomes the backbone of the studio. It’s the machine that doesn’t flinch when you add another drum mic, another reverb, or another revision. That kind of reliability matters more than benchmark numbers. When the computer doesn’t struggle, neither do you.
A laptop plays a different role, and it’s just as important. The laptop is the center of the studio, not because it’s the most powerful machine, but because it’s the most flexible. A laptop lets you move between rooms, bring sessions to rehearsals, track overdubs in different spaces, or collaborate remotely without friction. It becomes the command center where sessions live and decisions get made.
In many modern home studios, the smartest approach is to let the desktop do the heavy lifting and let the laptop handle mobility and control. You might track and edit on the laptop, then move the session to the desktop for mixing and production. Or the laptop might sit at the center of the room during band sessions, managing recording and monitoring, while the desktop handles post-production later.
This approach also protects creativity. If your entire studio depends on one machine doing everything, a crash or limitation becomes a creative bottleneck. Separating power and portability gives you options. Options reduce stress. Reduced stress improves performances.
What matters most is not whether you choose a desktop or a laptop. It’s whether your computer setup supports your workflow instead of dictating it. A powerful desktop that never leaves the room is useless if it slows down creative capture. A laptop that’s constantly overloaded becomes frustrating instead of freeing.
The goal is balance. Use a desktop when you need horsepower and long-term stability. Use a laptop when you need flexibility, speed, and mobility. When those roles are clear, the computer disappears into the background, and the studio starts working the way it should.
And that’s the real test of any studio decision. If the technology stays quiet and dependable while the music moves forward, you chose correctly.
Workflow Is Where Studios Are Won or Lost
Every studio, no matter the size, benefits from templates. Session organization. Clear labeling. Consistent routing. These things are not boring. They are freeing. They let you work faster and make better decisions under pressure. For bands, workflow includes communication. Headphone mixes that work. Clear talkback. Comfortable setups. A band that feels comfortable performs better. That performance matters more than any plugin.
For solo artists, workflow is about momentum. Being able to capture ideas quickly without technical roadblocks keeps creativity alive.
Learning Matters More Than Tools
This is where the truth really hits. The gap between great-sounding home recordings and frustrating ones is usually knowledge, not gear.
Learning how sound works takes time. There are no shortcuts. But there are good resources. Platforms like Groove3 teach real skills without hype. Tools like ChatGPT can help explain concepts, troubleshoot problems, and even help you think through signal flow and session planning. Creative AI tools like Suno can help you explore arrangement, structure, and sound design ideas in ways that sharpen your ears instead of replacing them.
The key is intent. Use tools to learn, not to avoid learning.
Building for Today While Planning for Tomorrow
The best home studios are not static. They grow. A bedroom setup becomes a basement rig. A solo workflow becomes a band workflow. Planning for expansion saves money and frustration. That means choosing interfaces that can grow. Rooms that can be adapted. Layouts that make sense. It means not painting yourself into a corner with gear that only solves today’s problem.
You do not need to build everything at once. You need to build smart.
The Bottom Line
A great home recording studio is not built on gear lust. It’s built on clarity. Clarity about what your room is doing to the sound. Clarity about what you’re actually hearing when you listen back. Clarity about how levels move through your system and why that matters.
Understanding your room gives you control instead of guesswork. Trusting your monitoring lets you make decisions without second-guessing every move. Managing gain keeps your recordings flexible and your mixes calm instead of crowded. Choosing tools that support your workflow means the technology stays in the background, where it belongs, instead of demanding constant attention. And learning continuously ties all of it together, because no studio ever stays “finished.”
When you focus on fundamentals, your studio becomes reliable. You stop fighting your setup and start trusting it. When your studio is reliable, creativity flows more freely. Ideas move faster. Performances improve. Sessions feel productive instead of exhausting. And when creativity flows, the gear finally stops being the point. The studio becomes what it was always meant to be: a quiet, dependable partner in the process of making music.
 |  Spotify |  Deezer | Breaker |
 Pocket Cast |  Radio Public |  Stitcher |  TuneIn |
 IHeart Radio |  Mixcloud |  PlayerFM |  Amazon |
 Jiosaavn |  Gaana |  Vurbl | Audius |
Reason.Fm | |||
Find our Podcasts on these outlets
Buy Us a Cup of Coffee!
Join the movement in supporting Making a Scene, the premier independent resource for both emerging musicians and the dedicated fans who champion them.
We showcase this vibrant community that celebrates the raw talent and creative spirit driving the music industry forward. From insightful articles and in-depth interviews to exclusive content and insider tips, Making a Scene empowers artists to thrive and fans to discover their next favorite sound.
Together, let’s amplify the voices of independent musicians and forge unforgettable connections through the power of music
Make a one-time donation
Make a monthly donation
Make a yearly donation
Buy us a cup of Coffee!
Or enter a custom amount
Your contribution is appreciated.
Your contribution is appreciated.
Your contribution is appreciated.
DonateDonate monthlyDonate yearlyYou can donate directly through Paypal!
Subscribe to Our Newsletter
Order the New Book From Making a Scene
Breaking Chains – Navigating the Decentralized Music Industry

Breaking Chains is a groundbreaking guide for independent musicians ready to take control of their careers in the rapidly evolving world of decentralized music. From blockchain-powered royalties to NFTs, DAOs, and smart contracts, this book breaks down complex Web3 concepts into practical strategies that help artists earn more, connect directly with fans, and retain creative freedom. With real-world examples, platform recommendations, and step-by-step guidance, it empowers musicians to bypass traditional gatekeepers and build sustainable careers on their own terms.
More than just a tech manual, Breaking Chains explores the bigger picture—how decentralization can rebuild the music industry’s middle class, strengthen local economies, and transform fans into stakeholders in an artist’s journey. Whether you’re an emerging musician, a veteran indie artist, or a curious fan of the next music revolution, this book is your roadmap to the future of fair, transparent, and community-driven music.
Get your Limited Edition Signed and Numbered (Only 50 copies Available) Free Shipping Included
Discover more from Making A Scene!
Subscribe to get the latest posts sent to your email.


